Creating a workflow template
- The minimum configuration: when is a workflow template "valid"?
- Step 0 – Check supported tables & events (must-know)
- Create a workflow template
- Configure related tables (optional)
- Define steps
- Step rules: how does the workflow move to the next step?
- Configure workflow triggers
- Workflow action on completion
- Cleanup (retention & cleanup)
- Module: Escalation Engine
- Module: Rejection Handling
The minimum configuration: when is a workflow template "valid"?
A workflow template is only fully usable in this app once at least these criteria are met:
- Active = Yes (the template must be active)
- Primary Table is set
-
Rule Set exists (is created/updated automatically when the primary table is set)
- At least one normal step (Step Type = Normal) exists
- At least one workflow trigger exists and is active
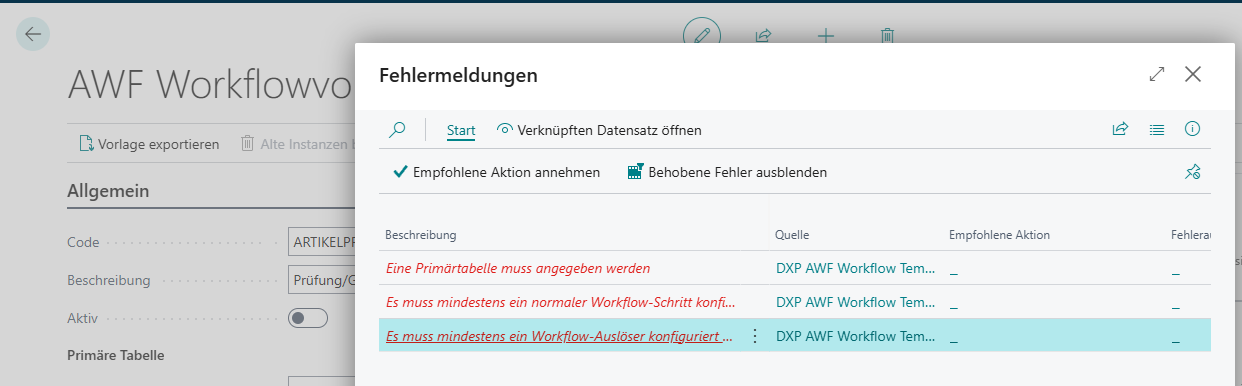
When you activate the template, the app runs a validation and shows an error list if necessary.
Step 0 – Check supported tables & events (must-know)
What are "AWF Supported Tables"?
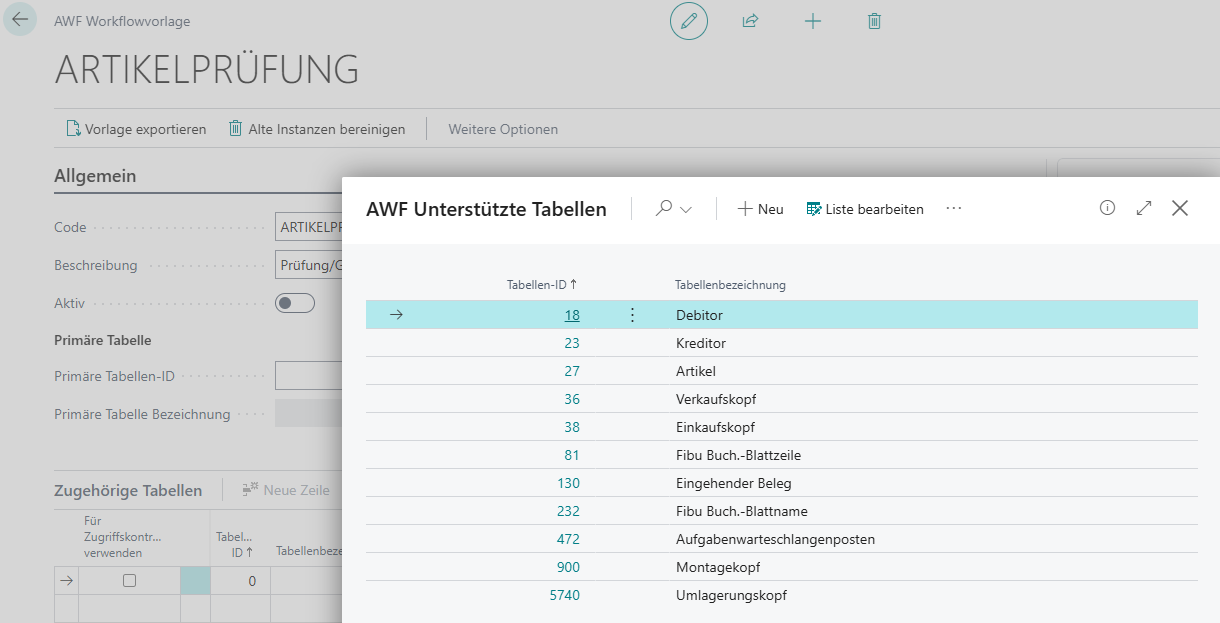
In "AWF Supported Tables" you maintain which tables can be selected as the primary table at all.
Important:
- In the workflow template, only supported tables can be chosen as the primary table.
- Per supported table, the following is additionally maintained:
- Workflow Events (which events may be used as triggers)
Initialize default tables
Since AWF Supported Tables is not directly searchable via Tell Me, open the page as follows:
- Open AWF Workflow Templates.
- Open a template (or create a new template).
- In the "Primary Table" area, open the lookup of "Primary Table ID"..
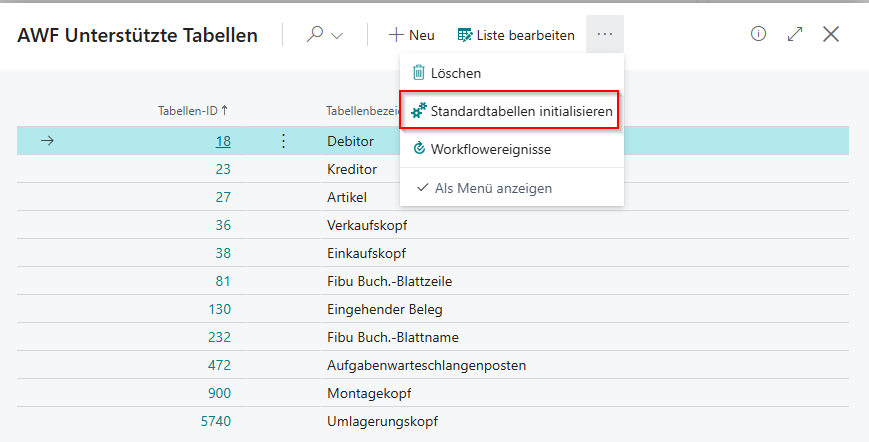
- In the opened list AWF Supported Tables Action "Initialize Default Tables" run it (it is also initialized directly when opening).
- Confirm.
This action initializes or repairs the default configuration.
View workflow events per table
On AWF Supported Tables:
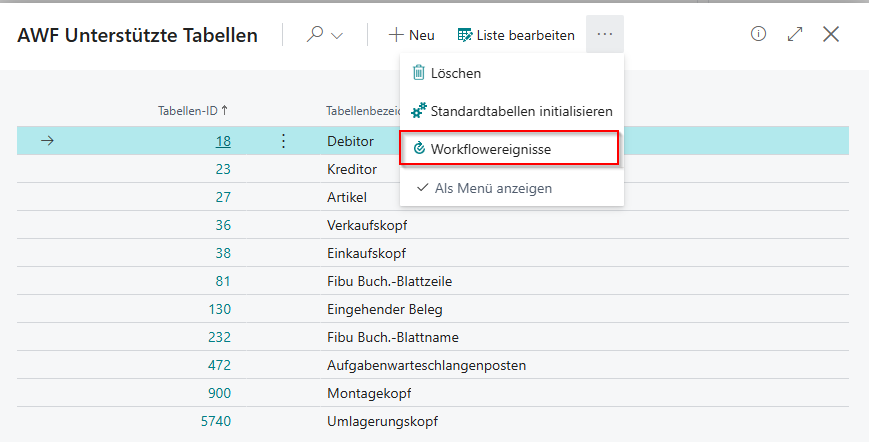
- Action "Workflow Events": shows valid workflow events for the table
Create a workflow template
Create a new workflow template
- Open AWF Workflow Templates.
- New.
- Fill in the area General:
- Code (unique)
- Description
- Active initially No (recommended)

Set the primary table (decisive, as this is the table the workflow is started for)
- In the workflow template (card), go to the area "Primary Table".
- Field "Primary Table ID" select.
- The list opens: AWF Supported Tables.
- Select a table.
- Check whether "Primary Table Caption" is filled automatically.
What happens in the background:
- The app automatically creates/updates a Rule Set for the template.
- The primary table is automatically stored as the Primary Table in the rule set.
Filter document type
Older versions had a Primary Document Type directly in the workflow template. This configuration was replaced by the Rule Engine .
If you want to start the workflow only for certain document types, or model different steps per document type, you now solve this via Rule Conditions:
2. Create a rule condition (action Show Conditions).
). 3. Choose as the source field e.g. "Document Type" (a field of the primary table or a related table).
4. Set operator/value (e.g. "= Order").
Save the audit trail as PDF
When a workflow completes successfully, the audit trail can be saved automatically as a PDF file in the document attachments of the source record.
Configuration
- In the AWF Workflow Template → field "Save Audit Trail to Attachments" = Yes.
- On successful completion of the workflow, the audit trail report is generated automatically as a PDF and attached as a document attachment to the source record.
Attachments FactBox
In the AWF Workflow Instance card attachments from two sources are shown combined:
- Attachments of the source record (e.g. scanned invoices)
- Attachments of the workflow instance (e.g. generated audit-trail PDFs)
This gives approvers and administrators all relevant documents in one place.
Configure related tables (optional)
Why do I need related tables?
The rule engine can check conditions not only on the primary table, but also on related tables (e.g. header/lines).
You define these related tables in the template in the area:
- Related Tables (technically: "DXP Rule Set Tables")
Add a related table
- In the template, in the section, Related Tables create a new line.
- Table ID select (lookup).
- Define the relation to the primary table:
-
Relation Field 1 (field number in the related table)
- Primary Field 1 (field number in the primary table)
-
Optionally also Relation Field 2 / Primary Field 2 etc.
-
Rule of thumb:
-
Relation field(s) = "foreign key" in the related table
-
Primary field(s) = the matching key/reference fields in the primary table
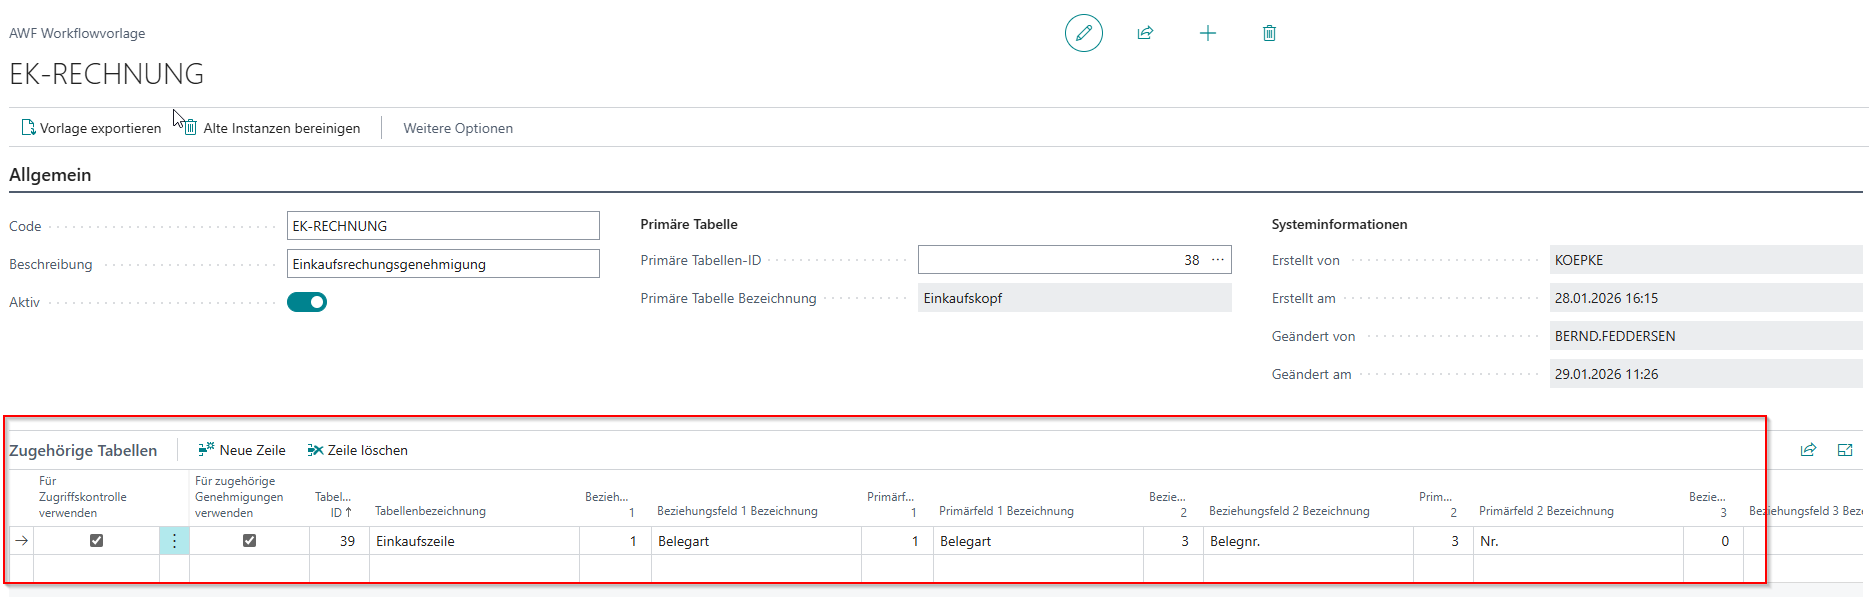
Important: Without a correctly defined relation, the rule engine cannot cleanly evaluate fields of the related table against the current record.
Define steps
Basic structure of the steps
In the template there is the section Steps. A step contains, among others:
- Step Code
- Step Name
- Order
- Step Type (Normal / Error / Final)
- Allow Record Editing
- Assignment logic
-
Approvals / Related Approvals: optionally enable line approvals (Enable Related Approval) and set the Approval Mode .

Create the first "Normal" step
- In the section → Steps → New.
- Step Type = Normal.
- Step Code and Step Name assign.
- In the card, set the Assignee Type and set the Assignee .
Important system behavior:
- When the first normal step is created, the app automatically generates:
- an Errorstep (code e.g.
ERROR) - an Finalstep (code e.g.
FINAL)
- an Errorstep (code e.g.
Configure assignment
On the AWF Stepcard you maintain:
- Assignee Type
- Assignee
- Approver Limit Type
Notes:
- With Salesperson/Purchaser the assignee is derived automatically from the record (salesperson/purchaser).
- With Workflow User Group a workflow user group must exist and have members.
If a step cannot resolve a valid assignee, the workflow is typically moved to the error step at runtime.

Due Date Formula (Due Date)
On the AWF Stepcard a Due Date Formula can be configured:
- Field: Due Date Formula (e.g.
<+3D>,<+1W>,<+2W>) - When set, approval entries created in this step automatically receive a due date.
- The due date is relevant for:
- The display in "Requests to Approve"
- The Escalation Engine (escalation steps are based on the due date)
- Standard BC due-date notifications
Step rules: how does the workflow move to the next step?
The app uses the DEXPRO Rules Engine to determine:
- which rule matches
- to which next step it switches
- whether the assignee is overridden
- whether it auto-approves
- and whether the action applies to the header approval, related approvals (lines), or both.
If no rule is defined, the respective step configuration applies.
Rule group per step ("Show Rules")
- In the Stepslist, mark the desired step.
- Action "Show Rules".
If no rule group is stored yet, the app automatically creates a Rule Group and enters it on the step.

Create rules (DEXPRO Core)
On the opened page Rules:
- New.
- Rule Code and Rule Name set.
- Sequence/Priority assign.
- Active = Yes.
- Optional:
- Condition Conjunction (AND/OR)
- Record Matching Type (Any Record / All Records)

Maintain Advanced Workflow fields on the rule (Next Step, Auto-Approve, Override Assignee)
On the rule there is the area "DEXPRO Advanced Workflow":
- Rule Action set (lookup/drilldown) and choose the desired action, e.g.
- Step Transition
- Override Assignee
- Auto-Approve
- For Step Transition additionally choose Next Step (the lookup shows the next possible steps).
- If related approvals are active: Applies To set (Header / Related Only / Header and Related).
- For Override Assignee: Assignee Type and Assignee maintain.

Add conditions (rule conditions)
On the Rules page:
- Action "Show Conditions".
- Add one line per condition:
- Source Table ID (primary table or related table)
- Source Field ID (field)
- Comparison Operator (operator)
- Value (value; AssistEdit for Enum/Boolean/Between/In Set)

Tip: If you use conditions over related tables, the relation in Related Tables must be maintained correctly.
Test rules (without a real workflow)
On the Rules page there are:
- Test Rule
- Test Rule Group
This lets you check rules/rule conditions against a sample record before starting real workflows.

Configure workflow triggers
Workflow triggers determine when a new workflow instance is started.
In the template the section is called "Workflow Triggers".
Template triggers: basic fields
- In the template → section Workflow Triggers.
- New.
- Field Workflow Event select (AssistEdit → list "AWF Table Workflow Events").
- Active = Yes.
- Priority set (order when several matching triggers exist).

Trigger rules: when may a trigger fire?
On the trigger there is a Rule Group Code. Via the action "Show Rules":
- mark the trigger.
- Show Rules.
- Maintain rules/rule conditions as in Step rules .
Important system behavior:
- If no rule conditions exist for this trigger rule group, the trigger is considered satisfied (the trigger then fires in principle).

OnAfterModify: Monitored fields
For the event OnAfterModify there is the action "Monitored Fields".
- Mark the trigger with the workflow event OnAfterModify .
- Action "Monitored Fields".
- select fields (lookup via "Fields Lookup").
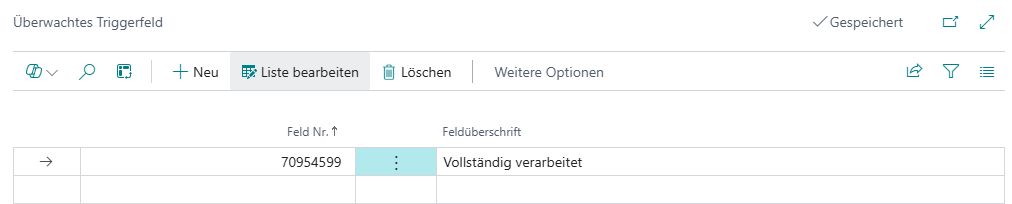
- In the current implementation, an OnAfterModify trigger is only started when at least one monitored field is maintained and this field has actually changed.
- If no monitored fields are maintained, the trigger is not started on OnAfterModify.
Workflow action on completion
In the template there is the section "Workflow Action".
- Run action on completion enable.
- Action on Completion choose (depending on the primary table):
- Release / Reopen (only for certain document tables)
- Custom action (codeunit/report)
- Define field value assignments
When Define field value assignments is selected, the section appears Field Value Assignments.

Cleanup (retention & cleanup)
Under Cleanup Configuration:
- Automatic Cleanup Enabled
- Retention Period for Cleanup (DateFormula, e.g.
-1M)
In addition there is the action:
- "Clean Up Old Instances"

Module: Escalation Engine
The escalation engine automatically monitors overdue approval requests and runs definable escalation steps. This lets you model reminders, automatic delegations, or reassignments on a time-based schedule.
How it works
- The escalation is controlled by a Job Queue Entry that regularly checks all open approval entries.
- For each overdue entry it is checked whether an escalation step is due (based on the "Overdue Duration" relative to the approval’s due date).
- Escalation steps can be defined at template level (apply as default for all steps) and/or at step level (override the template setting for that step).
- The highest escalation step already executed is tracked in the approval entry in the field "Escalation Level" so that no step is executed twice.
Prerequisites
- The escalation job queue entry must be set up and active (see AWF Setup).
- The approval entries must have a Due Date (configurable via "Due Date Formula" in the step).
Configure escalation steps
At template level (default for all steps)
- In the AWF Workflow Template → section "Escalation Steps".
- New.
- Fill in the fields:
- Step No.: running number (determines the order).
- Description: description of the escalation step (e.g. "Reminder after 1 day").
- Overdue Duration: date formula relative to the due date (e.g.
<+1D>= 1 day after due,<+1W>= 1 week after due). - Escalation Action: action that runs when the overdue duration is reached.
- Enabled: Yes/No.
At step level (overrides template level)
- In the AWF Stepcard → section "Escalation Steps".
- Create steps as described above.
- If a workflow step has its own escalation steps, the template escalation steps are not considered for this step.
Escalation actions
| Action | Description |
|---|---|
| Send Notification | Sends an escalation notification (via the standard BC notification mechanism). |
| Delegate | Delegates the approval automatically via the BC standard substitute chain (from "Approval User Setup"). |
| Reassign | Reassigns the approval to a defined recipient. Recipient Type and Recipient Code are configured (user or workflow user group). |
| Custom Action | Runs a custom object (codeunit or report). Optionally the source record can be passed (Pass Source Record). |
Configure recipient (for "Send Notification" and "Reassign")
- Recipient Type: approver (specific user) or workflow user group.
- Recipient Code: user ID or code of the workflow user group.
- For "Reassign", the approval is redirected to the new recipient.
- For "Send Notification", the recipient receives an escalation notification.
Rule-based escalation (optional)
Escalation steps can optionally have a Rule Group Code . When set, the escalation step only runs if the rule conditions of the rule group match for the current record.
Due date and escalation
For the escalation to work meaningfully, a Due Date Formula must be maintained in the step:
- In the step: set the field "Due Date Formula" (e.g.
<+3D>= due 3 days after the approval is created). - The escalation duration is added on top of the due date: if the due date formula is
<+3D>and the overdue duration is<+1D>the escalation step runs 4 days after the approval is created.
If an approval entry has no due date , a prompt for manual entry is shown if necessary.
Module: Rejection Handling
The rejection behavior in Advanced Workflow is configurable and controls what happens when an approver rejects an approval request.
Default behavior (without special configuration)
- Rejection in the first step: the workflow is cancelled (status → Cancelled).
- Rejection in a later step: the workflow returns to the previous step and the approval is recreated.
Rejection group for related approvals (lines)
If you use related approvals (line approvals), you can specify to whom rejected line approvals are reassigned:
Configuration at template level
- In the AWF Workflow Template → area Rejection Settings:
- Use Rejection Group for Related = Yes
- Default Assignee Type for Rejection Approver / Workflow User Group / Salesperson/Purchaser
- Default Assignee for Rejection: specific user or group
Configuration at step level (overrides template level)
- In the AWF Stepcard → area Rejection Behavior:
- Use Rejection Group for Related = Yes
- Default Assignee Type for Rejection and Default Assignee for Rejection as above
- If a step has its own rejection settings, these override the template settings.
Rejection group for header approvals
Normally, rejecting the header approval leads back to the previous step (or cancellation in the first step). Alternatively, you can configure the header rejection to keep the workflow on the current step and reassign it to a rejection group:
- Use Rejection Group for Header Rejection = Yes
- Assignee Type for Header Rejection: Approver / Workflow User Group / Salesperson/Purchaser
- Assignee for Header Rejection: specific user or group
The configuration is possible at both template and step level (step level overrides template level).
Rejection reason and reassignment for lines
When rejecting a related approval, a dialog opens:
- Rejection Reason: mandatory field – why is the line rejected?
- New Assignee: pre-filled with the configured rejection group, but can be adjusted manually.
- Recipient Type: Approver / Workflow User Group / Salesperson/Purchaser
- User or Workflow User Group (depending on type)