Core for Dynamics 365 BC - en-US
- Supported Microsoft Dynamics 365 Business Central versions
- Licenses
- Obtaining the DEXPRO modules
- Permission sets
- Core Setup
- DEXPRO Apps
- Core Documents
- Document Class Setup
- Field Mapping
- OAuth 2.0 and OpenID Setup
- File Viewer
- File Viewer Setup Wizard
- Rule Engine
- Rule Sets
- Rule Card
- Document Creation Logs
- Role Center
- Cleanup and Job Queue
- Extensibility
Supported Microsoft Dynamics 365 Business Central versions
Microsoft Dynamics 365 Business Central integration with DEXPRO Core is possible from the following version onward, due to minimum technical requirements:
- Application 25.0 or higher
- Platform 1.0 or higher
- Runtime 14.0 or higher
- Target: Cloud (SaaS) and supported On-Premises deployments
The prerequisite for operation is that the respective Microsoft Dynamics 365 Business Central version is still in regular (mainstream) support. Extended support is excluded.
DEXPRO Core is the shared base module for all DEXPRO apps (SQUEEZE, Breeze Interface, Advanced Workflow, Freeze, eInvoice Sender). Every one of those apps depends on DEXPRO Core, so the Core version installed must always be equal to or higher than the version required by the dependent app.
Licenses
DEXPRO Core is the free, shared base module that every DEXPRO app for Microsoft Dynamics 365 Business Central depends on. It is not sold on its own; you receive it automatically as part of the license for any DEXPRO app you purchase.
How licensing works
DEXPRO Core has no separate price and no standalone subscription. When you license one or more DEXPRO apps (for example SQUEEZE, Advanced Workflow, Freeze, or the eInvoice Sender), the Core module is licensed together with them at no additional cost. Because all DEXPRO apps require Core, it must always be installed and active alongside the app that uses it.
Cloud licensing and entitlements
On Business Central online (SaaS), access to DEXPRO Core objects is granted through entitlements that map to the Microsoft license SKUs (plans) assigned to a user. A user who already holds a qualifying Microsoft license automatically gains the corresponding access to DEXPRO Core objects, so no extra Core-specific license needs to be assigned.
DEXPRO Core ships entitlements for the following Microsoft license types:
- Dynamics 365 Business Central Essentials
- Dynamics 365 Business Central Premium
- Dynamics 365 Business Central Team Members
- Dynamics 365 Business Central Device
- Dynamics 365 Business Central for IWs (Information Workers)
Entitlements are handled automatically by the platform. As an administrator you only manage the Microsoft license plans assigned to each user in the Microsoft 365 admin center; the matching DEXPRO Core access follows from them.
On-premises licensing
On supported On-Premises deployments, access to DEXPRO Core objects follows the permissions granted by the DEXPRO app licensed for the installation, combined with the DEXPRO Core permission sets assigned to each user.
Related features
- Obtaining the DEXPRO modules
- Permission sets
Obtaining the DEXPRO modules
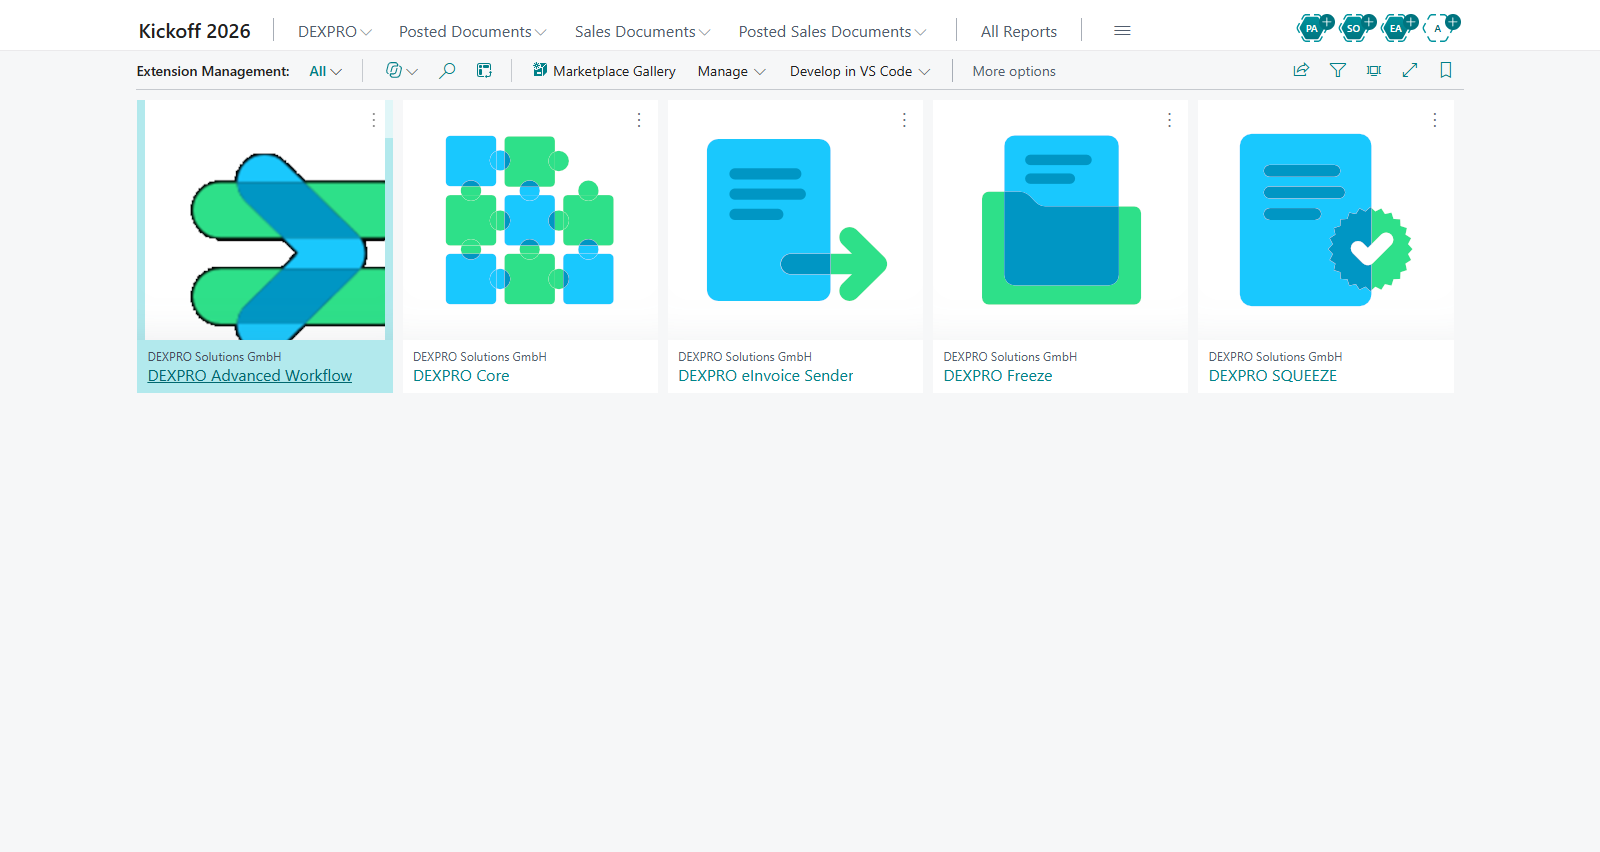
DEXPRO apps for Microsoft Dynamics 365 Business Central are distributed through Microsoft AppSource and directly by DEXPRO Solutions GmbH. Whichever route you choose, the DEXPRO Core base module is installed automatically as a dependency.
From Microsoft AppSource
The DEXPRO apps are published on Microsoft AppSource, the official marketplace for Business Central extensions. To install an app:
- Open your Business Central environment and search for the DEXPRO app you want (for example "DEXPRO SQUEEZE").
- Alternatively, browse to the app on AppSource and choose Get it now, then select the environment to deploy to.
- Confirm the installation. Business Central installs the app together with all of its dependencies.
Because every DEXPRO app depends on DEXPRO Core, the Core module is installed automatically in the same step. You do not need to search for or install Core separately.
From DEXPRO Solutions GmbH
You can also obtain the modules directly from DEXPRO Solutions GmbH, for example for On-Premises deployments or partner-managed installations. In this case you receive the app packages (.app files) and publish them to your environment in dependency order, with DEXPRO Core published first.
After installation
Once an app is installed and its setup has run, DEXPRO Core registers the module in its internal registry so that Core knows which DEXPRO modules are present and active. You can review and manage this registry in Core Setup.
Prerequisites
- A supported Microsoft Dynamics 365 Business Central version (see "Supported Microsoft Dynamics 365 Business Central versions").
- Permission to install extensions in the target environment (administrator).
- A valid license for at least one DEXPRO app.
Related features
- Licenses
- DEXPRO Apps
- Core Setup
Permission sets
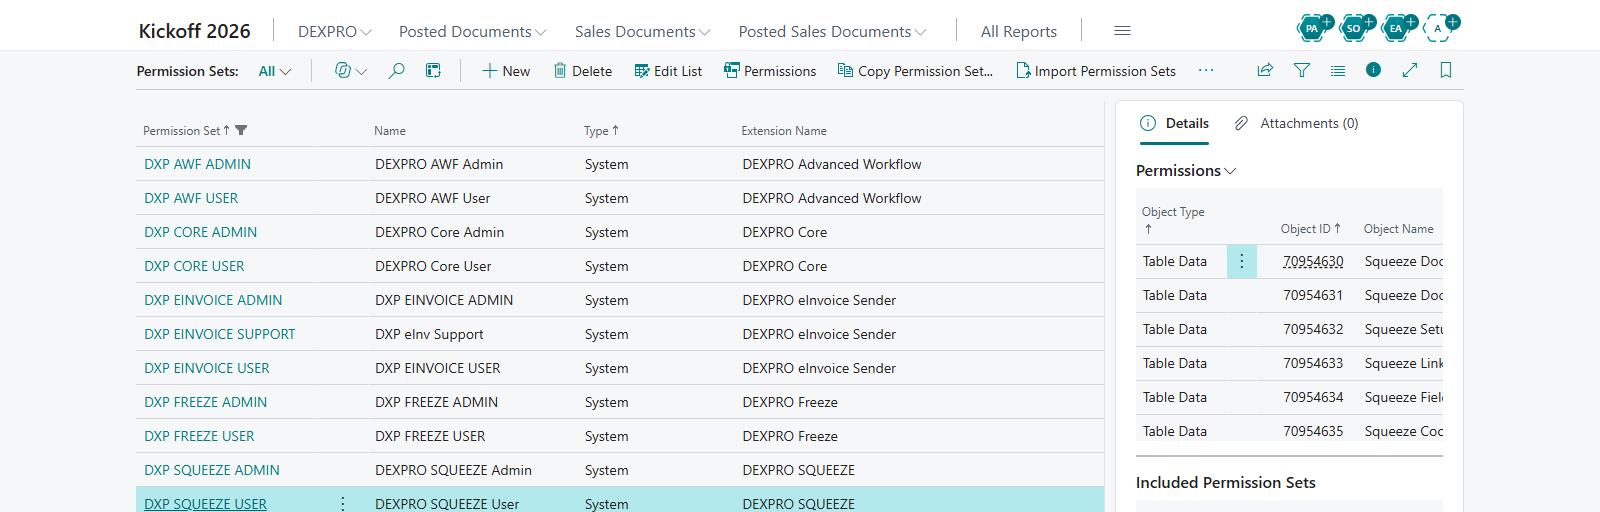
DEXPRO Core ships a small set of permission sets that control who can configure the module and who can work with Core documents and rules day to day. Assign them to users in the same way as any other Business Central permission set.
Available permission sets
Two of the permission sets are intended for direct assignment to users. The third is an internal building block that is referenced only by the module's entitlements and is not meant to be assigned on its own.
| Permission set | Audience | Rights |
|---|---|---|
| DEXPRO Core Admin | Administrators and consultants who set up and maintain the module. | Full Read, Insert, Modify, Delete (RIMD) on all DEXPRO Core tables, plus execute rights on all objects. Required to run setup, manage the DEXPRO Apps registry, configure the File Viewer and OAuth/OpenID connections, and create jobs. |
| DEXPRO Core User | Day-to-day users who process documents and work with rules. | Reduced rights on configuration tables (for example Core Setup and the DEXPRO Apps registry are read/modify but no delete), and full rights on operational data such as Core documents and rules. The OAuth 2.0 and OpenID connection settings are read-only — enough for features such as the File Viewer to request tokens — and their setup pages are not included, so connections and client secrets can only be maintained with DEXPRO Core Admin. Suitable for purchasing agents and processing clerks. |
| DEXPRO Core Objects - Exec | Internal building block — not for direct assignment. | Wildcard execute permission on the module's objects. Not included in the Admin and User sets, but referenced only by the module's entitlements, which make the module's objects available to licensed users. Assign the Admin or User set instead. |
Assigning a permission set
- Open the Permission Sets page (search for "Permission Sets").
- Locate DEXPRO Core Admin or DEXPRO Core User.
- Assign it to the relevant users or user groups via User Setup, the Users page, or your usual security groups.
Assign DEXPRO Core Admin only to the people responsible for configuration. Regular processing users should receive DEXPRO Core User.
Do not assign DEXPRO Core Objects - Exec directly. It grants only execute rights and, on its own, does not give the data access users need. It exists only for the module's entitlements.
Related features
- Licenses
- Core Setup
Core Setup
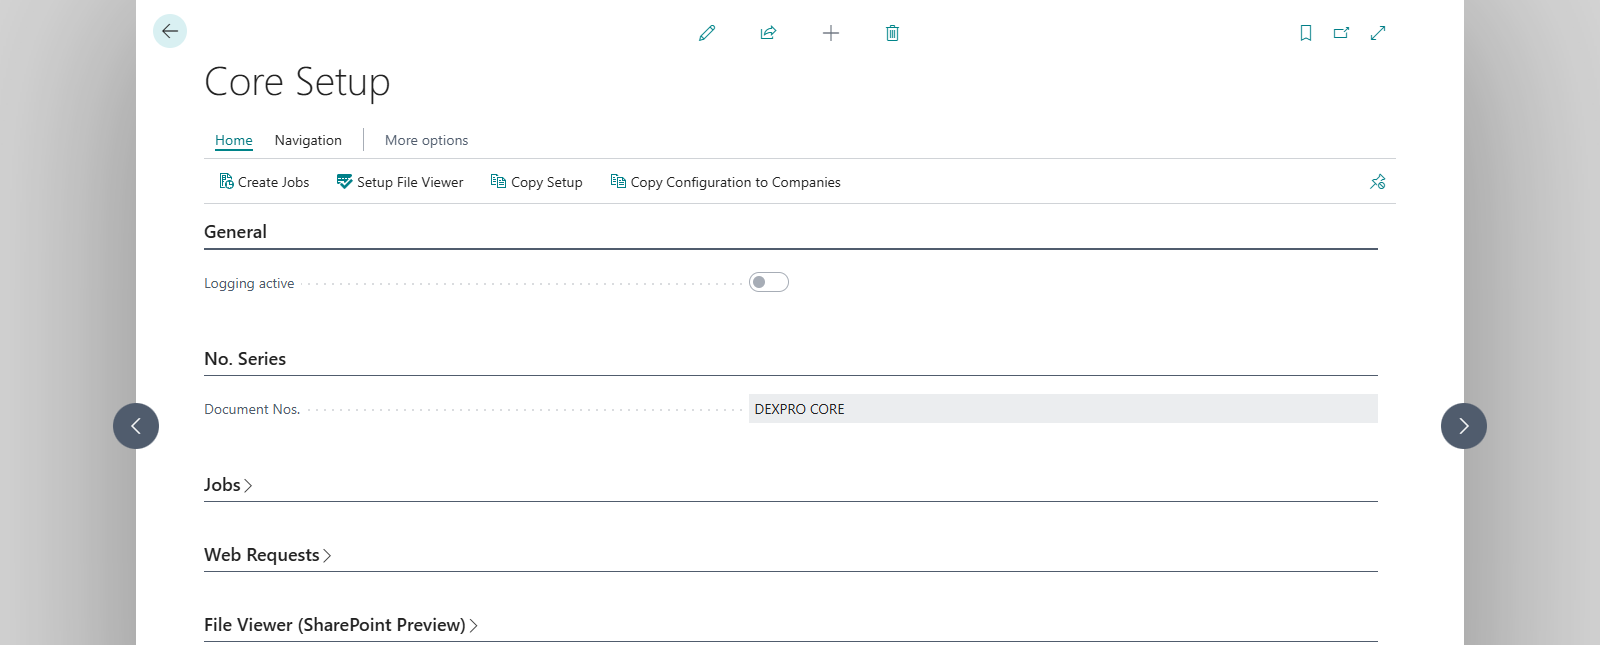
The Core Setup card is the central configuration page for the DEXPRO Core module. From here you control document numbering, logging, the HTTP timeout, the automatic cleanup of old documents, and the File Viewer, and you reach the other Core configuration pages.
You can open it from the Role Center or by searching for Core Setup (it is listed under the Administration usage category).
Menu
The following actions are available on the Core Setup card:
- Field Mapping — opens the standard field mapping list, where source document fields are mapped to Business Central target tables and fields.
- Copy Configuration to Companies — opens a wizard that copies the Core Setup, the custom field mappings and the generic field mappings to one or more other companies, so you do not have to re-enter them manually. See "Copying the configuration to other companies" below.
- Document Class Setups — opens the list where each Document Class is linked to its next process step.
- Document Creation Logs — opens the diagnostic logs written during purchase document creation (only when logging is active).
- Create Jobs — (re)creates the recurring cleanup Job Queue Entry described below.
- Setup File Viewer — launches the File Viewer Setup Wizard to configure the SharePoint document preview.
FastTabs
Numbering
- Document Nos. — the No. Series used to assign numbers to incoming Core documents.
General
- Enable Logging — when switched on, Core writes Document Creation Logs during purchase document creation for troubleshooting. Leave off during normal operation.
- HTTP Timeout — the timeout in seconds (default 100) applied to outgoing HTTP calls made by DEXPRO apps through the shared web request client.
Cleanup
- Cleanup Job GUID — the identifier of the automatically created cleanup Job Queue Entry.
- Cleanup Interval — a DateFormula that defines how long completed documents are kept. The default is -1M (keep documents for one month before they become eligible for deletion).
File Viewer (SharePoint Preview)
- Settings that enable and configure the inline SharePoint/OneDrive document preview on attachment FactBoxes. These are normally filled in by the File Viewer Setup Wizard rather than by hand.
Automatic cleanup job
When Core Setup is initialized, a recurring Job Queue Entry is created automatically to keep the document list tidy. It runs every 720 minutes (twice a day), starting at 05:00, and deletes old Core documents whose status is Deleted, Closed, or Cancelled and that are older than the configured Cleanup Interval.
You can re-create the cleanup job at any time with the Create Jobs action if it was removed. See "Cleanup and Job Queue" for details.
If the user setting up Core does not have permission to manage Job Queue Entries, a message is shown and the cleanup job is not created. An administrator with Job Queue permission should then run Create Jobs.
DEXPRO Apps registry
The Core Setup card embeds the DEXPRO Apps part, which lists the installed DEXPRO modules and lets you activate or deactivate them. See the "DEXPRO Apps" page for details.
Copying the configuration to other companies
The Copy Configuration to Companies action opens a wizard that copies the DEXPRO Core configuration from the current company to one or more other companies in one run.
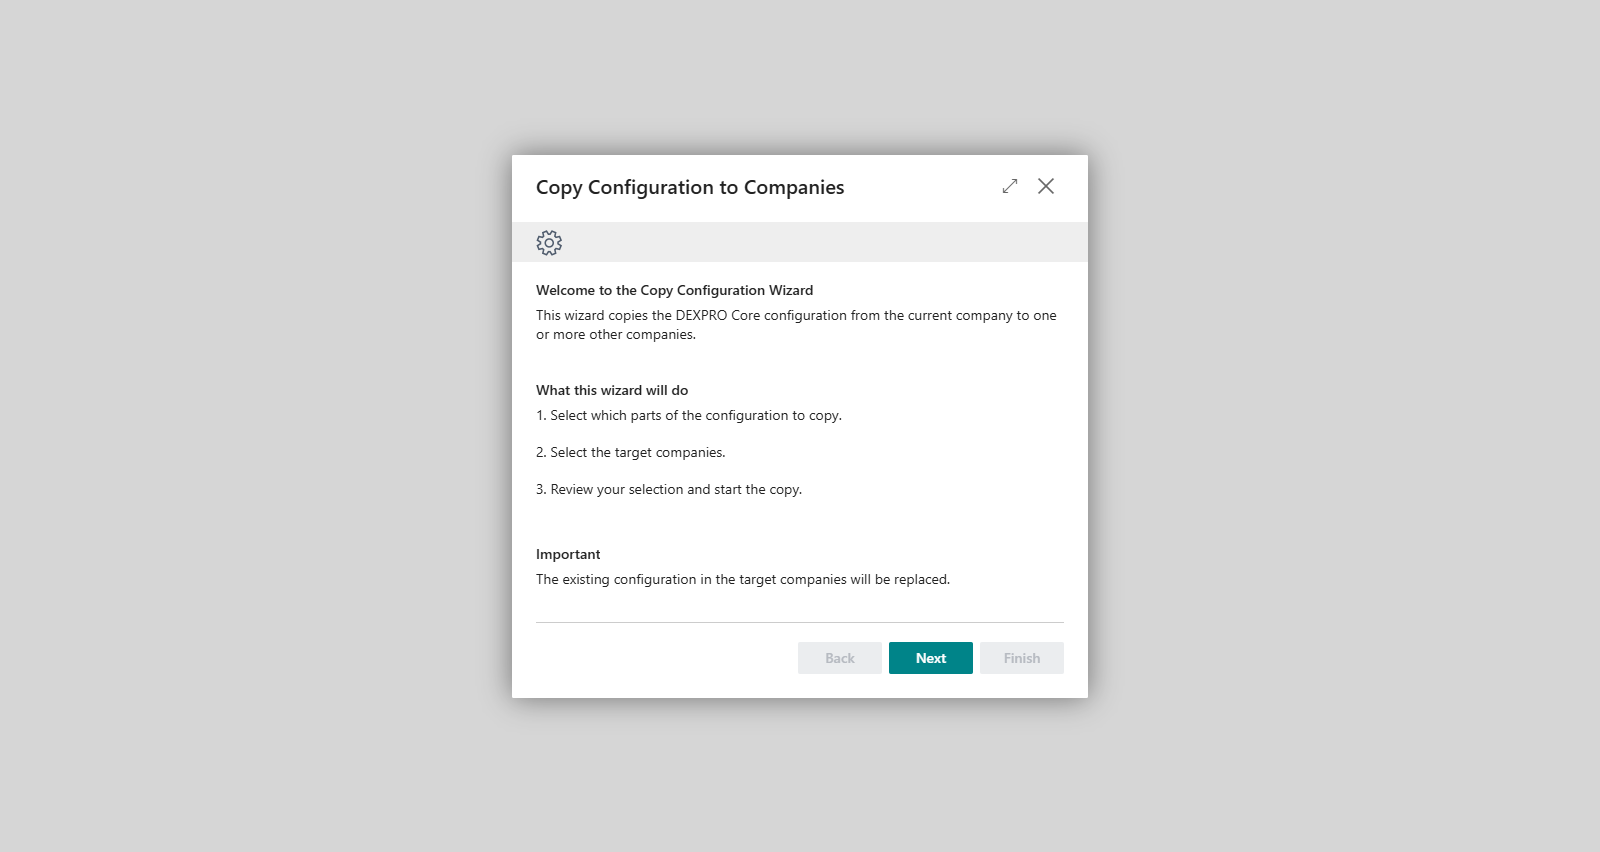
- Welcome — explains what the wizard does and warns: The existing configuration in the target companies will be replaced.
- Select Configuration Parts — choose which parts to copy:
- Core Setup — copies the Core Setup including the Document Nos. number series. The number series is created in the target company if it does not exist there yet.
- Custom Field Mappings — replaces the custom field mappings of every document class that has custom field mappings in the current company. Document classes without mappings here are left untouched in the target companies.
- Generic Field Mappings — replaces the generic field mappings (Generic Additional Fields) in the target companies.
- Select Target Companies — use the assist button of the Target Companies field to select one or more companies. The current company cannot be a target.
- Review — check the selected parts and companies, then choose Next to start copying.
- Copy Completed — shows one result line per part, for example Core Setup: copied to 2 of 3 company(ies). A part with nothing to copy in the current company (for example no generic field mappings) is skipped and counted as 0. Choose Finish to close the wizard.
The wizard checks your input before it moves on:
- "Please select at least one configuration part to copy." — shown on the Select Configuration Parts step if no part is selected.
- "Please select at least one target company." — shown on the Select Target Companies step if no company is selected.
Copying starts when you choose Next on the Review step and overwrites the selected parts in the target companies. Each company is saved as soon as it has been processed: if an error occurs, the wizard stays on the Review step, and the companies processed before the error keep the copied configuration.
Related features
- DEXPRO Apps
- Field Mapping
- Document Class Setup
- File Viewer Setup Wizard
- Cleanup and Job Queue
DEXPRO Apps
The DEXPRO Apps registry lists every installed DEXPRO module and lets you activate or deactivate each one. It is embedded as a part on the Core Setup card and is how DEXPRO Core knows which modules are present and which are currently active.
{add screenshot of Core Setup here}
Purpose
Each DEXPRO app registers itself with Core when it is installed. The registry gives you a single place to see the installed modules and to turn their functionality on or off, without uninstalling anything.
Fields
- App / Name — the DEXPRO module (for example SQUEEZE, Advanced Workflow, Freeze, eInvoice Sender).
- Active — a toggle that indicates whether the module is currently active. Turning it on or off synchronizes the module's own setup table so that Core and the module stay consistent.
Menu
- Activate all Apps — sets every listed module to active in one step.
- Deactivate all Apps — sets every listed module to inactive in one step.
Usage
- Open Core Setup and locate the embedded DEXPRO Apps list.
- Use the Active toggle on a line to activate or deactivate that module, or use the Activate all Apps / Deactivate all Apps actions to change every module at once.
When you toggle Active, Core updates the module's own setup table accordingly. This keeps the registry and the individual module setup in sync, so you can manage activation from one place.
Related features
- Core Setup
- Obtaining the DEXPRO modules
Core Documents
The Core Documents list is the central place where all incoming DEXPRO Core documents are collected and tracked. Each line represents one document received through a DEXPRO app, together with its processing status and a link to the Business Central record it created.
You can open it from the Role Center or by searching for Core Documents (it is listed under the Documents usage category).
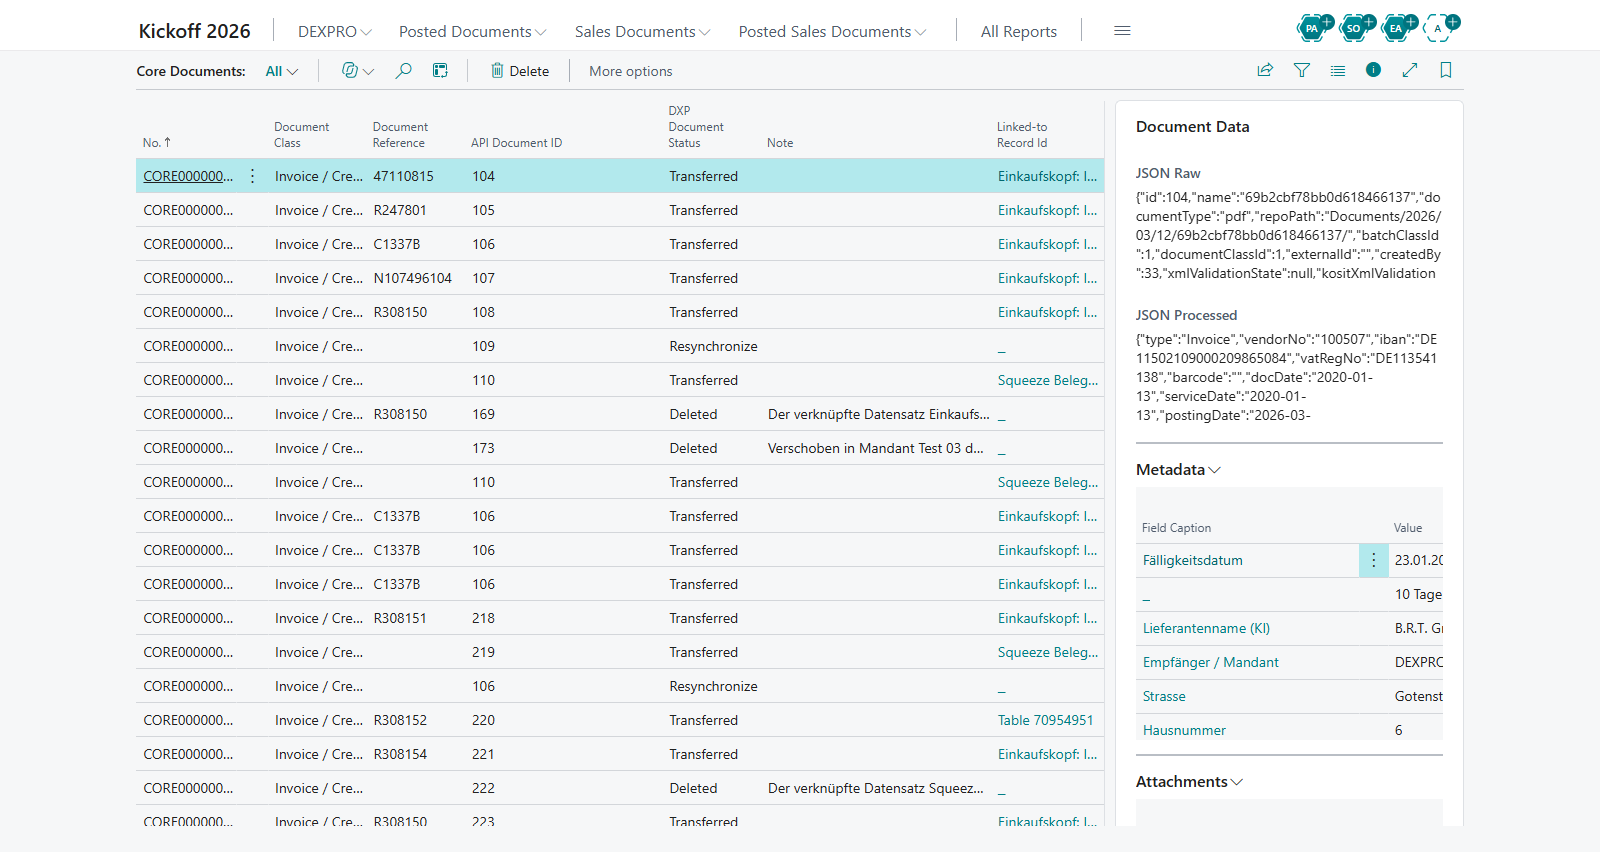
Columns
- No. — the document number assigned from the No. Series configured in Core Setup.
- Document Class — the classification of the document (for example Invoice or Credit Memo, added by downstream apps such as SQUEEZE).
- API Document ID — the external identifier of the source document.
- Status — the current stage of the document (see the lifecycle below).
- Note — a free-text note about the document.
- Linked-to Record Id — a reference to the Business Central record created from the document. Drilling down opens that record directly.
Editing and deletion
The list is designed to reflect what was received, so Insert and Modify are disabled — you do not create or change documents here manually. Delete is allowed only for documents in certain statuses.
If you try to delete a document in a status that does not permit it, Core shows a validation message: "You can only delete a Core Document if the Status is Deleted, Imported, Closed or Cancelled." Documents in other statuses are protected from deletion.
Deleted view
A separate Deleted view lets you review documents that have been marked as deleted, keeping the main list focused on active documents.
Drilldown to the created record
Use the drilldown on Linked-to Record Id to jump straight to the Business Central record that was created from the document — for example the purchase invoice or purchase order. This makes it easy to trace a document to its result.
FactBoxes
- Document Data — shows the source data captured for the document.
- Metadata — shows additional metadata associated with the document.
- Attachments — shows the files attached to the document.
Document lifecycle
The Status field reflects where a document is in its lifecycle. The possible statuses are:
| Status | Meaning |
|---|---|
| Imported | The document has been received into Core but not yet transferred to a Business Central record. |
| Transferred | The document has been transferred and a Business Central record has been created. |
| Resynchronize | The document is flagged to be synchronized again with its source. |
| Finished | Processing of the document is complete. |
| Closed | The document has been closed and is no longer actively processed. |
| Deleted | The document has been marked as deleted. |
| Rejected | The document was rejected during processing. |
| Cancelled | Processing of the document was cancelled. |
| On Hold | The document is temporarily paused and awaits further action. |
| Custom Processing | The document is handled by custom, app-specific processing. |
The set of statuses is extensible, so a downstream DEXPRO app can add its own status values where needed.
Related features
- Document Class Setup
- Document Creation Logs
- Role Center
- Cleanup and Job Queue
Document Class Setup
The Document Class Setup maps each Document Class to the process step that Core should run next for documents of that class. It lets you tailor how different kinds of documents flow through the DEXPRO apps.
Open the list from Core Setup (Document Class Setups action) or by searching for Document Class Setups.
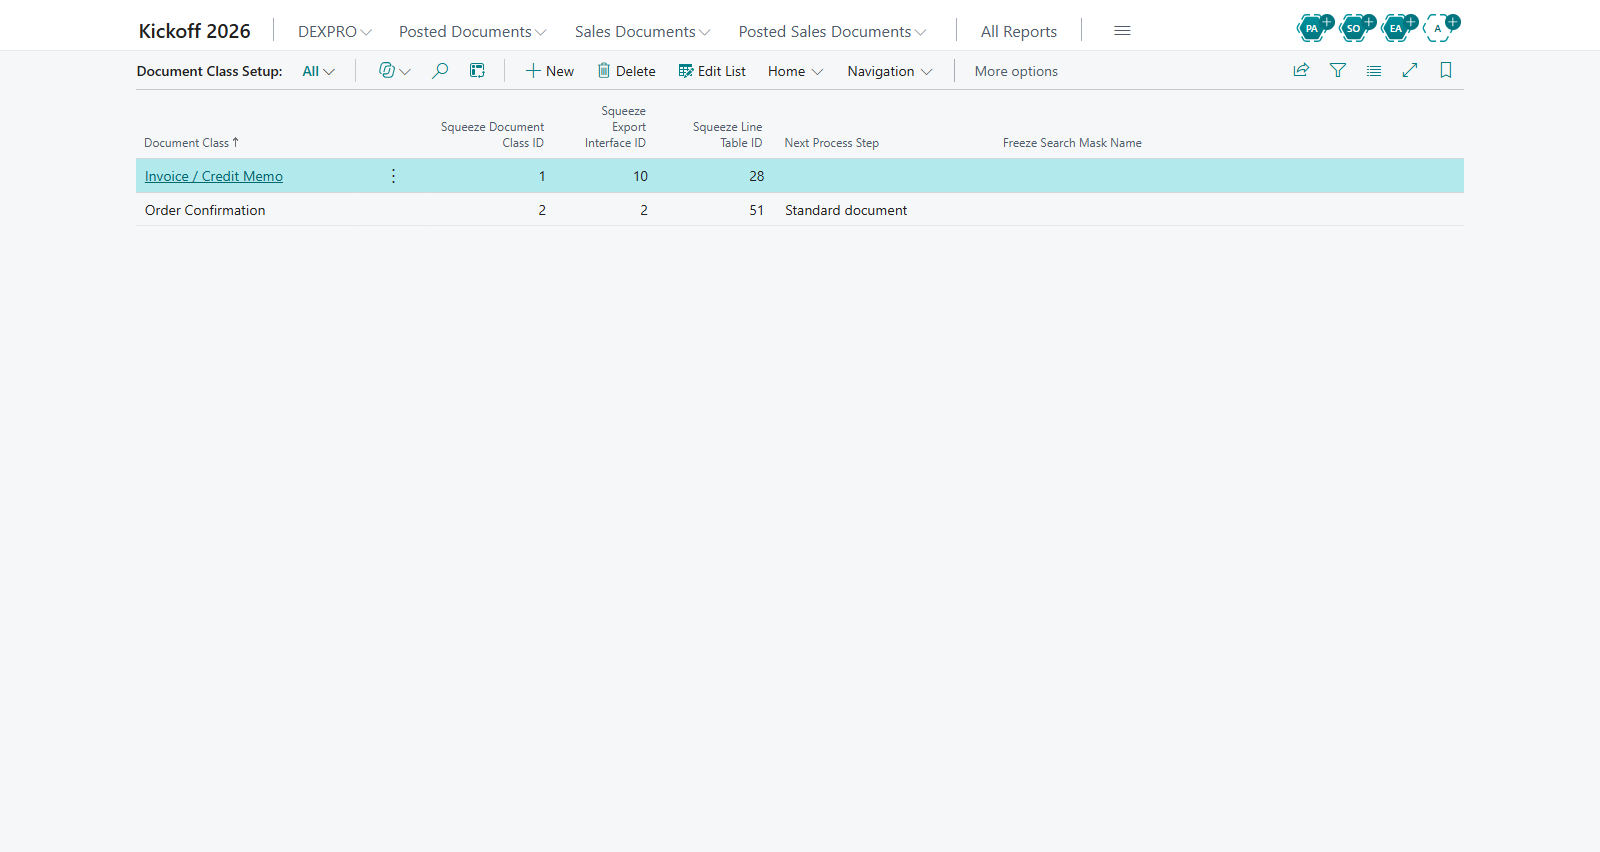
Concepts
Document Class
The Document Class classifies an incoming document. It is an extensible enum, so the available values depend on which DEXPRO apps are installed:
- Unassigned — the default value used when no specific class applies.
- Downstream apps add their own values. For example, SQUEEZE contributes classes such as Invoice, Credit Memo, and Order Confirmation.
Next Process Step
The Next Process Step determines what happens to a document of a given class after it is received. It is also an extensible enum, so installed apps can add their own steps — for example, the Breeze Interface app contributes an additional value.
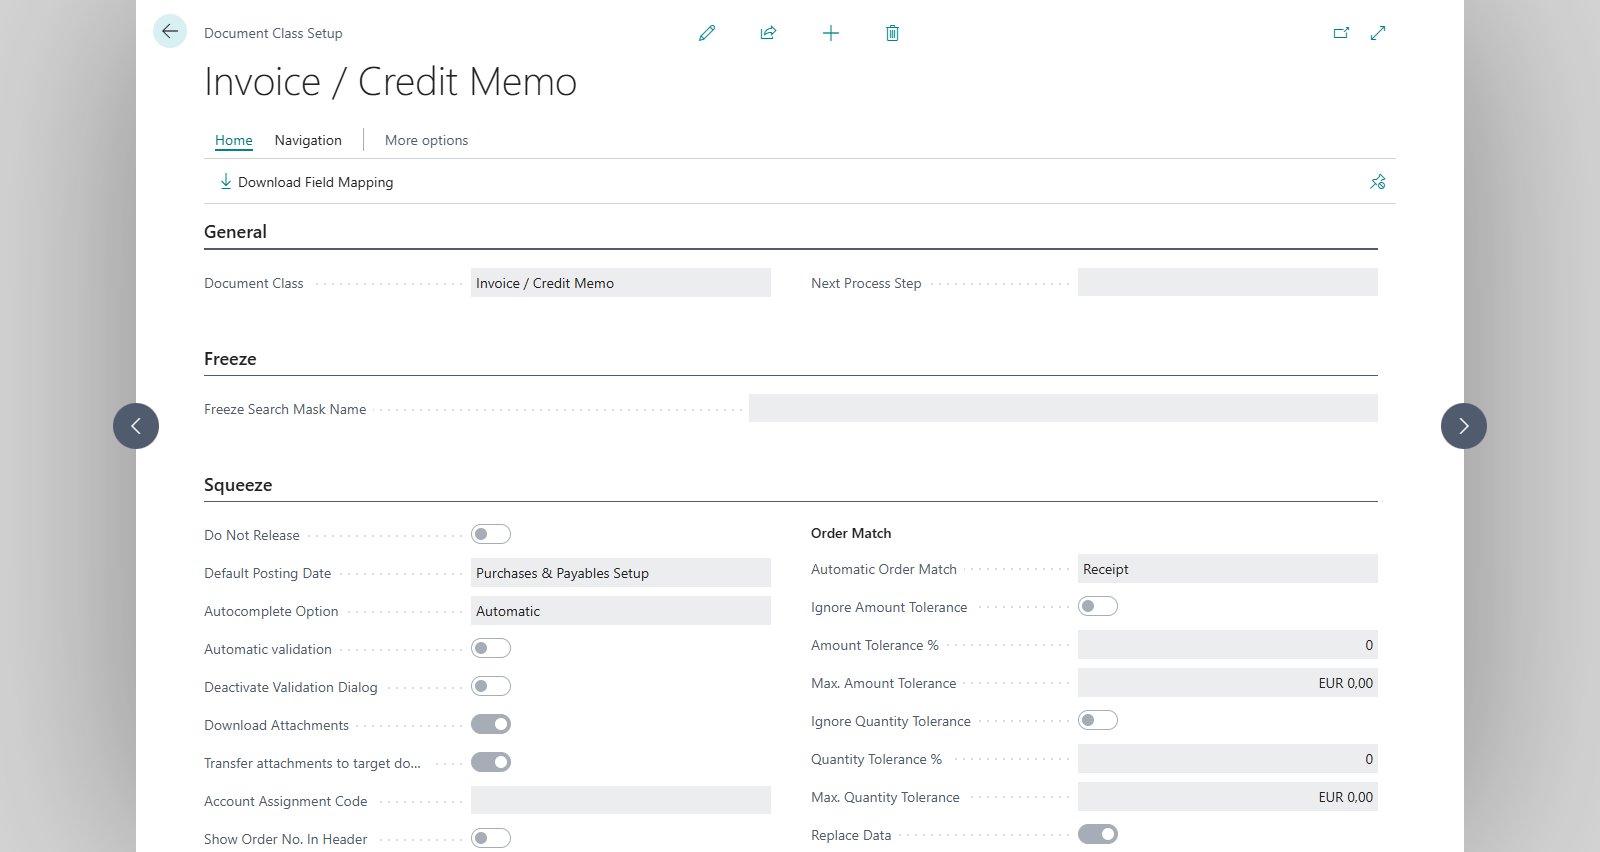
Document Class Setup card
Open a line to see the card for a single Document Class.
- Document Class — the class this setup applies to.
- Next Process Step — the step Core runs next for documents of this class.
Usage
- Open Document Class Setups.
- Create or select a line for the Document Class you want to configure.
- Choose the appropriate Next Process Step.
Because both Document Class and Next Process Step are extensible, the values you see reflect the DEXPRO apps installed in your environment. Installing an app can add new classes and steps to choose from.
Related features
- Core Documents
- Field Mapping
- Extensibility
Field Mapping
Field mapping controls how data from an incoming document is written into Business Central records. DEXPRO Core offers three mapping surfaces, each for a different kind of field, so you can cover standard fields, arbitrary JSON fields, and custom app fields.
Open the mapping lists from Core Setup (Field Mapping action) or by searching for the individual pages.
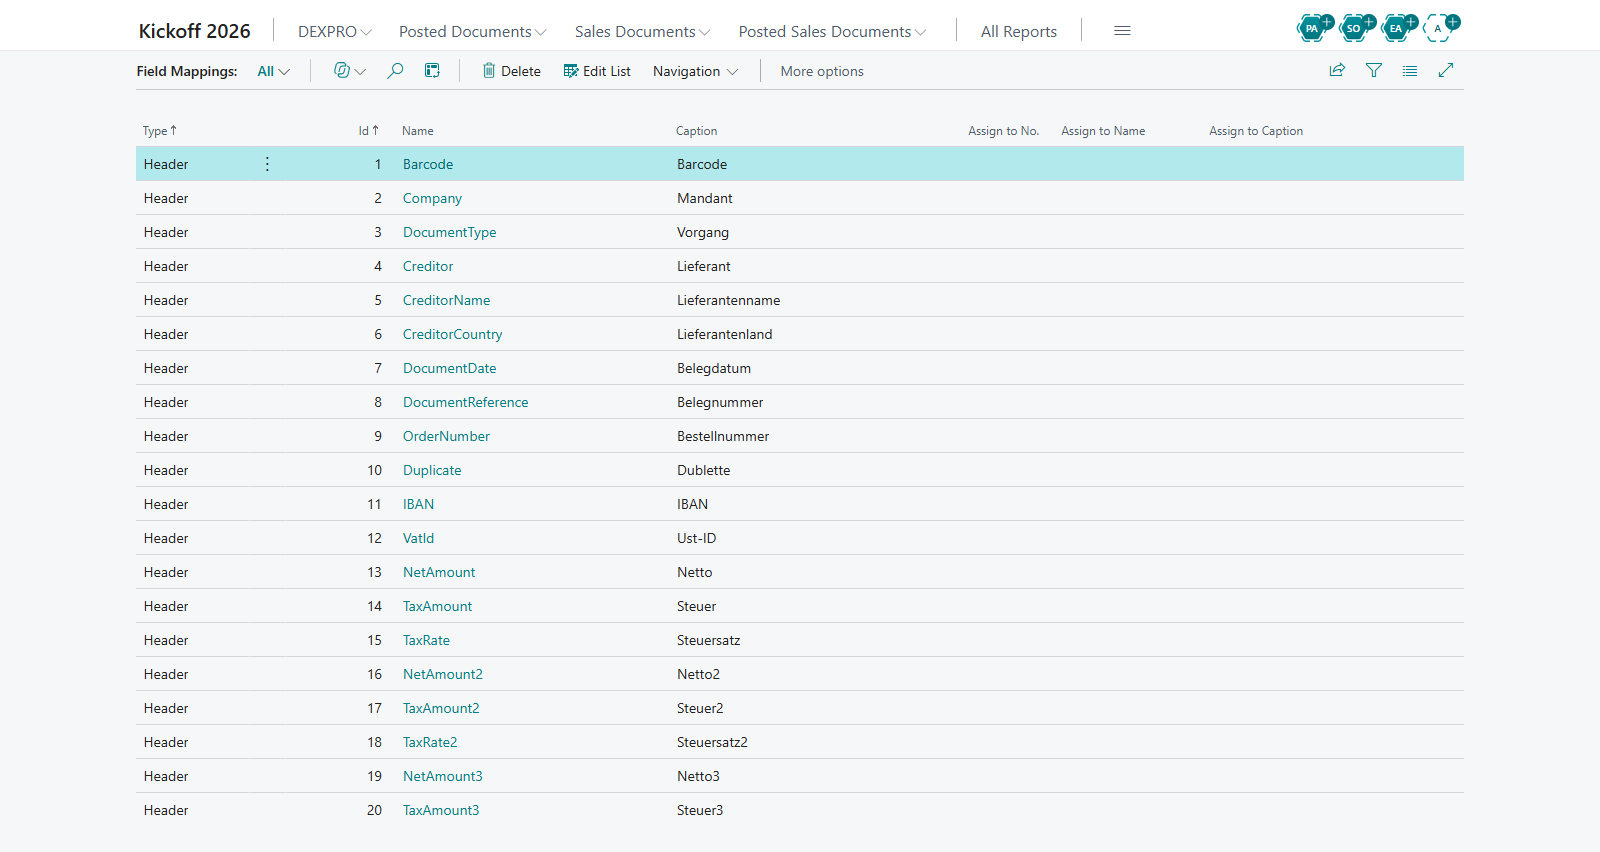
Standard Field Mapping
The Field Mappings page maps source document fields to Business Central target tables and fields. Mappings are defined per Document Class and can apply to the document header or the document lines.
- Document Class — the class the mapping applies to.
- Header / Line — whether the field belongs to the document header or to a document line.
- Source field — the field in the source document.
- Target Table / Target Field — the Business Central table and field the value is written to.
Use this when you need to map the well-known fields of a document class to their standard Business Central destinations.
Generic Additional Fields
The Generic Additional Fields page maps arbitrary JSON field names from the source data to a target table and field. This is useful when the source contains extra fields that are not part of the standard mapping.
- JSON field name — the name of the field as it appears in the source JSON.
- Target Table / Target Field — the Business Central destination.
- Validate — an optional flag that runs the field's validation logic (the OnValidate trigger) when the value is written, rather than just setting it.
Use this for ad hoc or additional source fields that you want to route into Business Central without a code change.
{add screenshot of Generic Additional Fields here}
Custom Field Mapping
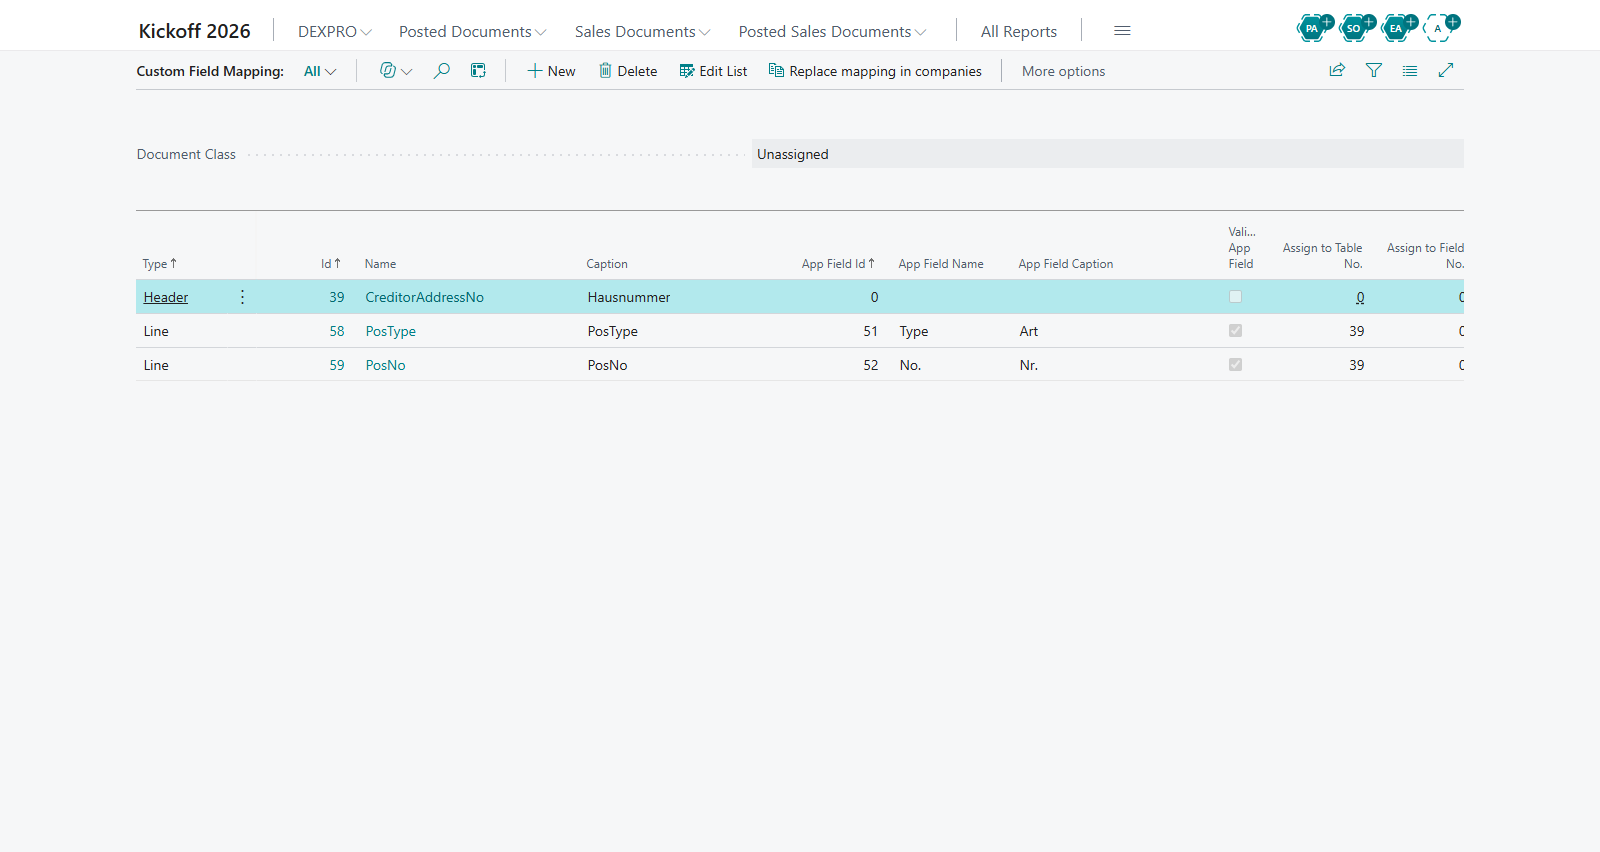
The Custom Field Mapping page maps custom app fields in the range 50000-99999 to target fields. This is intended for fields added by other extensions (the customer/partner field range) that need to be populated from the source data.
- Custom field — the custom field (50000-99999) to read from.
- Target field — the destination field.
Use this when your environment has custom fields that must be filled during document creation.
Which mapping to use
| Use case | Mapping surface |
|---|---|
| Standard, well-known fields of a document class (header or line) | Standard Field Mapping |
| Extra JSON fields present in the source data | Generic Additional Fields |
| Custom fields (50000-99999) added by another extension | Custom Field Mapping |
Use the Validate flag on Generic Additional Fields when the target field has validation logic that must run (for example to trigger dependent field updates). Leave it off to set the value directly.
Copying mappings to other companies
The Generic Additional Fields and Custom Field Mapping pages each have a Replace mapping in companies action that copies the mapping to other companies:
- Choose Replace mapping in companies and select one or more target companies. The current company is not offered.
- Confirm the question Do you really want to copy the settings to the following companies:. It lists the selected companies (at most ten, followed by the number of further selected companies) and defaults to No.
- The mapping is replaced in each target company, and a message reports the number of companies, for example The generic field mapping was replaced in 3 company(ies).
On the Custom Field Mapping page, only the mappings of the document class selected at the top of the page are replaced. To copy the Core Setup and both kinds of mappings in one step, use Copy Configuration to Companies on the Core Setup card.
Related features
- Core Setup
- Document Class Setup
- Document Creation Logs
OAuth 2.0 and OpenID Setup
DEXPRO Core provides shared authentication setup for the DEXPRO apps that call external services. Two setup lists are available: one for OAuth 2.0 client-credentials connections and one for OpenID Connect connections. Both keep secrets in Business Central isolated storage so they are never shown again after entry.
Purpose
Several DEXPRO features connect to external services — for example the Freeze archive, the SQUEEZE tenant, Digivoice, and Microsoft Graph. These connections need to authenticate. Instead of each app defining its own credentials, Core stores the connection settings centrally and issues the tokens the apps need.
DEXPRO OAuth 2.0 Setup Entries
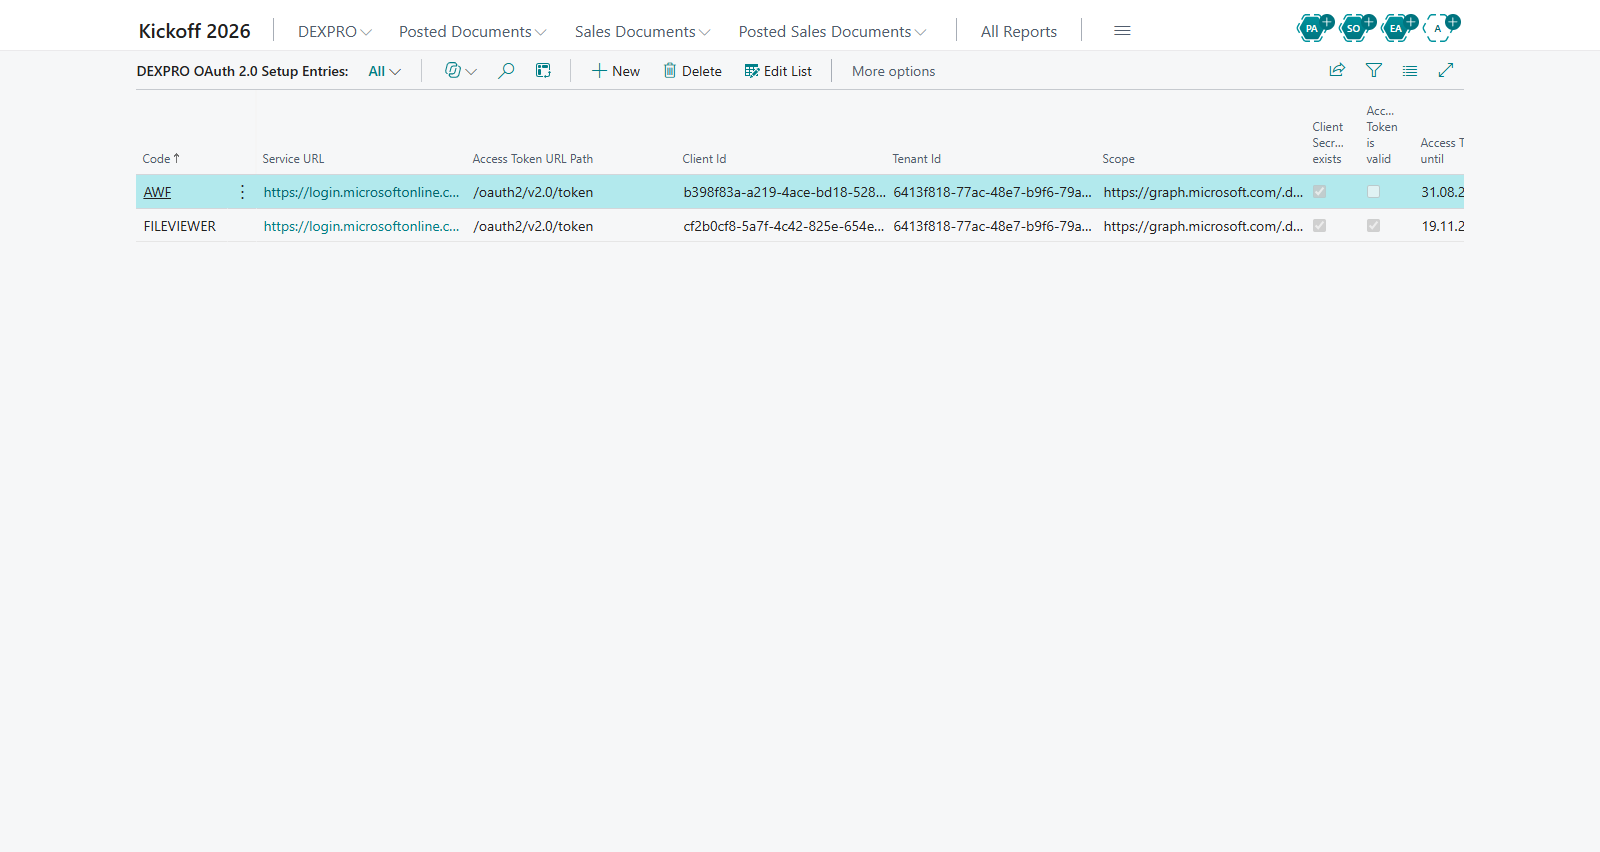
The DEXPRO OAuth 2.0 Setup Entries page holds client-credentials connections. Each entry defines how Core obtains a token for a given service.
- Service URL — the base URL of the service to call.
- Token Path — the endpoint used to request an access token.
- Client ID — the application (client) identifier.
- Tenant ID — the tenant the token is requested for.
- Scope — the scope requested for the token.
- Client Secret — entered through a dedicated dialog and stored in isolated storage.
Open ID Setup Entries
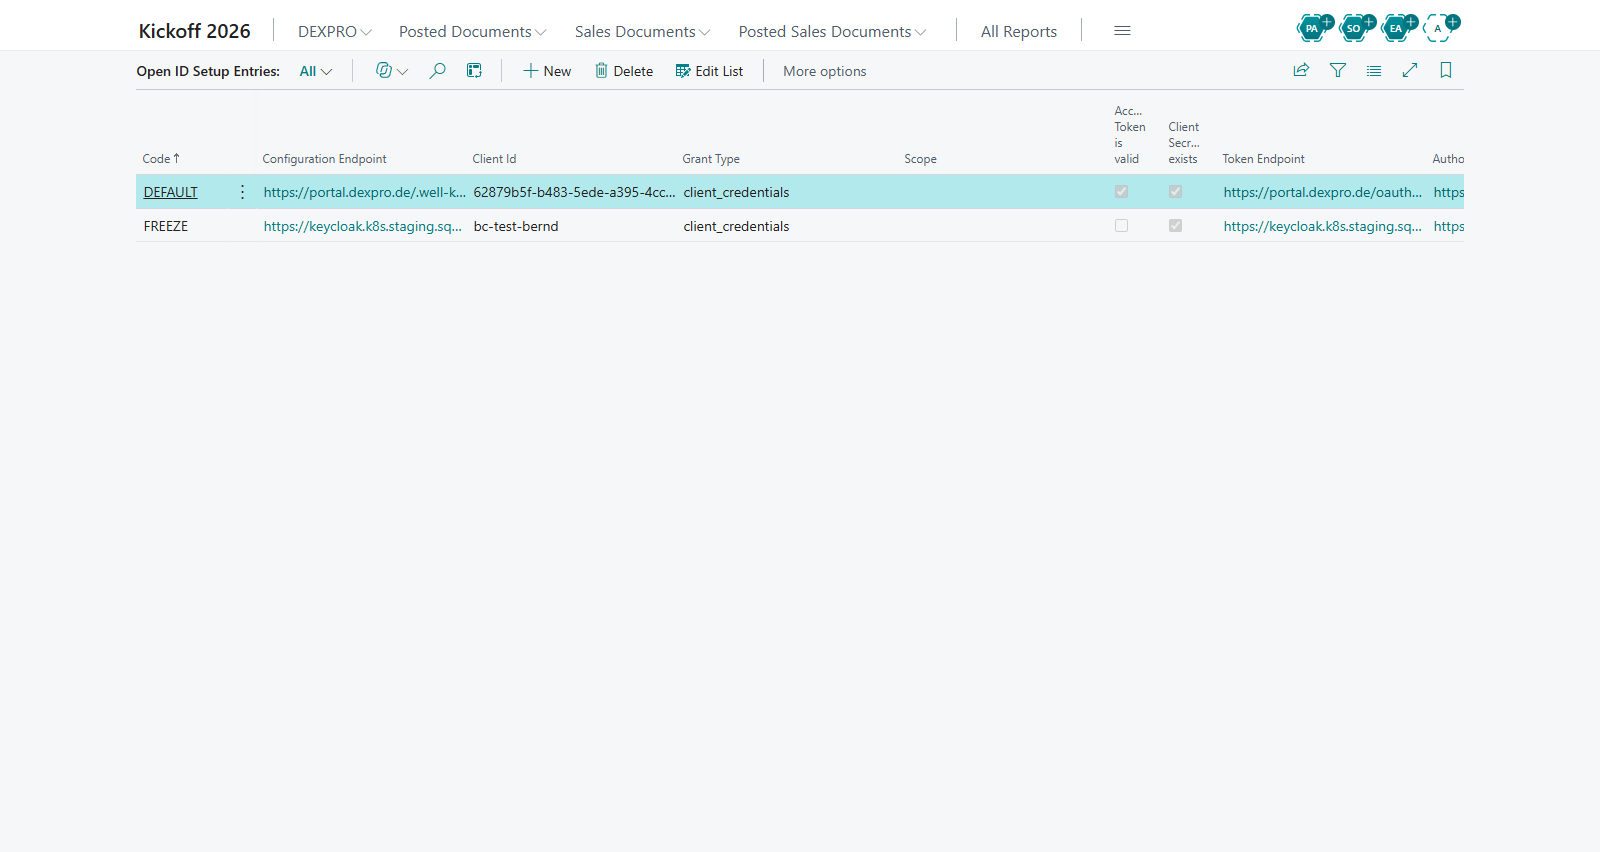
The Open ID Setup Entries page holds OpenID Connect connections.
- OpenID endpoints — the OpenID Connect endpoint(s) used for authentication.
- Client ID — the application (client) identifier.
- Grant Type — the OAuth grant type used.
- Scope — the scope requested.
- Secret and token — stored in isolated storage.
Entering a secret
Secrets are entered through a dialog and written straight to isolated storage. They are used when Core requests tokens on behalf of the apps.
For security, secrets are never displayed again after they are entered. If a secret changes, re-enter it through the dialog — you cannot read the stored value back from the page.
Permissions
Of the DEXPRO Core permission sets, only DEXPRO Core Admin includes the DEXPRO OAuth 2.0 Setup Entries and Open ID Setup Entries pages and the dialog for entering a client secret. Only users with this permission set can therefore create, change or delete connections and enter secrets.
DEXPRO Core User grants read access to the stored connection settings only. This lets features such as the File Viewer request tokens for regular users without giving them access to the setup pages.
Prerequisites
- The service you are connecting to must be registered and must provide the client ID, tenant ID (where applicable), scope, secret, and endpoint values.
- For Microsoft Graph connections you need a Microsoft Entra ID app registration (see "File Viewer" and "File Viewer Setup Wizard").
Related features
- File Viewer
- File Viewer Setup Wizard
- Extensibility
File Viewer
The File Viewer lets users preview document attachments directly inside Business Central, on the standard attachment FactBoxes of document pages. It uploads the attachment to SharePoint/OneDrive through Microsoft Graph and shows the returned preview inline, so users can read a file without downloading it.
Purpose and business value
Processing incoming documents usually means checking the attached file (for example the original invoice PDF) while working on the Business Central record. The File Viewer removes the download-open-switch-back cycle by showing the file next to the record, which speeds up review and reduces errors.
Usage
- Open a Business Central document that has an attachment FactBox (for example a purchase invoice created from a Core document).
- Select the attachment; its preview is shown inline in the FactBox.
- Use Undock Viewer to detach the preview into its own window — useful on wide or multi-monitor setups.
- Use Dock Viewer to return the preview to the FactBox.
{add screenshot of Document Attachment FactBox with File Viewer here}
How it works
When you preview an attachment, the file is uploaded to SharePoint/OneDrive via Microsoft Graph, and Graph returns a preview URL that Business Central renders inside the viewer control.
Setup
The File Viewer is enabled and configured from the File Viewer (SharePoint Preview) group on the Core Setup card. The recommended way to configure it is the File Viewer Setup Wizard, which walks you through the credentials, the connection test, and the SharePoint site.
Prerequisites
- A Microsoft Entra ID app registration providing a Tenant ID, Client ID, and Client Secret.
- A SharePoint site to hold the uploaded files.
- Appropriate Microsoft Graph permissions granted to the app registration.
Error handling
When you enable the File Viewer, Core validates the prerequisites. If a required setting is missing (for example the credentials or the SharePoint site), enabling fails with an error and the viewer stays off until the missing information is provided.
Related features
- File Viewer Setup Wizard
- Core Setup
- OAuth 2.0 and OpenID Setup
File Viewer Setup Wizard
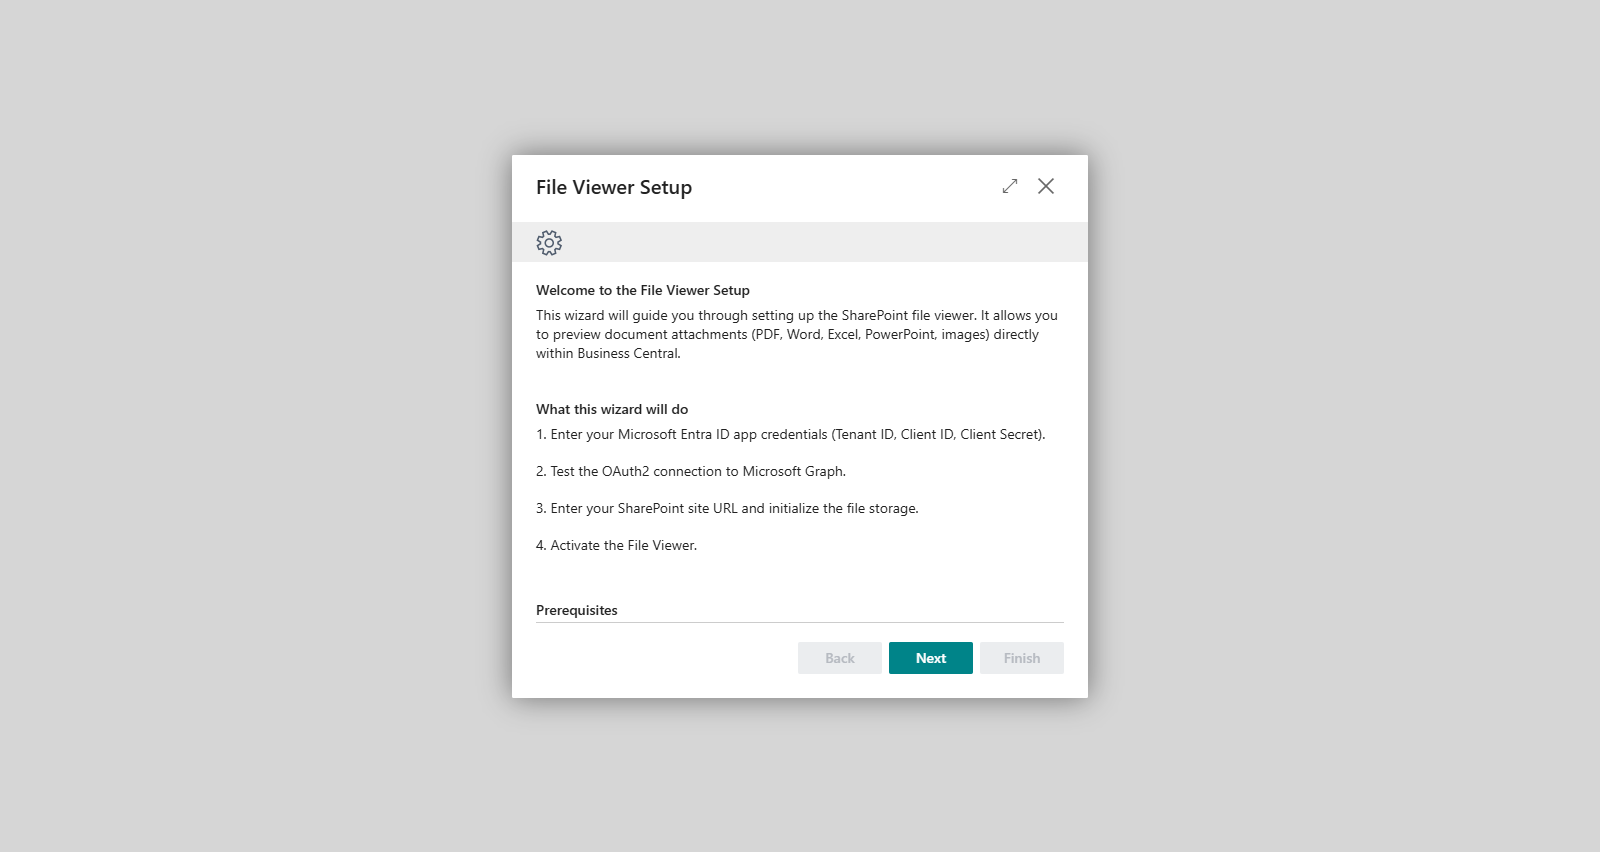
The File Viewer Setup Wizard is an assisted, multi-step guide that configures the File Viewer (SharePoint document preview) end to end. It collects the Microsoft Entra ID credentials, tests the connection to Microsoft Graph, sets the SharePoint site, and finally activates the viewer.
Launch it from the Core Setup card with the Setup File Viewer action.
Steps
- Welcome — introduces the wizard and what it will configure.
- Credentials — enter the Tenant ID, Client ID, and Client Secret of your Microsoft Entra ID app registration. A link to the Azure Portal is provided to help you find or create these values.
- Connection Test — the wizard performs an OAuth 2.0 authentication against Microsoft Graph. While it runs you see Testing connection...; on success it shows Connection test successful. Access token retrieved from Microsoft Graph. (green), and on failure Connection test failed. (red).
- SharePoint — enter the SharePoint Site URL and initialize the storage that will hold the previewed files.
- Done — completing this step activates the File Viewer.
Usage (step by step)
- Open Core Setup and choose Setup File Viewer.
- On the Welcome step, choose Next.
- On the Credentials step, fill in the Tenant ID, Client ID, and Client Secret. Use the Azure Portal link if you need to look up the values.
- On the Connection Test step, run the test and confirm you see Connection test successful. before continuing.
- On the SharePoint step, enter the SharePoint Site URL and initialize storage.
- On the Done step, finish the wizard to activate the File Viewer.
Validation messages
- "Please fill in all three fields: Tenant ID, Client ID, and Client Secret." — shown on the Credentials step if the Tenant ID, Client ID, or Client Secret is missing.
- "Please enter a SharePoint Site URL." — shown on the SharePoint step if the site URL is empty.
If you see Connection test failed., re-check the credentials on the previous step and the Microsoft Graph permissions granted to the app registration, then test again.
Prerequisites
- A Microsoft Entra ID app registration (Tenant ID, Client ID, Client Secret) with the required Microsoft Graph permissions.
- A SharePoint site to store the previewed files.
Related features
- File Viewer
- Core Setup
- OAuth 2.0 and OpenID Setup
Rule Engine
The Rule Engine is a configurable, priority-ordered decision engine shared across the DEXPRO apps. It lets you express business decisions as rules instead of code — for example choosing the next process step, checking plausibility, or assigning an account in SQUEEZE, and deciding stage transitions or assignees in Advanced Workflow.
Purpose and business value
Many document-processing decisions differ by customer, vendor, amount, or document type. The Rule Engine puts those decisions in the hands of configurators: rules are evaluated in priority order, and the first matching rule determines the outcome. This keeps behavior transparent and adjustable without a development change.
Concepts
Rule Set
A Rule Set is scoped to exactly one primary table and can reference up to 50 related tables. It groups everything the engine needs to evaluate one kind of decision.
Rule Group
A Rule Group organizes rules within a rule set and orders them so they are evaluated in a defined sequence.
Rule
A Rule defines the actual condition to match. It supports:
- AND / OR condition groups — combine several conditions with a logical connector.
- Record Match Type — Any Record (a match on any record is enough) or All Records (every record must match); installed DEXPRO apps hide it on the Rule Card for rules on which it has no effect.
- Validity dates — a Valid From / Valid To window.
- Active flag — enable or disable the rule.
Rule Condition
A Rule Condition compares a field against a value using a comparison operator. It can compare to a single value or to a reusable value set.
Value Set
A Value Set is a reusable list of values used by the In Set operator, so the same list can be referenced from many conditions.
Rule Validity Period
A Rule Validity Period restricts when a rule applies using weekday, time-of-day, and date windows.
Comparison operators
- Equal
- Not Equal
- Greater Than / Greater Than Or Equal
- Less Than / Less Than Or Equal
- Contains
- Begins With
- Ends With
- Between
- In Set
- RegEx
Testing rules
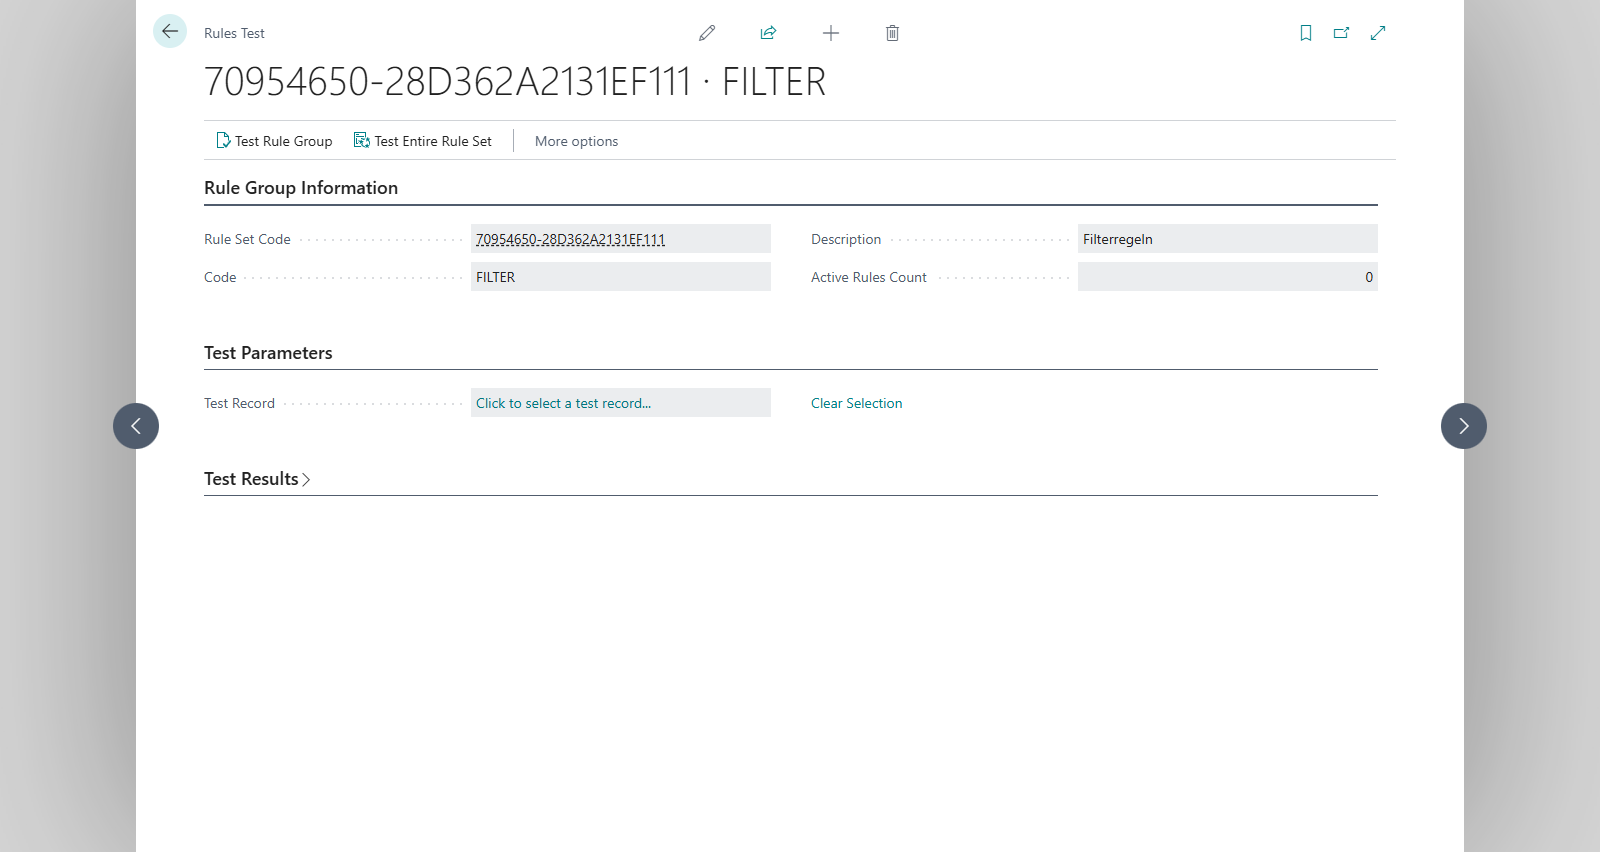
An interactive Rule Test page lets you evaluate a rule set against sample data and see which rule matches, so you can verify your configuration before it goes live.
Validation messages
- "Only one primary table allowed per rule set" — a rule set can have exactly one primary table.
- "Maximum allowed: 50 tables" — you cannot add more than 50 related tables to a rule set.
- "Valid To must not be earlier than Valid From" — the validity window must be in the correct order.
- Operator-not-allowed-for-field-type — a comparison operator that does not apply to the selected field's data type is rejected (for example a text-only operator on a numeric field).
Related features
- Rule Sets
- Rule Card
Rule Sets
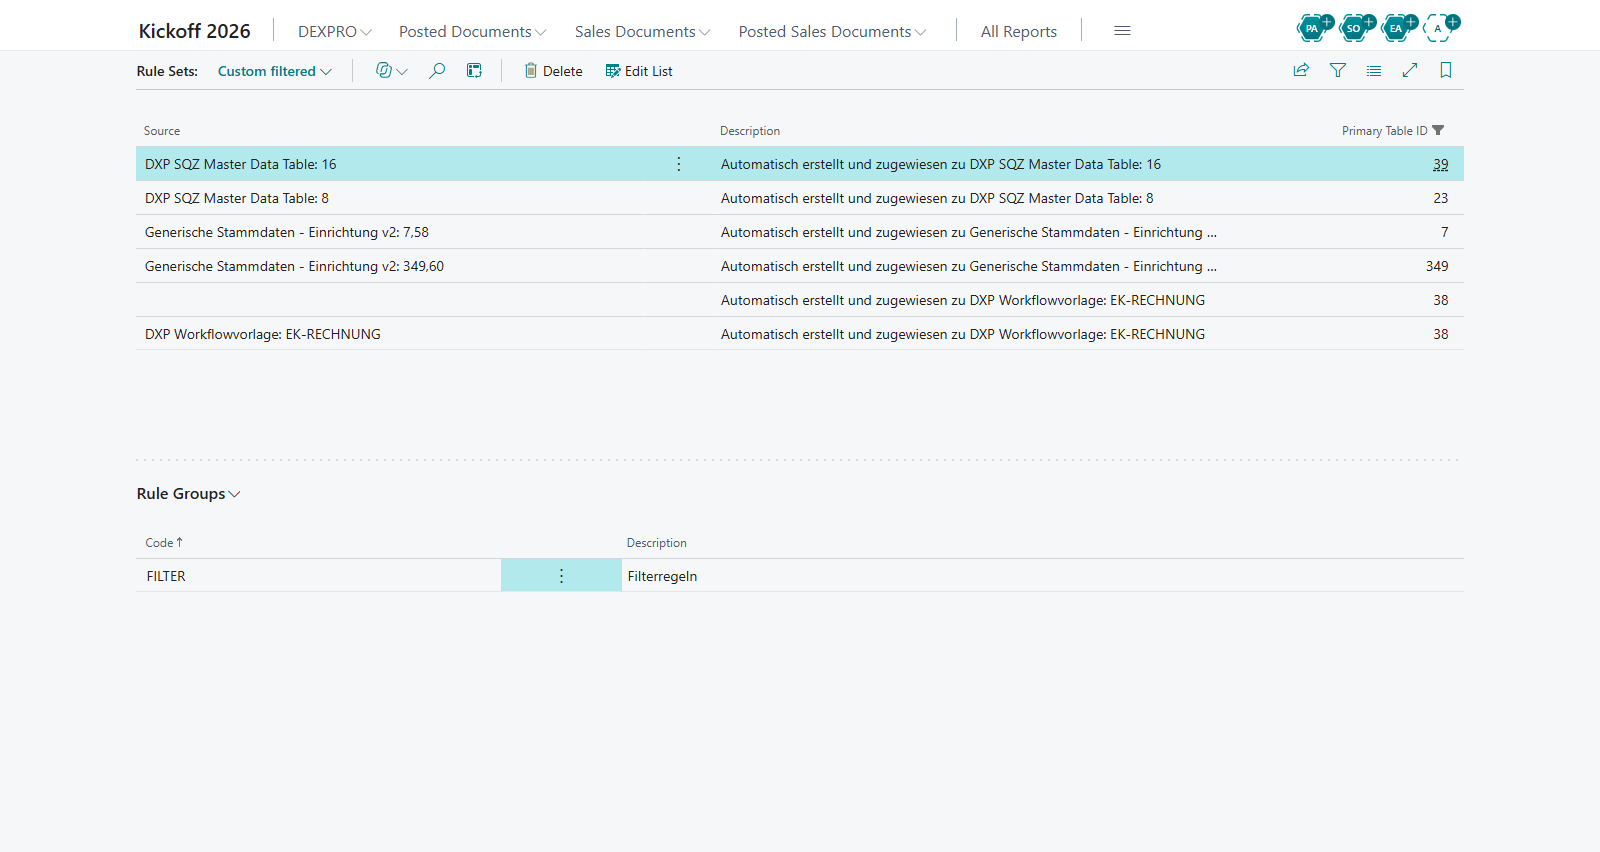
The Rule Sets list is where you create and manage the rule sets used by the Rule Engine. Each rule set targets one primary table, may reference related tables, and contains the rule groups that hold the individual rules.
Open it by searching for Rule Sets (it is listed under the Administration usage category).
Fields
- Code / Description — identify the rule set.
- Primary Table — the single main table the rule set evaluates.
- Related Tables — up to 50 additional tables the rules may reference.
Rule Groups
The rule set embeds its Rule Groups, which order and organize the rules that belong to the set. From a rule group you open the individual Rule Cards.
Usage
- Open Rule Sets and create a new rule set with a code and description.
- Set the Primary Table — the main table the rules evaluate. Only one primary table is allowed per rule set.
- Add any related tables the rules need to reference (up to 50).
- Add one or more Rule Groups to organize the rules.
- Open a rule group and add rules via the Rule Card.
A rule set may have only one primary table ("Only one primary table allowed per rule set") and at most 50 tables in total ("Maximum allowed: 50 tables").
Related features
- Rule Engine
- Rule Card
Rule Card
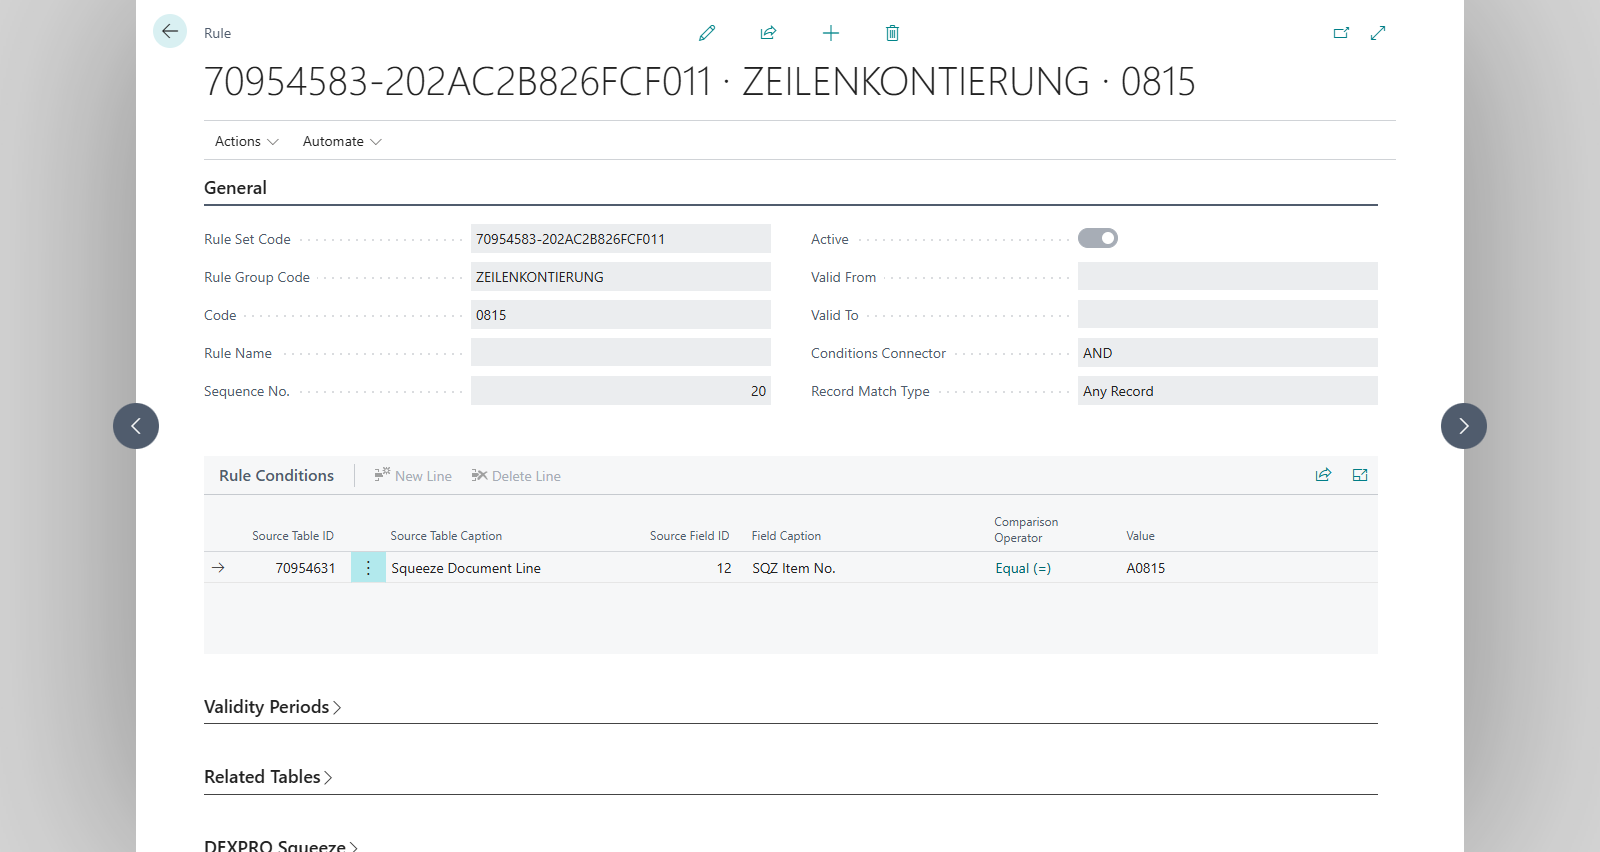
The Rule Card is where you define a single rule: its conditions, how those conditions are combined, when it is valid, and whether it is active. It belongs to a rule group within a rule set.
General
- Conditions Connector — how the rule's conditions are combined: AND (all must match) or OR (any may match).
- Record Match Type — Any Record (a match on any record satisfies the rule) or All Records (every record must match). The card shows this field only where it affects the rule: installed DEXPRO apps hide it for rules on which it has no effect, for example the rules of a SQUEEZE plausibility rule group.
- Valid From / Valid To — the validity dates that bound when the rule applies.
- Active — a toggle to enable or disable the rule without deleting it.
The Valid To date must not be earlier than the Valid From date.
Conditions
The Conditions subpage lists the individual comparisons that make up the rule. To add a condition:
- Select the field to test (from the primary or a related table).
- Choose a comparison operator (for example Equal, Contains, Between, In Set, RegEx).
- Enter a value, or, for the In Set operator, reference a reusable value set.
Only operators that are valid for the selected field's data type can be used; an operator that does not apply to the field type is rejected.
Validity Periods
The Validity Periods subpage lets you further restrict when the rule applies using weekday, time-of-day, and date windows — in addition to the Valid From / Valid To dates on the card.
Testing the rule
Use the interactive Rule Test page to evaluate the rule (and its rule set) against sample data and confirm it matches as expected before relying on it in production.
Usage
- From a rule group, create a new rule to open the Rule Card.
- Set the Conditions Connector and, if shown, the Record Match Type.
- Add conditions on the Conditions subpage.
- Optionally add Validity Periods and set the Valid From / Valid To dates.
- Set the rule Active and test it.
Related features
- Rule Engine
- Rule Sets
Document Creation Logs
The Document Creation Logs are diagnostic records that capture what happens during purchase document creation. They are written only when logging is enabled in Core Setup and are used to troubleshoot how a Core document became a Business Central record.
Purpose
When a purchase document is created from a Core document, several steps read the source data and build the record. If the result is not what you expect, these logs show the source JSON alongside the actual record JSON at each creation point, so you can pinpoint where a value came from or where it diverged.
Enabling logging
- Open Core Setup.
- Switch on Enable Logging.
- Re-run the document creation you want to diagnose so that logs are written.
Logging adds overhead and produces data at every creation point. Enable it only while investigating an issue, and switch it off again afterward.
Reading the logs
Open the Document Creation Logs list from Core Setup (Document Creation Logs action) or by searching for the page. Each entry corresponds to a creation point during document creation.
{add screenshot of Document Creation Logs here}
To compare the data, open the JSON Comparison view. It shows the source JSON (what the document provided) next to the record JSON (what was written to the Business Central record) so you can spot differences directly.
{add screenshot of JSON Comparison here}
Troubleshooting workflow
- Enable logging in Core Setup.
- Reproduce the document creation.
- Open Document Creation Logs and find the entries for that document.
- Use the JSON Comparison to check where a field value was set, changed, or missing.
- Adjust field mappings or rules as needed, then disable logging.
Related features
- Core Setup
- Field Mapping
- Core Documents
Role Center
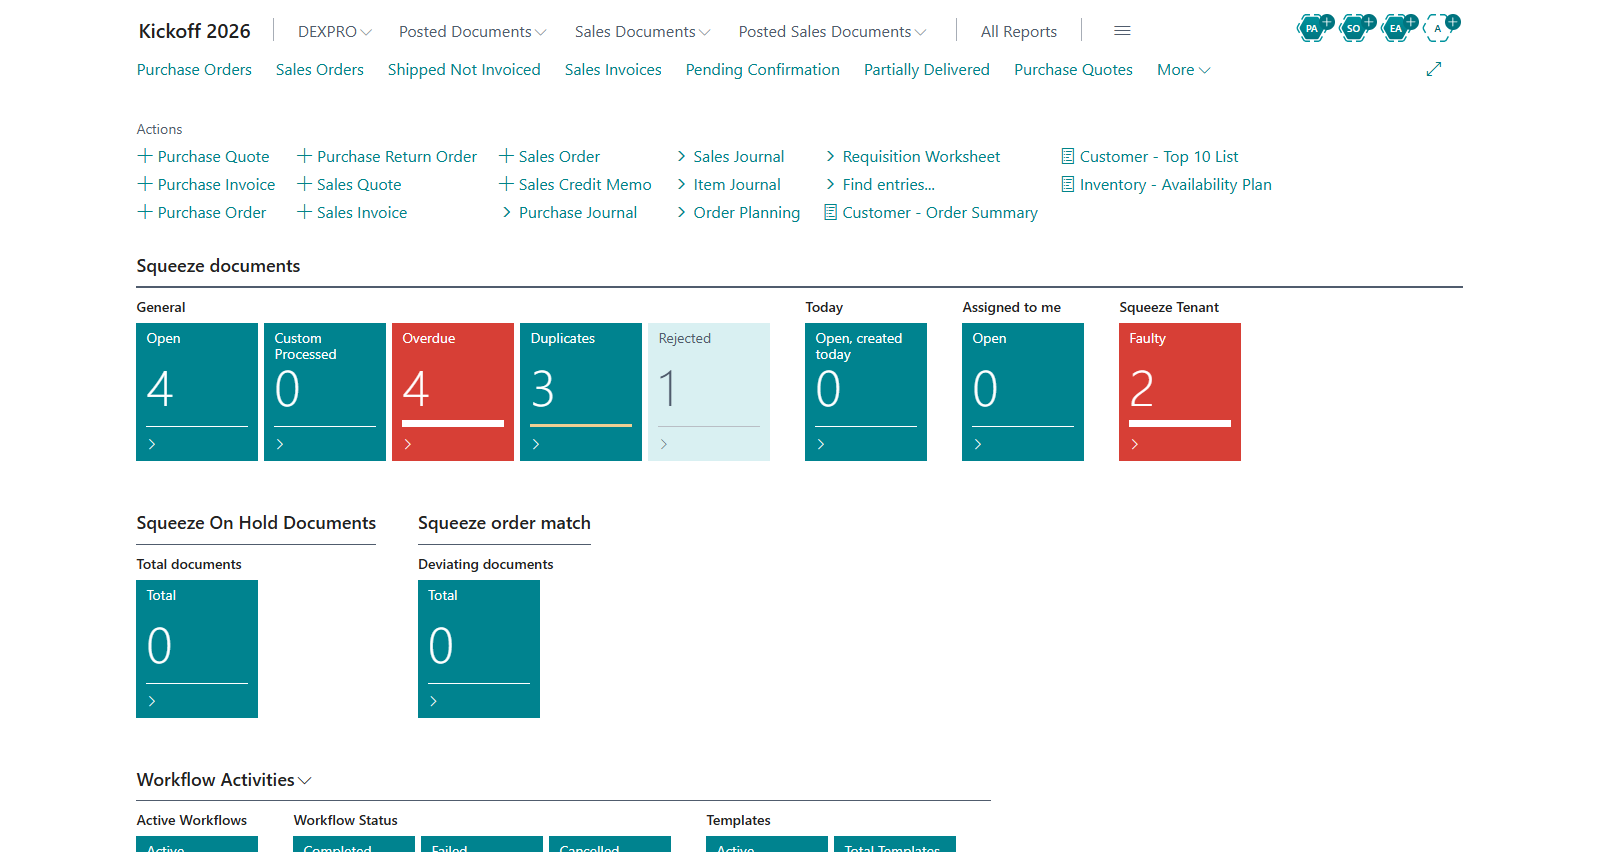
DEXPRO Core ships a dedicated Role Center for purchasing agents. It gives people who process incoming documents an at-a-glance overview through activity cues that drill down to Core Documents, plus quick links to the Core pages they use most.
The Purchasing Agent profile
The Role Center is delivered as the DEXPRO Purchasing Agent profile. Selecting this profile makes the DEXPRO Core Role Center the user's home page.
Activity cues
The Core Activities cues summarize the Core documents by status and let you drill down to the underlying list. The cues include:
- Open — documents still to be processed.
- Overdue — documents that are past due (highlighted for attention).
- Finished — documents whose processing is complete.
- Closed — documents that have been closed.
- Deleted — documents marked as deleted.
- Today — documents received today.
Choosing a cue opens the Core Documents list filtered to the matching documents.
DEXPRO section
The Role Center includes a DEXPRO section with direct links to:
- Core Documents
- Core Setup
Selecting the profile
- Choose the Settings (gear) icon and then My Settings.
- In the Role field, choose the assist button and select DEXPRO Purchasing Agent.
- Confirm. The DEXPRO Core Role Center becomes the home page.
An administrator can also assign this profile to users by default from the Profiles (Roles) page.
Related features
- Core Documents
- Core Setup
Cleanup and Job Queue
DEXPRO Core keeps the Core Documents list tidy with a recurring cleanup task that runs through the Business Central Job Queue. This page explains what the job does, how to (re)create it, and the permissions it needs.
The cleanup job
A recurring Job Queue Entry (Core Cleanup Tasks) is created automatically when Core Setup is initialized. It:
- runs every 720 minutes (twice a day),
- starts at 05:00, and
- deletes old Core documents whose status is Deleted, Closed, or Cancelled and that are older than the Cleanup Interval configured in Core Setup (default -1M, i.e. keep one month).
Each run deletes at most 50 documents. If more documents are eligible, the remaining ones are deleted in the following runs — with the default schedule of two runs a day, that is up to 100 documents per day.
The job's identifier is stored in the Cleanup Job GUID field on Core Setup.
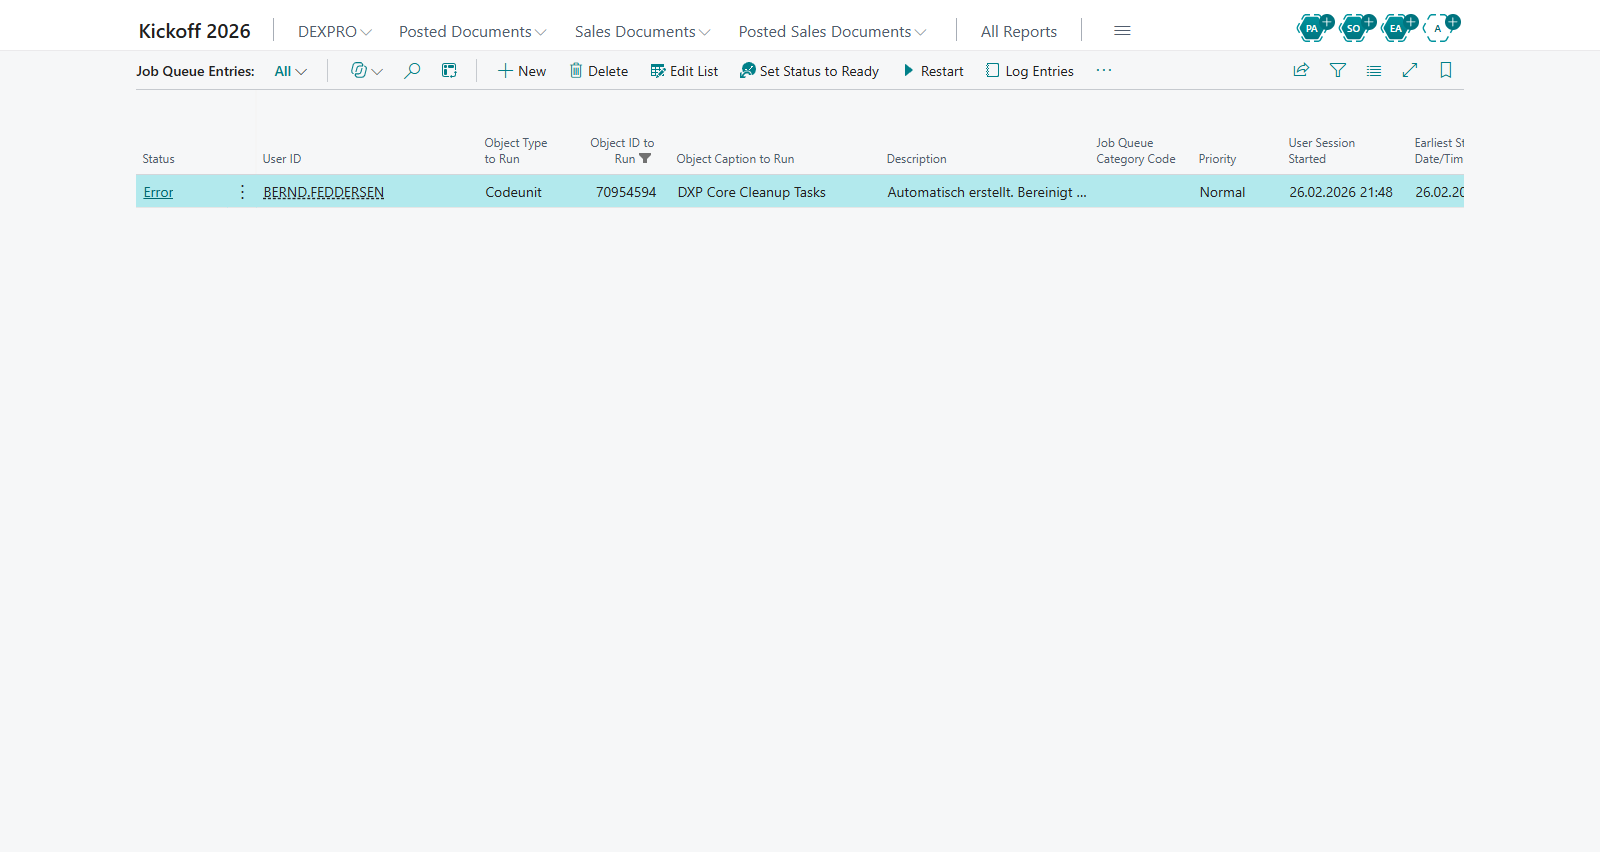
(Re)creating the job
If the job was removed, or if it was never created because of missing permissions, you can recreate it:
- Open Core Setup.
- Choose the Create Jobs action.
- Core creates the recurring cleanup Job Queue Entry with the schedule above.
Adjusting how long documents are kept
Change the Cleanup Interval DateFormula on Core Setup to keep documents for a different period. For example, -2M keeps two months of completed documents before they are eligible for deletion.
Permissions
Creating and running Job Queue Entries requires the standard Business Central Job Queue permissions, in addition to the DEXPRO Core permission set.
Troubleshooting
If the user initializing Core Setup lacks Job Queue permission, Core shows a message and does not create the cleanup job. Have an administrator with Job Queue permission open Core Setup and run Create Jobs.
Only documents in Deleted, Closed, or Cancelled status are removed. Documents in other statuses are never deleted by the cleanup job, regardless of age.
Related features
- Core Setup
- Core Documents
Extensibility
This page is for developers and partners who build on top of DEXPRO Core. It describes Core's extension surface: the interfaces you implement, the extensible enums you add values to, the integration events you subscribe to, and the public codeunit APIs you can call.
Interfaces
DXP ISource Document
Implemented per DXP Document Class enum value to describe how a source document of that class is turned into processed data. Methods:
- CreateProcessedJsonFromSource — build the processed JSON from the raw source.
- CreateSource — create the source representation.
- InitFieldMapping — initialize the field mapping for the class.
- IsSourceDataPlausible — validate that the source data is plausible before processing.
DXP IDocument Processing
Bound per DXP Target Document Process enum value to perform the actual processing. Method:
- ProcessStandardDocument — process the standard document for the target process.
Extensible enums
- DXP Document Class — the classification of an incoming document (default Unassigned).
- DXP Target Document Process — the target processing to run.
- DXP Next Process Step — the next step for a document class.
- DXP Document Status — the lifecycle status of a Core document.
Add your own values to these enums from a dependent app to introduce new document types, processes, steps, and statuses.
Integration events
Key events are published from DXP Document Mgt. and DXP Document Transfer Mgt.:
- OnAfter / OnBefore purchase header creation.
- OnAfter / OnBefore purchase line creation.
- Events around dimensions handling.
- Events around document release.
- OnResolveDocumentViewerUrl — partners supply a viewer URL for an attachment/document.
- OnBeforeLookupPageFromPlausibiltyEntry — influence the lookup page opened from a plausibility entry.
Subscribe to the OnBefore events to adjust or skip default behavior, and to the OnAfter events to enrich the created records (for example to populate custom fields not covered by field mapping).
Further extension points:
- DXP Copy Configuration Wizard (page) — OnAfterOpenWizard, OnHasAdditionalPartsSelected, OnAddAdditionalPartCaptions, OnCopyAdditionalPartsToCompany and OnAfterCopyAdditionalParts let a dependent app add its own configuration part to the Copy Configuration to Companies wizard. Add a selection field to the group SelectionFieldsGroup with a page extension, then use the events to reset the selection when the wizard opens, report that the part is selected, add its caption to the review summary, copy it to each target company and add a result line to the final step. SQUEEZE and Breeze Interface use these events for their own setup.
- DXP Rule Mgmt. — OnIsLineMatchTypeRelevant: set IsRelevant to false for rules on which Record Match Type has no effect; the Rule Card then hides the field for those rules.
Public codeunit APIs
- DXP Document Mgt. — add and update Core documents (AddDocument, UpdateDocument), move a Core document (MoveCoreDocument), and run duplicate checks.
- DXP Rule Engine — evaluate rule sets from your app.
- DXP Web Request Mgt. — shared HTTP client for outgoing calls (honors the HTTP Timeout in Core Setup).
- DXP OAuth2 Mgt. and DXP OpenID Mgt. — obtain tokens for configured OAuth 2.0 / OpenID Connect connections.
- DXP Master Data Mgt. — work with vendor master data.
- DXP Telemetry — the shared telemetry helper for logging feature usage and errors.
Typical extension pattern
- Add a value to DXP Document Class for your new document type and implement DXP ISource Document for it.
- Add a value to DXP Target Document Process and implement DXP IDocument Processing to process it.
- Configure the Next Process Step for the class in Document Class Setup.
- Subscribe to the relevant OnBefore/OnAfter events to customize record creation.
- Call the public codeunit APIs (Document Mgt., Rule Engine, Web Request Mgt., OAuth2/OpenID Mgt., Master Data Mgt., Telemetry) as needed.
Related features
- Document Class Setup
- Field Mapping
- Rule Engine
- OAuth 2.0 and OpenID Setup