eInvoice Sender for Microsoft Dynamics 365 BC - en-US
This documentation covers the essential functions for daily use of DEXPRO eInvoice Sender. For advanced configuration and technical details, refer to the expert setup options and contact support as needed.
- System Requirements
- Installation
- Configuration & Administration
- Application / Usage
- FAQ
- Document Status
- Artifacts (GoBD audit history)
- Validation Findings
- Rule Setup
- KoSIT Report
- The sending pipeline and Job Queue
- Live compliance check (FactBox)
- Payment method and unit of measure mapping
- Extensibility (developers)
System Requirements
System requirements for using eInvoice Sender for Dynamics 365 BC
Supported Microsoft Dynamics 365 Business Central versions
Microsoft Dynamics 365 Business Central integration is possible from the following version due to minimum technical requirements:
Supportet Microsoft Dynamics 365 Business Central Versions
The prerequisite for operation is that the respective Microsoft Dynamics 365 Business Central version is still in regular support. The extended support is excluded.
Supported Digivoice Versions
A licensed Digivoice system is required to use the eInvoice Sender in Microsoft Dynamics 365 Business Central and for operation.
License: Valid Digivoice License/Credentials
Installation
Licenses
Microsoft
Information about the Microsoft Business Central licenses.
DIGIVOICE
The DEXPRO Digivoice system that should be connected to Business Central requires a valid customer license.
Obtaining the DEXPRO module
Detailed Information are here.
OnPrem
For OnPrem installations, an runtime package with the required apps is provided upon request of a registered reseller / partner. These modules are added to the customer license by the partner and then imported into Microsoft Dynamics Business Central. It should be noted that the DEXPRO Core module forms the basis for all DEXPRO modules and must therefore be imported first.
Cloud
For cloud installations, you only need the Microsoft AppSource. This is where the required DEXPRO modules are downloaded.

Setup Wizard
This wizard guides the user step by step through the different facilities of the module.
Guided Setup Wizard
Step 1: Welcome
- Review the introduction
- Enable Expert Settings if you need advanced configuration options
Step 2: Basic Setup Information
Configure the fundamental settings for electronic invoicing:
- Base URL: Web service endpoint for document generation
- Access credentials: Authentication details
- Default settings: Standard configuration options
Step 3: Payment Information (if Expert Mode enabled)
- Configure payment method mappings
- Set up bank account details
- Define payment terms
Step 4: Validation Settings (if Expert Mode enabled)
- Configure document validation rules
- Set field validation patterns
- Define mandatory field requirements
Step 5: Final Review
- Review all settings
- Click Finish to complete setup
Manual Setup Options
Access additional setup through DEXPRO eInvoice Setup page:
Actions Available:
- Document Queue: View and manage pending documents
- Process Log: Review processing history and errors
- Customer Setup: Configure customer-specific settings
- Vendor Setup: Configure vendor-specific settings
Mappings Section:
- Payment Term Keywords: Map payment terms to XRechnung codes
- UoM Code Mappings: Map units of measure to international standards
Configuration & Administration
Permission sets
In order to use the modules, the appropriate authorization set must be assigned to the respective users.
The following are supplied with:
-
DXP Core Admin - DEXPRO Core Administrator
-
DXP Core User - DEXPRO Core User
- DXP eInvoice Admin - DEXPRO eInvoice Administrator
- DXP eInvoice User - DEXPRO eInvoice User
- DXP eInvoice Support - DEXPRO eInvoice Support (read-only access to every eInvoice table, including artifact bytes and logs, plus Execute; intended for support and audit diagnosis with no write access)
DEXPRO Core
The DEXPRO Core manages the individual DEXPRO apps and their documents per client.
All documents that have been entered and processed via the various DEXPRO modules in Microsoft Dynamics 365 Business Central are displayed. A global number series, which is used across all DEXPRO apps, is used to complete individual documents. This offers the advantage that users only have to work with one number series per document.
Further information can be found here.
eInvoice Sender Setup
In the eInvoice Sender setup, both the connection to the DIGIvoice system and the processing within the app are set up.
Menue
Download Configuration
This is used to download the configuration and structure of the e-invoice documents.
Related
Document Queue
You can access the document queue via this menu item.
Process Log
You can access the process log of transactions with Digivoice via this menu item.
Customer Setup
You can access the customer-specific setup via this menu item.
Vendor Setup
You can access the vendor-specific setup via this menu item.
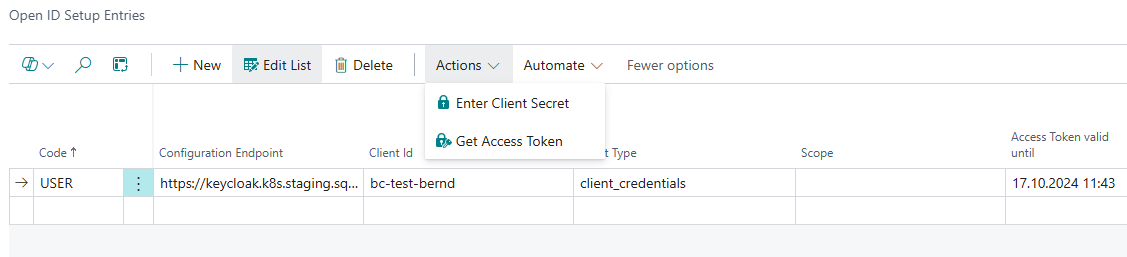
OAuth 2.0 Setup
This menu item takes you to the OAuth 2.0 setup for authentication on the Digivoice system.
Mappings
- Payment Term Keywords
- Unit of Measure Codes
- XR Field Structure
General
In this FastTab, you can activate/deactivate the use of this app and set up the connection to the Digivoice system.

Export Settings
The standards for the export are saved here.

XRechnung 3.0 defaults
The export defaults ship pre-configured for the current XRechnung 3.0 standard. The Business Process Type and Specification Identifier are the two profile fields that identify the e-invoice standard against which each document is generated:
- Business Process Type - default urn:fdc:peppol.eu:2017:poacc:billing:01:1.0.
- Specification Identifier - default urn:cen.eu:en16931:2017#compliant#urn:xeinkauf.de:kosit:xrechnung_3.0 (the XRechnung 3.0 CIUS identifier).
These defaults ensure generated documents declare conformance to XRechnung 3.0. Only change them if you are targeting a different profile and you understand the downstream validation impact.
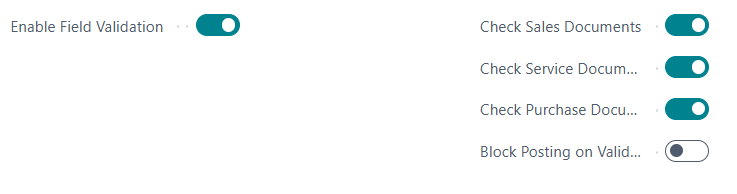
eInvoice Compliance Check
Here you will find the settings for the compliance check.
Document Queue
Here you can specify how long the entries are to be kept.

Expert Settings
The Show Expert Settings toggle hides advanced, low-level configuration by default. It is a UI-only switch (it is not stored in the setup). When you enable it, the following additional groups become visible on the setup page:
- XRechnung - profile identifiers and XRechnung-specific export defaults (see XRechnung 3.0 defaults above).
- XML Validation - settings controlling schema/schematron validation of the generated XML.
- Validation Patterns - the regular-expression patterns used by the compliance rules.
- Object Schemas - the schema definitions describing the document object structure.
Leave Expert Settings switched off during normal operation. These groups define how documents are built and validated - incorrect changes can cause generation or validation to fail.
The behaviour of individual compliance rules (enable/disable, severity override, category and stage) is configured separately - see the Rule Setup page.
Customer and Vendor Setup
Customer-Specific Settings
Access via DEXPRO eInvoice Setup → Customer Setup
Configuration Options:
- Override Email: Use different email than default
- Automatic Processing: Enable/disable automatic document sending
- Sending Profile: Default format for this customer
- Buyer Reference: Customer-specific reference requirements
Vendor-Specific Settings
Similar configuration available for vendors for purchase credit memos.
Email Templates
The system uses Word-based email templates:
Available Templates:
- SalesInvoiceEmail.docx: Sales invoice emails
- SalesCreditMemoEmail.docx: Sales credit memo emails
- ServiceInvoiceEmail.docx: Service invoice emails
- PurchaseCreditMemoEmail.docx: Purchase credit memo emails
Template Features:
- Professional formatting
- Dynamic content insertion
- Company branding
- Multi-language support
OAuth 2.0 Setup
The OAuth 2.0 / Open Id users and their access tokens are managed here.
Application / Usage
Working with Electronic Invoices
Sales Documents
Sales Orders and Invoices
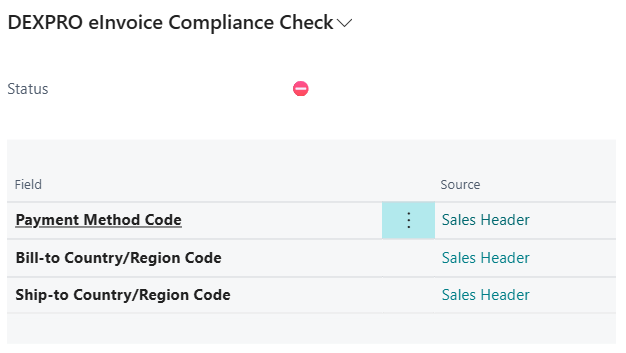
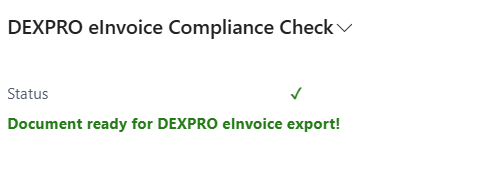
Sales documents such as orders and invoices now have a fact box for the e-invoice conformity check. This informs the user of the following:
- Required fields that are empty
- Validation warnings
- Compliance status
Common Missing Fields:
- Customer VAT registration numbers
- Complete billing addresses
- Valid email addresses
- Payment method codes
Posted Sales Invoices
In the Posted Sales Invoices list, you'll see:
New Fields:
- DXP eInvoice Document Sent: Shows if electronic document was sent
New Actions:

- Download DEXPRO eInvoice: Download electronic document
- Email DEXPRO eInvoice: Send electronic document via email
Posted Sales Credit Memos
Similar functionality available in Posted Sales Credit Memos:
- Document status tracking
- Download and email actions
Service Invoices
Electronic invoicing is also available for Service Invoices with the same functionality.
Document Types and Formats
When downloading or emailing documents, you can choose from:

- XRechnung XML: Pure XML format compliant with German standards
- ZUGFeRD PDF: Hybrid PDF with embedded XML data
- XRechnung XML and Standard PDF: Both formats in a ZIP file
Sending Documents
Manual Sending
- Open any posted sales document
- Click Email DEXPRO eInvoice
- Select the desired format
- System automatically:
- Generates the electronic document
- Creates email with appropriate template
- Sends to customer's email address
Automatic Processing
The system can automatically process documents through the Document Queue:
- Documents are queued when posted
- Background processing generates and sends electronic documents
- Status tracking shows processing progress
Document Management
Document Queue
Access via DEXPRO eInvoice Setup → Document Queue

Columns Displayed:
- Entry No.: Unique identifier
- Document Type: Type of document (Invoice, Credit Memo, etc.)
- Document No.: Business Central document number
- Customer/Vendor No.: Trading partner
- Status: Current processing status
- Created Date Time: When queued
- Sending Profile: Format to be generated
Actions Available:
- Process: Manually trigger processing
- Reset Status: Reset failed items
- Delete: Remove from queue
Process Log
Monitor all system activities via DEXPRO eInvoice Setup → Process Log
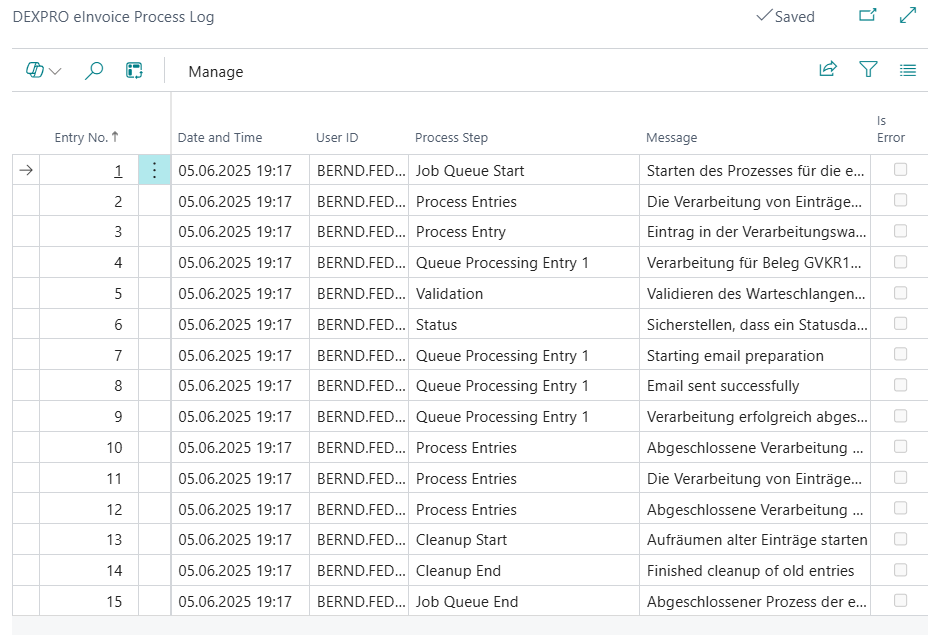
Information Tracked:
- Processing timestamps
- Success/failure status
- Error messages
- Document details
FAQ
Here you will find questions and answers to various scenarios.
Troubleshooting
Common Issues
Document Not Generating
Check:
- All required fields are completed (use Missing Fields Factbox)
- Customer has valid email address
- VAT setup is correct
- Connection to web service is working
Email Not Sending
Check:
- Email setup in Business Central
- Customer email address validity
- SMTP configuration
- Process log for error details
Validation Errors
Common causes:
- Missing VAT registration numbers
- Invalid GLN codes
- Incomplete address information
- Unsupported payment methods
Error Resolution
Process Log Analysis
- Open Process Log from setup page
- Filter by date range or document number
- Review error messages
- Check Context field for specific issues
Document Queue Management
- Open Document Queue
- Identify failed items (status indicators)
- Use Reset Status to retry processing
- Check document data before reprocessing
Getting Help
Built-in Guidance
- ToolTips: Hover over fields for explanations
- Missing Fields Factbox: Shows validation issues
- Process Log: Detailed error information
Support Resources
- Check field validation messages
- Review process log entries
- Verify setup configuration
- Contact DEXPRO Solutions GmbH for technical support
Best Practices
- Complete Setup First: Run guided setup completely before processing documents
- Test with Sample Data: Process test documents before going live
- Monitor Process Log: Regularly check for processing issues
- Maintain Customer Data: Keep email addresses and VAT numbers current
- Review Document Queue: Monitor automatic processing status
Document Status
The Document Status page (DXP eInv Document Status) shows the live processing state of every document that has been picked up by the eInvoice Sender. Each row is one queued document and reflects where that document currently stands in the sending pipeline, together with any error that occurred and where the finished e-invoice was sent.
{add screenshot of Document Status here}
Per-entry information
- Status - the current processing state of the entry (see the lifecycle below).
- Processing DateTime - when the entry was last processed.
- Sent To - the recipient e-mail address the released e-invoice was transmitted to, once transmission has completed (resolved from the override e-mail, the document e-mail, or the customer/vendor card).
- Error Message - the last error reported for the entry. Populated when the status is Error or Failed; empty otherwise.
Status lifecycle
An entry moves through the following states as the pipeline processes it:
- Pending - queued and waiting to be picked up by the Job Queue.
- Processing - currently being worked on by the pipeline.
- Validated - the source data, business and invoice-model validations have passed.
- Generated - the e-invoice artifact (XML/PDF) has been generated.
- Sent - the e-invoice has been released and transmitted to the recipient.
- Error - processing stopped on a recoverable error; the entry will be retried according to the backoff schedule.
- Failed - the entry has exhausted its retries (or hit a permanent/authentication error) and has been moved to the dead-letter state. It will not be retried automatically and requires manual intervention.
Validated and Generated are intermediate milestones within a single run. A healthy document typically progresses Pending → Processing → Validated → Generated → Sent.
Actions
- Reset Status - resets an entry that is stuck in Processing back to Pending (it can only be used from Processing). It does not clear the retry counter - use Re-queue for that.
- Re-queue - moves an Error or Failed entry back to Pending, clears the retry counter, clears the error, and shows a confirmation notification so the entry is processed again on the next Job Queue run. Use this after you have corrected the underlying data problem.
- Download Diagnostic Bundle - collects the status, retry state, artifact metadata (hashes, not content) and recent process-log rows into a text file for troubleshooting.
- View Process Log - opens the process log for the entry, showing the step-by-step trace of the exchange with the Digivoice system.
- View Validation Findings - opens the persisted Validation Findings from the last validation run.
- Show KoSIT Report / Download KoSIT Report - opens the official KoSIT report in the viewer, or downloads it as a file.
A Failed entry is a dead-letter - it stays put until someone fixes the cause and uses Re-queue. Failed entries are never picked up again on their own.
Artifacts (GoBD audit history)
The Artifacts page (DXP eInv Artifacts) is the immutable audit history of every e-invoice the app has generated. Each row records one generated artifact together with the exact inputs, validation verdict and cryptographic hashes that prove what was produced and sent. The page is designed to satisfy German GoBD requirements for the traceable, unalterable retention of business documents.
{add screenshot of Artifacts here}
Fields
- Format - the sending profile the artifact was generated for (XRechnung, ZUGFeRD, ...).
- Status - the lifecycle state of the artifact: Created, KoSIT-Validated, Released, Transmitted.
- Artifact Hash - the SHA-256 hash of the stored e-invoice bytes.
- Payload Hash - the SHA-256 hash of the JSON payload (hidden by default).
- KoSIT Passed - the KoSIT validator verdict as a pass/fail flag (only meaningful once the status is KoSIT-Validated or later).
- Validator Config Version - the version of the KoSIT validator configuration used, so the verdict can be reproduced later.
- Generated At / Released At / Transmitted At - the timestamps for each milestone.
- Superseded By - if a later artifact replaced this one, a reference to the newer artifact.
Immutability and GoBD relevance
Once an artifact reaches the Released state it becomes immutable - its content, hashes and verdict can no longer change. If a document has to be re-issued, a new artifact is created and the old one is marked with Superseded By, preserving the full chain rather than overwriting history.
The SHA-256 hashes of both the source payload and the generated artifact let you prove after the fact that a stored e-invoice is byte-for-byte the one that was validated and transmitted. Together with the validator config version and the milestone timestamps, this gives the complete, tamper-evident audit trail GoBD expects.
Actions
- Download E-Invoice - downloads the generated e-invoice artifact.
- Download Payload - downloads the source payload the artifact was built from.
- Show KoSIT Report / Download KoSIT Report - opens the official KoSIT report in the viewer, or downloads it as a file.
- View Source Document - navigates to the posted source business document (invoice, credit memo) the artifact was generated from.
Validation Findings
The Validation Findings page (DXP eInv Validation Result) shows the read-only, persisted findings of the last validation run for a document. Whenever the pipeline (or the live compliance check) validates a document, every rule that reported something is stored here so it can be reviewed after the fact - you are looking at the recorded result, not running the validation again.
{add screenshot of Validation Findings here}
Fields
- Rule Id - the identifier of the rule that produced the finding (for example an official BR-CO / BR-DE rule or an app-specific VAL-* rule).
- Severity - Error, Warning or Information. Errors block generation and transmission; warnings and information do not.
- Field Caption - the caption of the field the finding relates to, so you know exactly what to look at.
- How to Fix - a short, actionable hint describing the problem and how to resolve it in Business Central.
The stage a rule runs in (Source Data, Business Validation or Invoice Model) is configured on the Rule Setup page rather than shown as a column here.
Drilldown
Each finding can be drilled into to open the related record - the source document or the specific record that carries the offending value - so you can correct the data directly from the finding.
These findings are persisted from the last run. After you fix the data, re-run validation (or re-queue the document from the Document Status page) to refresh them.
Rule Setup
The Rule Setup page (DXP eInv Rule Setup) is where each individual compliance rule is configured. The app ships with a full rule catalog, and this page lets you tailor how each rule behaves - whether it runs, how severe its findings are, and how it is categorised - without touching the underlying implementation.
{add screenshot of Rule Setup here}
Per-rule configuration
- Enabled - switches the rule on or off.
- Severity Override - overrides the rule's default severity (Error, Warning or Information). Error findings block generation and transmission; Warning and Information do not.
- Category - the grouping the rule belongs to, used to organise the catalog.
- Stage - the stage the rule runs in: Source Data Validation, Business Validation or Invoice Model Validation. Source Data and Business Validation run live on unposted documents; Invoice Model runs in the sending pipeline.
- Description - a human-readable description of what the rule checks.
The rule list is seeded automatically the first time the page is opened, so every catalog rule appears with its default settings ready to adjust.
The rule catalog
The catalog combines two kinds of rules:
- Official rules - the standardised BR-CO and BR-DE business rules from the EN 16931 / XRechnung specification.
- App-specific rules - additional VAL-* rules provided by the app to catch data problems earlier and more precisely.
Rules are spread across the three stages so problems surface as early as possible: SourceData checks the raw document data, BusinessValidation checks business-level constraints, and InvoiceModel checks the assembled invoice model just before generation.
Blocking-Mandatory rules
A subset of the official rules are Blocking-Mandatory - notably the BR-CO arithmetic identities that guarantee the invoice totals add up correctly. These rules cannot simply be switched off.
Setting Enabled to No on such a rule is not enough on its own - the rule stays effectively active until a compliance override is confirmed. Confirming the override stamps the user and the date/time on the rule row; clearing it removes that stamp and the rule becomes effectively active again.
This is a deliberate safeguard: turning off a BR-CO arithmetic-identity rule produces documents that may fail KoSIT validation and may not be legally compliant, so the decision is recorded (who confirmed it and when) to keep it auditable. Do not disable these rules unless you fully understand the consequences.
KoSIT Report
The KoSIT Report viewer (DXP eInv KoSIT Report Viewer) displays the official KoSIT Pruefbericht (validation report) for a generated e-invoice directly inside Business Central.
What is KoSIT?
KoSIT (Koordinierungsstelle fuer IT-Standards) is the German public-sector body responsible for the XRechnung standard. It publishes the official validator that checks whether an e-invoice conforms to XRechnung. When the app pre-validates a document, it runs it against this official validator; the validator returns a Pruefbericht - the authoritative validation report describing exactly which rules passed and which failed.
The viewer
The KoSIT report is produced as an HTML document. The viewer renders that HTML in a WebPageViewer control so you can read the official report - with all its formatting, rule references and pass/fail detail - without leaving Business Central.
{add screenshot of KoSIT Report here}
Action
- Download Report - saves the KoSIT report to a file so it can be archived or forwarded (for example as evidence of validation).
You can open the KoSIT report for an entry from the Document Status page or from the Artifacts page via Show KoSIT Report.
The sending pipeline and Job Queue
Every e-invoice the app produces is processed by a fixed, seven-stage pipeline. Documents are enqueued automatically when they are posted, and a recurring Job Queue entry works through the queue in the background. This page explains the stages, when documents are enqueued, and how retries and dead-lettering work.
The seven stages
- Stage 1 - Source-data validation: the raw document data is validated (SourceData rules).
- Stage 2 - Business validation: business-level constraints are validated (BusinessValidation rules).
- Stage 3 - Invoice-model validation: the assembled invoice model is validated (InvoiceModel rules).
- Stage 4 - Serialize & persist artifact: the validated payload is serialized and persisted as an immutable artifact.
- Stage 5 - Generate XML/PDF: the e-invoice XML (and PDF) is generated via the Digivoice API.
- Stage 6 - KoSIT pre-validation: when Enable XML Validation is switched on in the setup, the generated document is checked against the official KoSIT validator before it leaves the system. A KoSIT rejection is a permanent failure.
- Stage 7 - Release & transmit: the artifact is released (becoming immutable) and the e-invoice is transmitted to the recipient by e-mail.
Documents that are enqueued only to be attached to the posted document or e-mail (rather than auto-sent) stop after generation at status Generated - they are not transmitted in stage 7.
Stages 1-3 must all pass before generation. If any Error-severity finding is raised, the document does not proceed - review the Validation Findings and correct the data.
When are documents enqueued?
A document is enqueued automatically at posting time for the following document types:
- Sales Invoice and Sales Credit Memo
- Service Invoice and Service Credit Memo
- Purchase Credit Memo
The recurring Job Queue
Processing is driven by a recurring Job Queue entry:
- Category: DXPEINV
- Schedule: Monday to Friday, 08:00-18:00
- Frequency: every 30 minutes
On each run the Job Queue picks up all Pending entries and moves them through the pipeline.
Retry, backoff and dead-lettering
If a stage fails with a recoverable error, the entry goes to Error and is retried on a rising backoff schedule with added jitter to avoid bunching:
- Attempt delays: 5 minutes → 15 minutes → 1 hour → 6 hours → 24 hours, plus a small deterministic jitter (up to 59 seconds, derived from the entry number) so retries do not all fire at the same instant.
- Max Attempts: default 5. When attempts are exhausted, the entry is moved to Failed (dead-letter).
Permanent errors and authentication failures do not wait for retries - they dead-letter immediately. A dead-lettered (Failed) entry is never picked up again automatically; fix the cause and use Re-queue on the Document Status page to reset the attempt counter and return it to Pending.
Live compliance check (FactBox)
The eInvoice Compliance Check FactBox gives you live e-invoice validation feedback while you are still editing an unposted document. It runs the same compliance rules the sending pipeline uses, so problems are caught before posting rather than after - when they are much cheaper to fix.
{add screenshot of Live compliance check (FactBox) here}
Where it appears
The FactBox is shown on unposted sales documents (quote, order, invoice, credit memo), service documents (order, invoice, credit memo) and the purchase credit memo. It re-evaluates as you change the document and displays the current per-document findings.
What it shows
- A green checkmark with "Document ready for DEXPRO eInvoice export!" when the document currently passes all compliance rules.
- A blocked indicator with a list of findings when it does not - each row showing the field name, severity and rule id.
Each finding can be drilled into to jump straight to the exact field that needs attention, so you do not have to hunt for the offending value.
Turning the check on or off
The live check is enabled by the master Enable Field Validation switch in the eInvoice setup, and then controlled per document area by three toggles:
- Check Sales Documents
- Check Service Documents
- Check Purchase Documents
Disable a toggle if you do not want the FactBox to evaluate documents in that area.
Block Posting on Error
When Block Posting on Error is enabled, the compliance findings are enforced at posting time, not just displayed. Each Error-severity finding is raised as a collectible ErrorInfo, so the user sees all blocking problems at once rather than one at a time. Every ErrorInfo carries two actions:
With Block Posting on Error enabled, a document with any Error-severity finding cannot be posted until the findings are resolved. Warning and Information findings are shown but do not block posting.
Payment method and unit of measure mapping
An e-invoice has to express payment details and quantities using standardised, internationally recognised codes rather than the free-text values used inside Business Central. This page describes the two mapping lists that perform that translation, plus the routing field that identifies the recipient.
Payment Method mapping
Each Business Central Payment Method is mapped to an eInvoice Payment Type (the standardised payment-means code required by the e-invoice format). When a document is exported, the app looks up the document's payment method and writes the mapped payment type into the e-invoice.
{add screenshot of Payment method and unit of measure mapping here}
- Payment Method - the Business Central payment method code (the eInvoice Payment Type field is added directly to the standard Payment Methods list).
- eInvoice Payment Type - the standardised payment-means code the method maps to. The available values are None, Cash Payment, Check Payment, Card Payment, Direct Debit and Bank Transfer (aligned with the UNTDID 4461 payment-means codes).
International UoM Codes
The International UoM Codes list maps Business Central units of measure to the internationally standardised unit-of-measure codes required in the e-invoice. Every quantity written to an e-invoice must reference one of these standard codes, so ensure the units of measure used on your invoiced items are represented here. On the standard Units of Measure page an Auto-Detect Standard Codes action helps assign the international code, and the International Standard Code field offers a lookup into this list.
E-Invoice Routing No.
The routing field is available on both the Customer and Vendor cards. It holds the recipient's routing identifier (for example the Leitweg-ID used by German public-sector recipients) that tells the receiving platform where to deliver the e-invoice. On the customer it is captioned E-Invoice Routing No.; on the vendor it is captioned Buyer Reference (E-Invoice Routing No.).
Complete these mappings before going live. A missing payment-type or UoM-code mapping, or a missing routing number, will surface as a compliance finding and can block generation or transmission.
Extensibility (developers)
The eInvoice Sender is built around a small set of AL interfaces so that partners and customers can extend it - add support for new document types, plug in a different reader, or add their own validation rules - without modifying the base app. This page is aimed at developers.
Interface 1 - DXP eInv Doc Exporter
Implement DXP eInv Doc Exporter to build the export payload for a given document type. It has a single method, CreateDocument(DocHeader: Variant): JsonObject - turning one kind of Business Central document into the JSON payload the pipeline serializes and sends to generation.
Implementations are bound through the extensible Export Document enum: add a value for your document type and point it at your implementing codeunit. The pipeline selects the exporter by resolving this enum, so registering a new exporter is a matter of extending it.
Interface 2 - DXP eInv Doc Reader V2
Implement DXP eInv Doc Reader V2 to provide a reader over the CIM (common information model) representation of a document - its ReadDocument method fills the CIM buffers (document, party, line, allowance/charge, payment, attachment) so rules and generation can consume the data uniformly.
The Export Document enum binds both interfaces: each enum value points at an exporter and a reader for that document type. When you add a new document type you provide both.
Interface 3 - DXP eInv IValidation Rule
Implement DXP eInv IValidation Rule to add validation rules. It has two methods: Evaluate (runs the check and appends findings) and GetMetadata (returns the rule's category, default severity, stage, description and fix hint - which is what seeds Rule Setup). A single codeunit can dispatch on the rule id and serve many rules, keeping within the object-ID budget.
Rules are bound through the extensible Validation Rule enum, which provides a dedicated CUSTOM extension point for customer- and partner-supplied rules. Add an enum value bound to your implementing codeunit, and the rule participates in validation like any built-in rule - it appears in Rule Setup where its Enabled flag, severity override and stage can be configured.
The OnCollectValidationRules event
The app publishes the OnCollectValidationRules integration event. Subscribe to it to register your rule implementations with the validation engine at runtime. This is the hook that lets an extending app contribute rules into the collection the pipeline and the live compliance check both use.
Together these three interfaces plus the integration event cover the main extension scenarios: new document type (Doc Exporter + Export Document enum), custom model reading (Doc Reader V2), and custom validation (IValidation Rule + Validation Rule enum, registered via OnCollectValidationRules).