Squeeze for Dynamics 365 BC - en-US
Manual for the administration and use of SQUEEZE for Microsoft Dynamics 365 Business
Central.
SQUEEZE is a multi-client software solution for document classification and
Content extraction. It is a fully web-based system for processing electronic documents, with a significant focus on the recognition and extraction of incoming documents in the B2B sector.
- System Requirements
- Installation
- Configuration & Administration
- Permission sets
- DEXPRO Core
- SQUEEZE Setup
- Document Classes Setup
- Vendor Related Setup
- Account Assignment Setup
- Field Mapping
- Custom Field Mapping
- User specific setup
- Squeeze Master Data Tables
- SQUEEZE
- Role Center Activities
- Validation
- SQUEEZE Document Overview
- Cross Company Document Overview
- Import Queue Entries
- SQUEEZE Document Validation
- Vendor-specific Training
- Document Split
- Order & Goods Receipt Reconciliation
- Import Order / Goods Receipt Lines
- External Viewer
- Upload Documents
- SQUEEZE Queue
- Viewer in Target Document
- Plausibility Checks
- Order Confirmations
- Extension Development
- Modify Squeeze origin attachment
- Alternative use of the SQUEEZE attachments
- Adjustment of attachment file names after validation
- Adding a field in the validation (from version 2.10)
- Implementation of a user-defined, automatic order reconciliation
- Implementation of a new, generic document class
- Custom Document Creation (Custom Processing)
- Embedding the SQUEEZE Viewer part in your own pages WIP
- FAQ
System Requirements
System requirements for using SQUEEZE for Dynamics 365 BC
Supported Microsoft Dynamics 365 Business Central versions
Microsoft Dynamics 365 Business Central integration is possible from the following version due to minimum technical requirements:
Supportet Microsoft Dynamics 365 Business Central Versions
The prerequisite for operation is that the respective Microsoft Dynamics 365 Business Central version is still in regular support. The extended support is excluded.
Supported SQUEEZE versions
The integration of SQUEEZE in Microsoft Dynamics 365 Business Central requires a licensed SQUEEZE system from version 2.10.0 for operation.
Installation
Licenses
Microsoft
Information about the Microsoft Business Central licenses.
SQUEEZE
The DEXPRO SQUEEZE system that should be connected to Business Central requires a valid customer license.
Obtaining the DEXPRO module
Detailed Information are here.
OnPrem
For OnPrem installations, an runtime package with the required apps is provided upon request of a registered reseller / partner. These modules are added to the customer license by the partner and then imported into Microsoft Dynamics Business Central. It should be noted that the DEXPRO Core module forms the basis for all DEXPRO modules and must therefore be imported first.
Cloud
For cloud installations, you only need the Microsoft AppSource. This is where the required DEXPRO modules are downloaded.
![]()
Setup Wizard
When the SQUEEZE setup is opened for the first time, you will be greeted by the SQUEEZE setup wizard.
This wizard guides the user step by step through the different facilities of the module.
Start
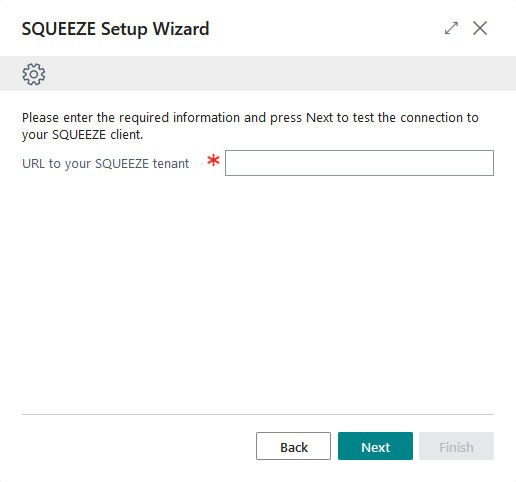
Selection SQUEEZE system
In this step the URL of the SQUEEZE system is stored.
Example: https://demo.msbc.squeeze.one
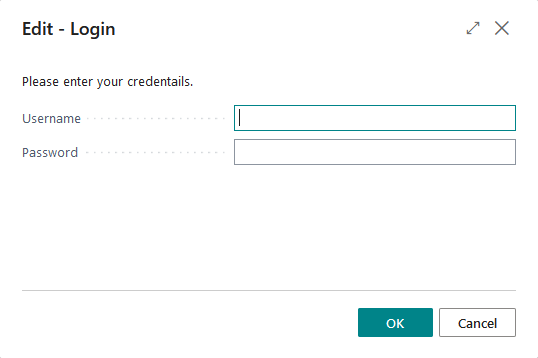
Login to the SQUEEZE system
In this step, you enter the user name and password of a valid SQUEEZE user with the Admin role. This data is only used once for the setup. Subsequently, the login to the SQUEEZE system takes place via API key.
Number series for the SQUEEZE documents
In this step you select number series for the Core documents and the SQUEEZE documents. If none exists yet, you can also create a new entry via the number series selection.
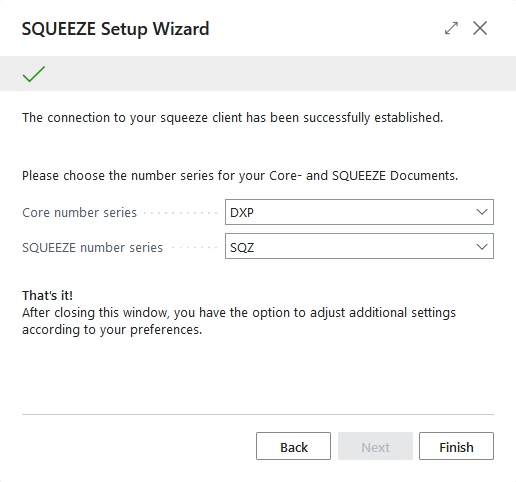
Conclusion
By clicking on "Finish" you end the setup wizard. Subsequently, the SQUEEZE setup opened. Further configuration options are described here.
Configuration & Administration
Permission sets
In order to use the modules, the appropriate authorization set must be assigned to the respective users.
The following are supplied with:
-
DXP Core Admin - DEXPRO Core Administrator
-
DXP Core User - DEXPRO Core User
- DXP SQUEEZE Admin - DEXPRO SQUEEZE Administrator
- DXP SQUEEZE User - DEXPRO SQUEEZE User

DEXPRO Core
The DEXPRO Core manages the individual DEXPRO apps and their documents per client.
All documents that have been entered and processed via the various DEXPRO modules in Microsoft Dynamics 365 Business Central are displayed. A global number series, which is used across all DEXPRO apps, is used to track individual documents. This offers the advantage that users only have to work with one number series per document.
Further information can be found here.
SQUEEZE Setup
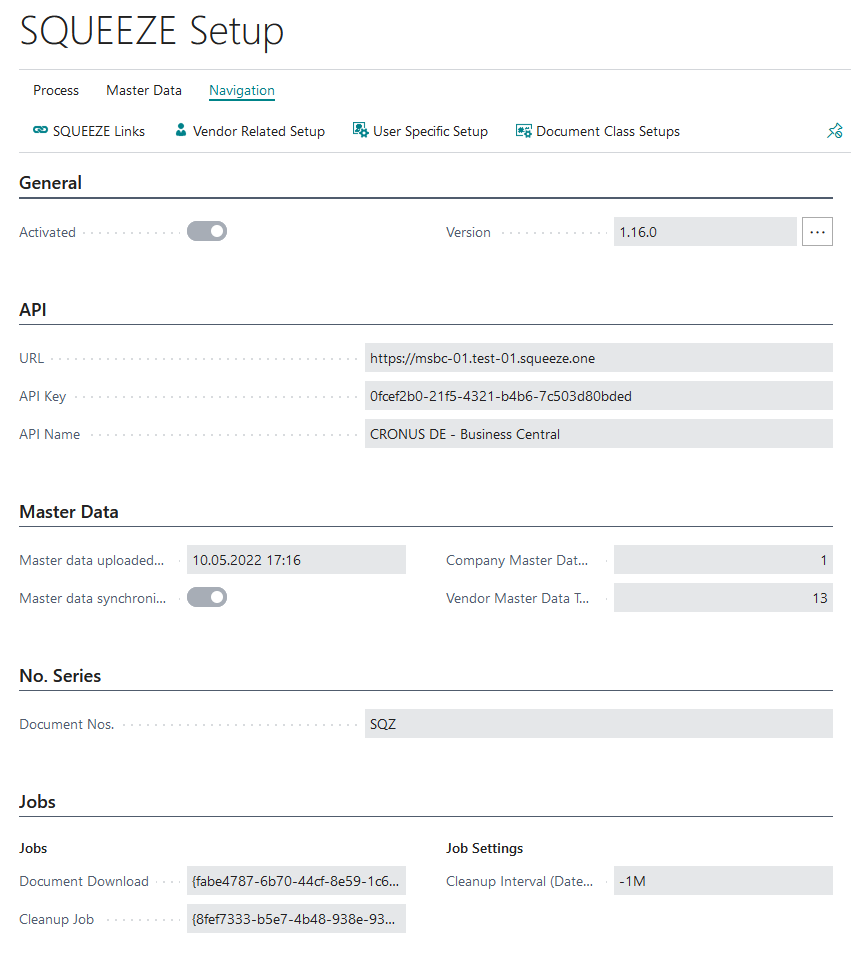
In the SQUEEZE setup, both the connection to the SQUEEZE system and the processing within the app are set up.
Menu
Home

Setup Wizard
This is used to start the setup wizard. This guides the user step by step through all menu items.
Get API key
This function is used to set the API key for the configured API name from the connected SQUEEZE system.
Create jobs
The automated retrieval and processing of documents from SQUEEZE requires the setup of a background job. This can be done in via this function.
Copy setup
This copies the setup to other clients.
Master data

Initially Upload master data
Via the function "Upload master data for the first time" all accounts payable and accounts payable bank accounts are transferred to SQUEEZE for the first time.
Navigation

SQUEEZE links
Using the SQUEEZE links menu item, you can see which vendor/vendor bank account has which ID on the squeeze page.

User specific setup
This menu item is used to access the user-specific setup. In this, different rules can be stored for each user.
Import queue entries
This menu displays a list of SQUEEZE vouchers that are ready to be imported into the SQUEEZE for BC app. By changing the system filter it is also possible to view already imported vouchers.
Vendor related setup
Document classes setup
Squeeze Master Data Tables
Opens up an overview over all squeeze master data tables which were synchonisized.
Fasttabs
General
In this Fasttab you can activate/deactivate the use of this app. Additionally you can see the version of the connected SQUEEZE system.

API
In this Fasttab the URL of the SQUEEZE system is specified. Furthermore, an API name is set and the corresponding API key is entered via the "Get API key" function.

No. Series
The number series for the SQUEEZE covers is indicated here.

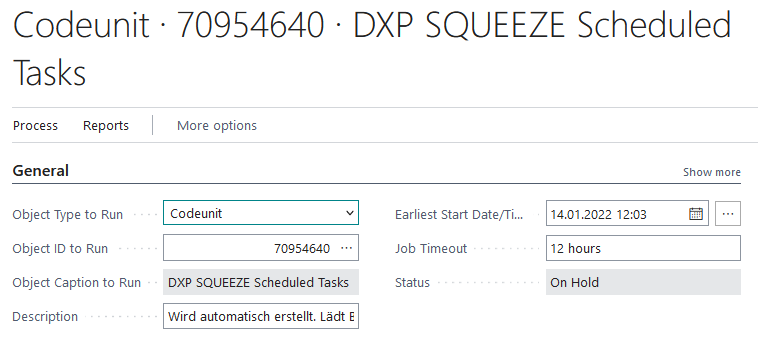
Background jobs
The automated retrieval and processing of documents from SQUEEZE requires the setup of a background job. For this, the code unit 70954640 "DXP SQUEEZE Scheduled Tasks" is entered in the task queue item.
This background job is created automatically after the setup wizard is completed.

Job queue entries
Codeunit 70954640 "DXP SQUEEZE Scheduled" is entered as an item in the job queue entries.
Security
This FastTab contains security-related settings:
- Use Document Token: When enabled, a per-document access token is used instead of the API key in viewer URLs. The token is valid for 30 minutes and is automatically refreshed. This increases security because the API key is not transmitted in browser URLs.
Viewer
This FastTab contains settings for the SQUEEZE Viewer:
- Viewer in Target Document: When enabled, the SQUEEZE Viewer is displayed as a FactBox in the resulting target documents, e.g. in Purchase Invoices and Purchase Orders. This allows users to view the originally scanned document at any time after validation without having to navigate back to the SQUEEZE document.
Job Settings
In addition to the background jobs themselves, the following value can be configured in the job settings:
- Cleanup Interval (Date Formula): Defines how old the documents marked for deletion must be before they are cleaned up. Example:
-1Mmeans documents must be at least one month old.
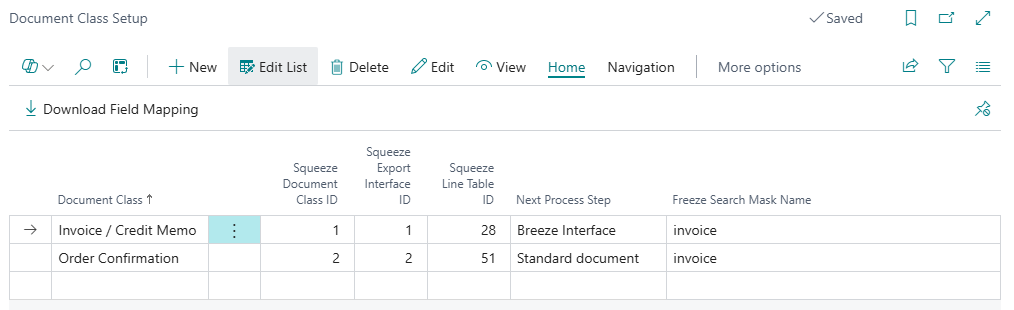
Document Classes Setup
In the SQUEEZE document class setup, the mapping between the respective document class and your export interface is done. Furthermore, the field mapping of each document class is downloaded here, creating a set of standard fields and their usage in Microsoft Dynamics 365 Business Central.
The document class setup is cross-app and is managed via the DEXPRO Core.
Home

Download field mapping
This downloads the field structure of the SQUEEZE document class. These are needed for the metadata mapping.
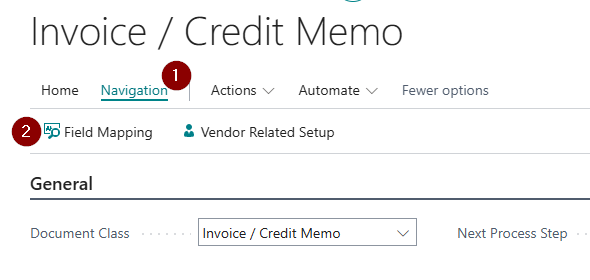
Navigation
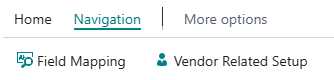
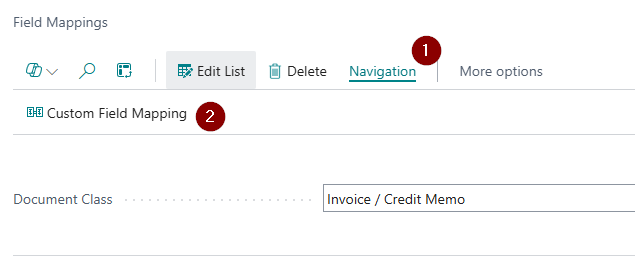
Field Mapping
You can access the field mapping via this menu item. This defines which fields from the squeeze endpoint are transferred to the defined fields in Microsoft Dynamics 365 Business Central. The standard field mapping cannot be edited. Different mappings can be realized via the custom field mapping.
Vendor Related Setup
List
Document classes
This overview lists all the document classes that have been set up.
Card
Document class
Here, each document class is set up individually.
General

In this fastab the name of the document class, the next process step, as well as the automatic enrichment of the positions is set up.
Squeeze
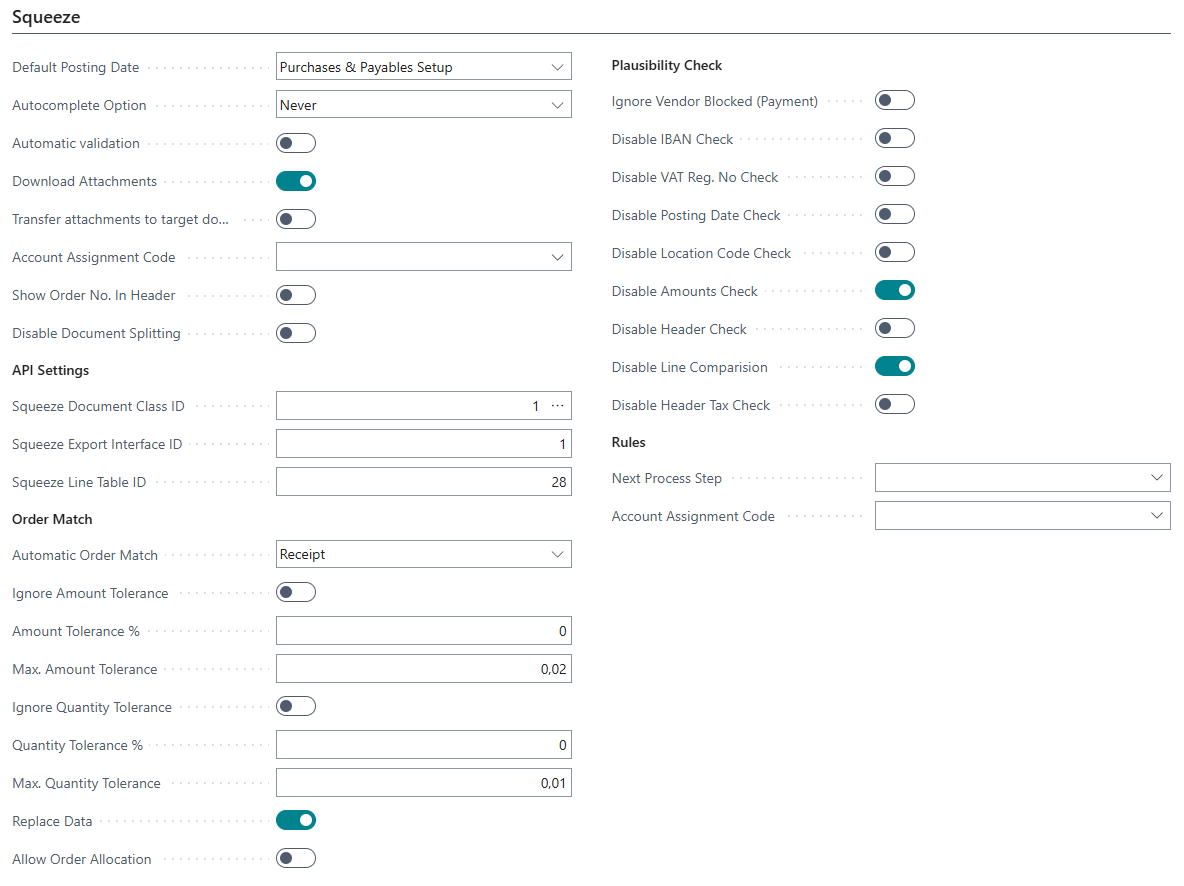
Autocomplete:
In the case of documents without a purchase order reference, the system can remember and recall the items read in and the account assignment applied to them for each vendor. There are three options that can be selected for this.
- Never: Disables the function and hides the button in the validation page
- Manual: Applying the autocomplete data is done manually by clicking the button "Autocomplete". Die Speicherung der Metadaten für die Autovervollständigung wird automatisch beim Abschluss des Validierungsprozesses ausgeführt

- Automatic: Creating and applying the data for auto-completion is done automatically
- When creating the SQUEEZE document, the entries are applied
- When the validation is completed, the entries are created/updated

Automatic validation:
Enable this option to have Squeeze for BC automatically validate incoming receipts. Please note that this function works only in case of perfectly plausible data.
Download attachments:
Enable this switch to automatically download SQUEEZE attachments when creating a new document.
Transfer attachments to target document:
Here you can set whether the SQUEEZE attachments are to be transferred to the target document.
Account assignment code:
Specifies the account assignment setup to be used when performing the account assignment in the validation process.
API Settings
At this point, the ID of the connected squeeze client corresponding to the document class is stored, as well as the ID of the pull export interface and the correct line table ID. The default values do not necessarily match the setup in the squeeze client and should be cross-checked.
Order Match
The purchase order reconciliation is used for the automated check of the read out positions with those of the still open purchase orders in Microsoft Dynamics 365 Business Central. In this Fasttab, the permissible amount & quantity tolerances for the matching are set up. Additionally, it can be defined whether the matching should take place on purchase orders or deliveries. If "Replace data" is active, the amounts and descriptions of the items will be replaced with those of the order/delivery after matching.
Plausibility Check
Here you can deactivate individual plausibility checks.
Rules
Here, you can use the Rules Engine to set up rule-based configurations. For example, you can define rules for determining the next process step, which decide how a document is forwarded.
Show Order No. in Header
The Show Order No. In Header toggle controls whether the recognized order number is displayed as a field in the header area of the SQUEEZE document.
Disable Document Splitting
The Disable Document Splitting toggle disables the "Document Split" function for this document class. When enabled, document splitting is not available on the validation page.
Allow Order Allocation
The Allow Order Allocation toggle determines whether SQUEEZE line items can be manually allocated to purchase order lines.
Ignore Vendor Blocked (Payment)
The Ignore Vendor Blocked (Payment) toggle controls whether vendors with the blocked status "Payment" should not be flagged as an error during plausibility checks.
Rules
In this section, rule-based configurations can be made. The Rules Engine enables automated decisions based on conditions:
- Rule Group for Next Process Step: Defines the rule group that determines the next process step. For example, you can specify that documents from certain vendors or above a certain amount are routed to custom processing.
- Rule Group for Account Assignment Code: Defines the rule group that determines the account assignment code to be used.
For more information on rule-based configuration, see the chapter "Extension Development" under "Rule-based next process step".
Vendor Related Setup
In this setup, vendor-specific settings are made per SQUEEZE document class. This is done for vendors that deviate from the set client standard.
In addition to the auto-completion of positions, deviating amount and quantity tolerances can also be set up here.
List

Card
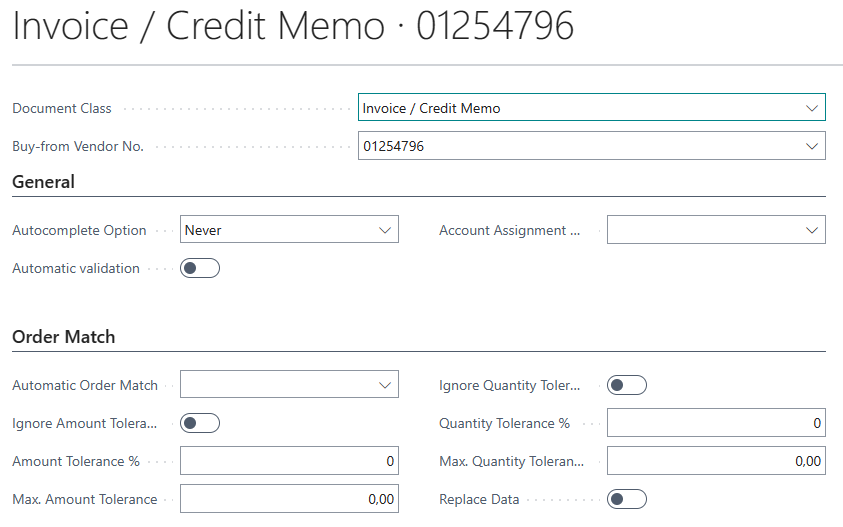
Autocomplete:
In the case of documents without a purchase order reference, the system can remember and recall the items read in and the account assignment applied to them for each vendor. There are three options that can be selected for this.
- Never: Disables the function and hides the button in the validation page
- Manual: Applying the autocomplete data is done manually by clicking the button "Autocomplete". Die Speicherung der Metadaten für die Autovervollständigung wird automatisch beim Abschluss des Validierungsprozesses ausgeführt
- Automatic: Creating and applying the data for auto-completion is done automatically
- When creating the SQUEEZE document, the entries are applied
- When the validation is completed, the entries are created/updated
Automatic validation:
Enable this option to have Squeeze for BC automatically validate incoming receipts. Please note that this function works only in case of perfectly plausible data.
Account assignment code:
Specifies the account assignment setup to be used when performing the account assignment in the validation process.
Order Match
The order reconciliation is used for the automated check of the read out positions with those of the still open orders in Microsoft Dynamics 365 Business Central. In this FastTab, the permissible amount & quantity tolerances for the matching are set up. Additionally, it can be defined whether the matching should take place against purchase orders or deliveries. If "Replace data" is active, the amounts and descriptions of the items will be replaced with those of the purchase order/delivery after matching.
Account Assignment Setup
Here you will find the account assignment setup. If you have standard account assignments for certain VAT. You can store them here.
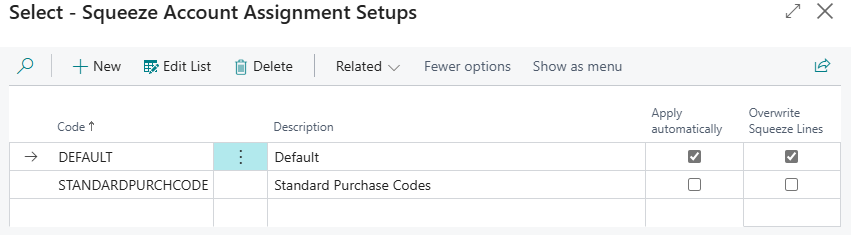
As soon as an account assignment setup with setup lines has been created and stored in a document class or an vendor related setup, it will be used automatically.
When importing a document from Squeeze, the recognized VAT. records are checked against the setup lines of the stored account assignment setup. If matching entries are found, a check is made to determine whether lines with the stored account assignments may be created. In the standard case, this is only done if Squeeze does not supply any items.
In addition, it is possible to set up whether an account assignment setup may be used automatically for validation.
This should not be set as default in the document class setup, as this would then apply to all vendors and documents. This option makes more sense for individual vendors (vendor related setup).
For automatically use, you can additionally activate that all squeeze lines of a document are overwritten with the configured account assignment setup lines. ("Overwrite squeeze lines" checkbox).
Account assignment setup
Setup lines are managed separately for each account assignment code.
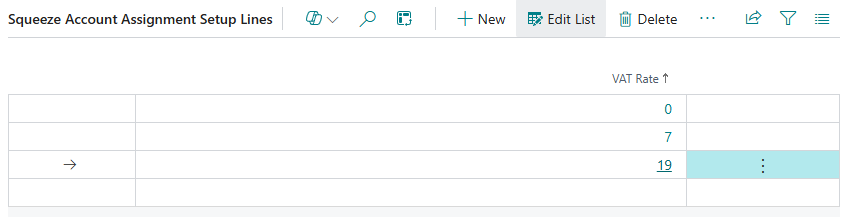
This is where the individual VAT. records for which standard account assignments are to be set.
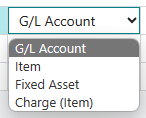
Account Assignment Type "One Account"
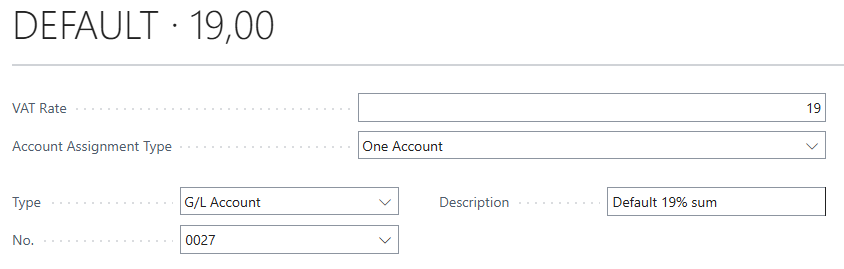
The selection of the account type corresponds to the BC standard:
The description can be customized as desired after selecting the number.
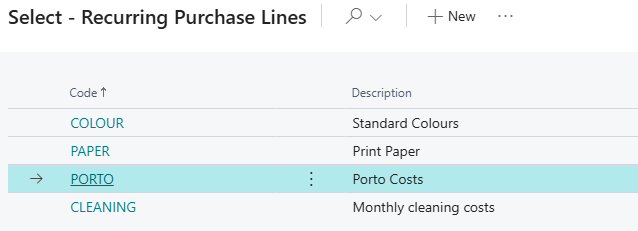
Account Assignment Type "Standard Purchase Code"
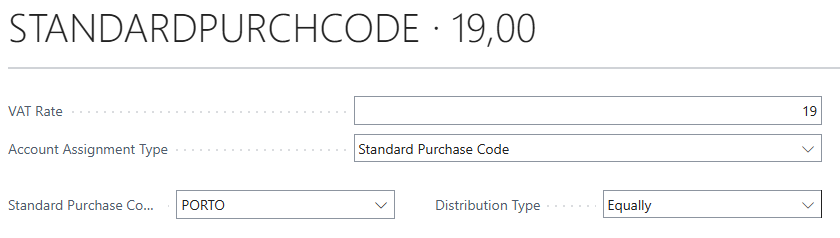
Here you can choose the standard purchase code from the recurring purchase lines.
Field Mapping
In Metadata Mapping, the field mapping of each document class is downloaded, creating a set of standard fields and their usage in Microsoft Dynamics 365 Business Central.
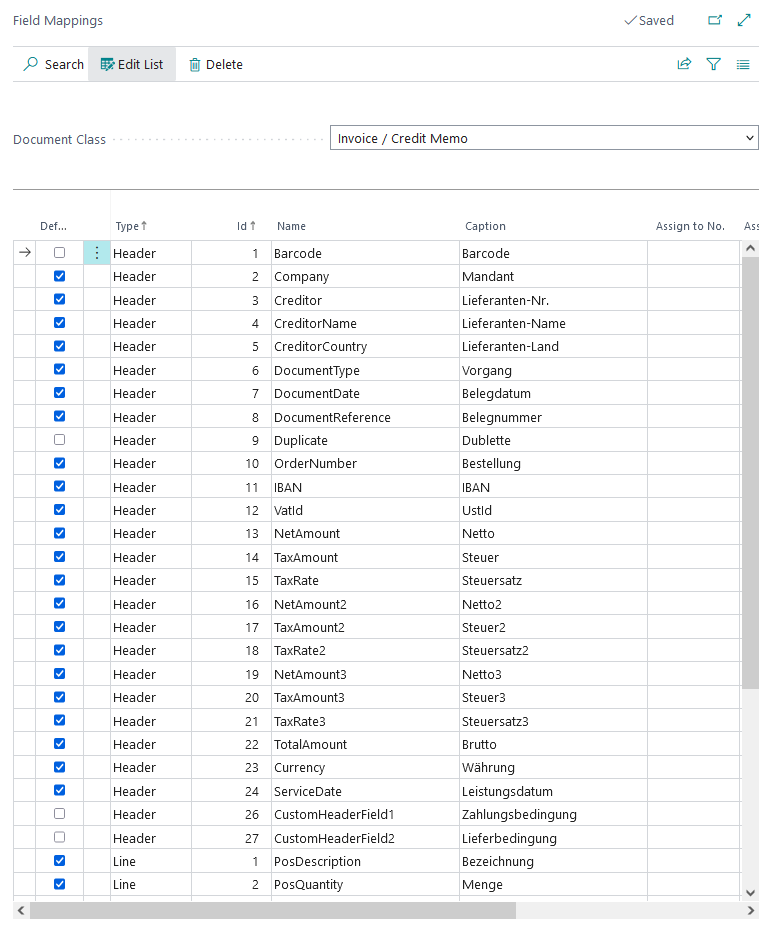
Metadata assignment
Additional SQUEEZE fields which deviate from the standard add.
After assignment:
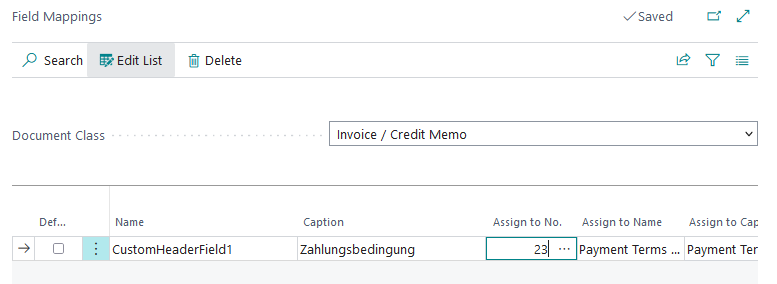
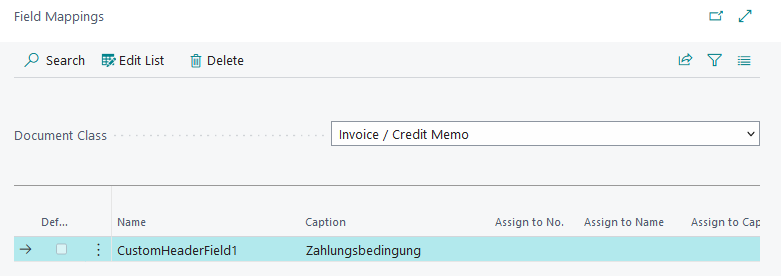
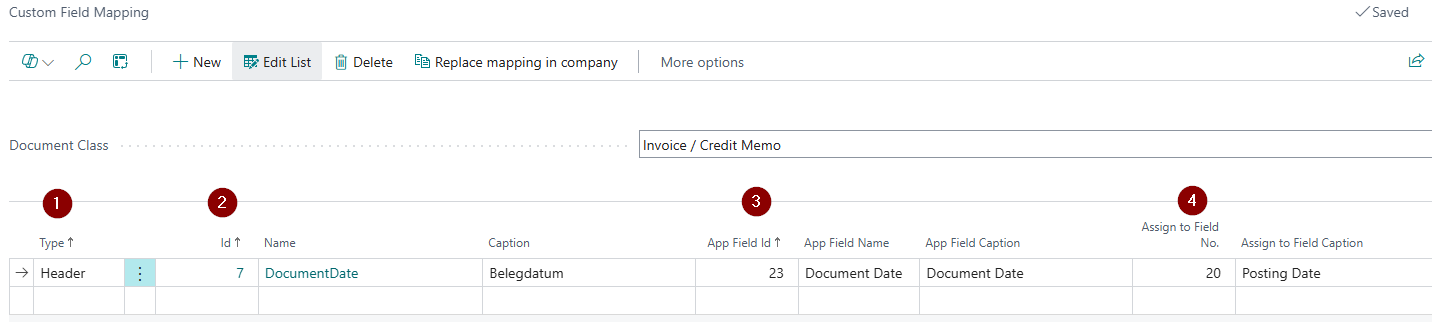
Custom Field Mapping
You may always want to write certain information in certain fields in your process that deviates from the standard field assignment. In the following example, the service date recognized by Squeeze is always written in the “Booking date” field - in addition to the standard behaviour. The service date therefore remains filled.
Open the field assignment in the document class setup:
Then open the “User-defined field assignment”:
Then make the desired assignment:
User specific setup
In this setup, user-specific settings are configured. Users can customize the app to suit their workflow and peripheral devices.
The overview displays all users and their respective settings. When opened, it automatically shows the current user.
Viewer
- Use external viewer only: When enabled, the viewer is displayed exclusively in detached (external) mode. This is particularly recommended when working with two monitors. The detached viewer updates automatically when switching between documents.
- Viewer Resolution: Allows adjusting the viewer resolution. The options High and Low are available.
Validation
- Back to List After Validation: When enabled, the app automatically navigates back to the document overview after completing the validation. This speeds up processing when validating multiple documents sequentially.
- Deactivate Validation Dialog: When enabled, the confirmation dialog after completing the validation is suppressed.
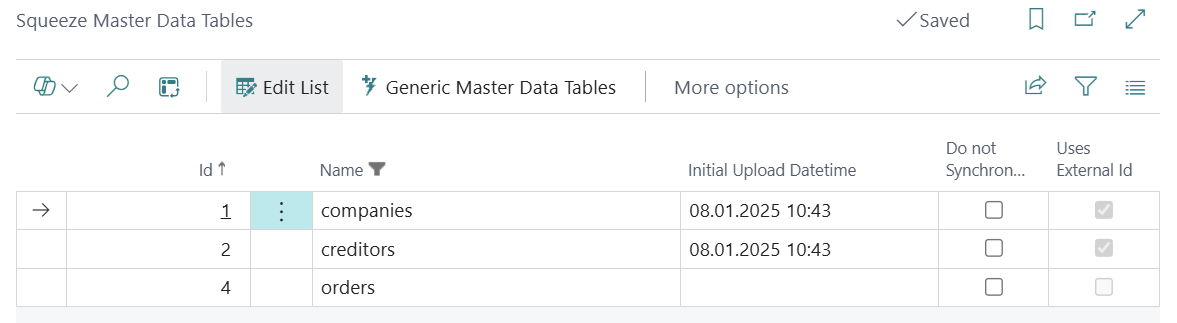
Squeeze Master Data Tables
Standard Tables
Unless deactivated, this master data is automatically synchronized with the Squeeze client. It is still necessary to upload the master data initially.
The “Uses external ID” field is supported from Squeeze version 2.13 and allows you to manage Squeeze master data from third-party software. In this case BC.
Generic Master Data Tables
To transfer additional master data to Squeeze, maintain it in the generic master data table setup.
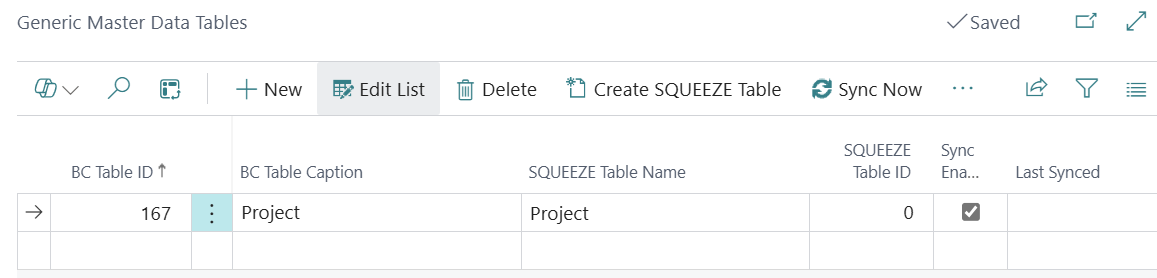
Attachment of the table to be transferred
The table to be transferred is entered in the “BC table no.” field or selected via the drilldown. The name can then be adjusted in the “Squeeze table name” field. The “Synchronization activated” field is used to specify whether this table is currently to be synchronized or not.
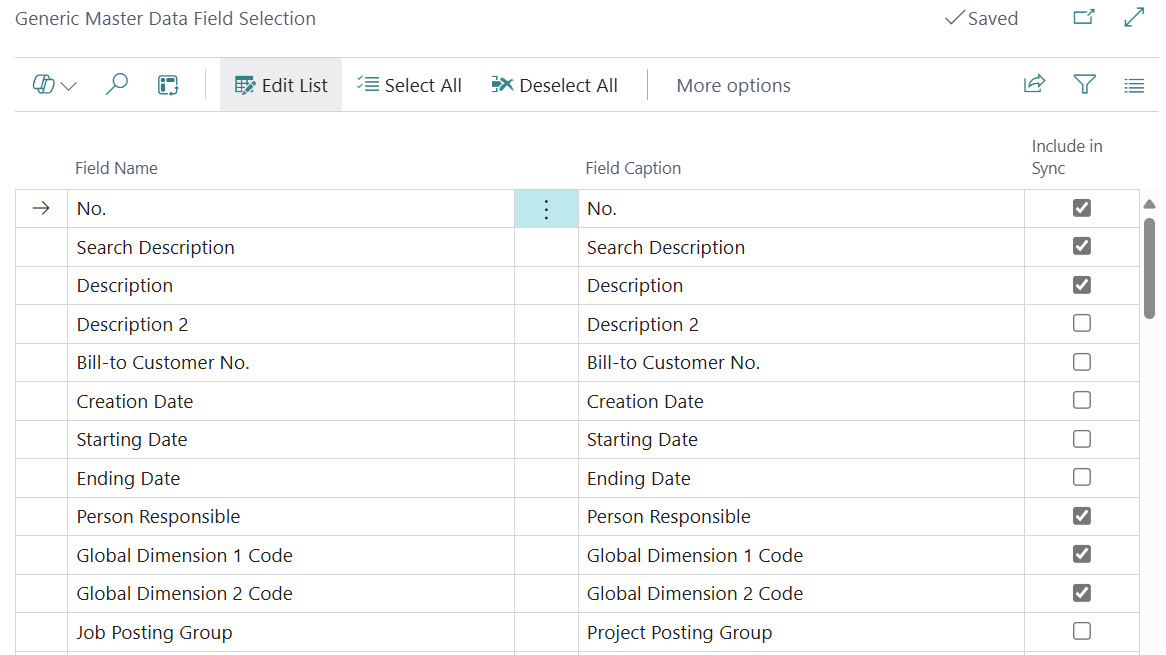
Selection of the fields to be transferred
You can access the setup via the “Field Selection” menu item.
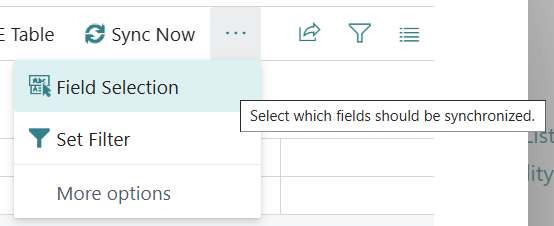
The fields to be synchronized are selected here.
Creation of the Squeeze master data table from BC
Once a BC table has been entered and its fields selected for synchronization, a new squeeze table can now be created from BC. The “Create squeeze table” button is available for this purpose.

After creation, the “Squeeze table ID” field is set in the overview.
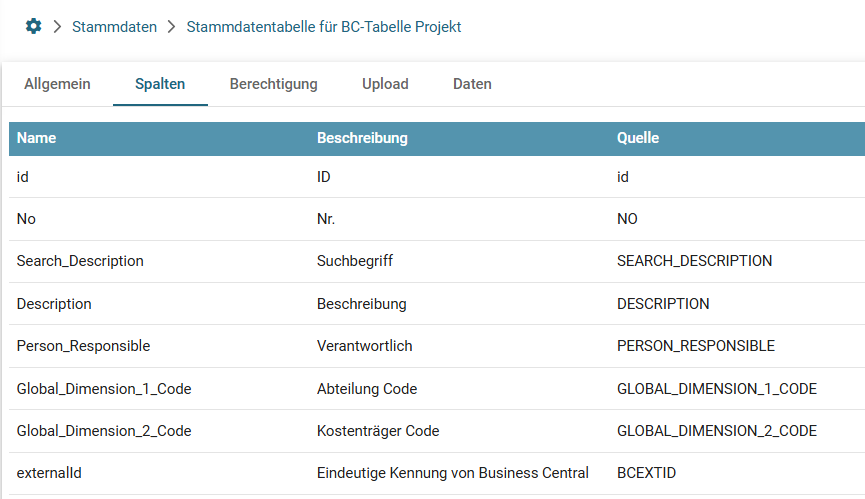
The new table is now available on the squeeze page.

The selected fields have now been automatically created here as columns.
Synchronization of the data
After creating the squeeze table, the user is asked whether a synchronization task should be created.
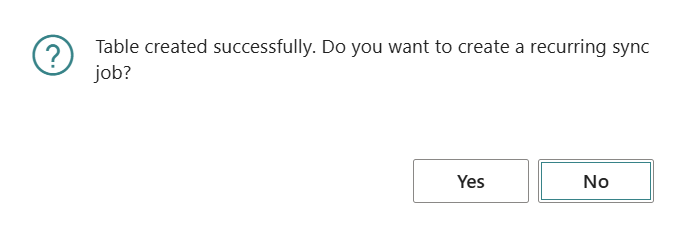
If this is active, the master data is automatically transferred at the set frequency. Alternatively, the master data can also be transferred manually once using the “Synchronize now” button.
Deleting the master data table
When deleting a list entry, you are asked whether the Squeeze master data table should also be deleted.
If this is confirmed, the squeeze table created from BC will be irretrievably removed.
Filter Rules
Via the Manage Filter Rules menu item, you can define filters that determine which records from the BC table should be synchronized to SQUEEZE. For example, you can transfer only records of a specific type or with a specific status.
Refresh Columns
If the field selection of a generic master data table has changed, the Refresh Columns action can be used to update the columns in the SQUEEZE table without having to recreate the entire table.
Synchronization Status
For each generic master data table, the time of the last synchronization (Last Synced) and any error text (Last Sync Error) are displayed. This helps with troubleshooting synchronization issues.
Note on "Uses External Id"
The Uses External Id field is supported from SQUEEZE version 2.13 onwards. When enabled, master data in SQUEEZE is managed via an external ID (from Business Central). This enables bidirectional referencing and prevents duplicate creation of master data.
SQUEEZE
The SQUEEZE page must also be prepared for fetching documents from Microsoft Dynamics Business Central.
Each document class that is to be retrieved from Microsoft Dynamics Business Central requires its own export interface of the type "Pull". In addition, the document class ID, the export interface ID and the master data table ID must be stored in Microsoft Dynamics Business Central in the setup for the SQUEEZE document classes.
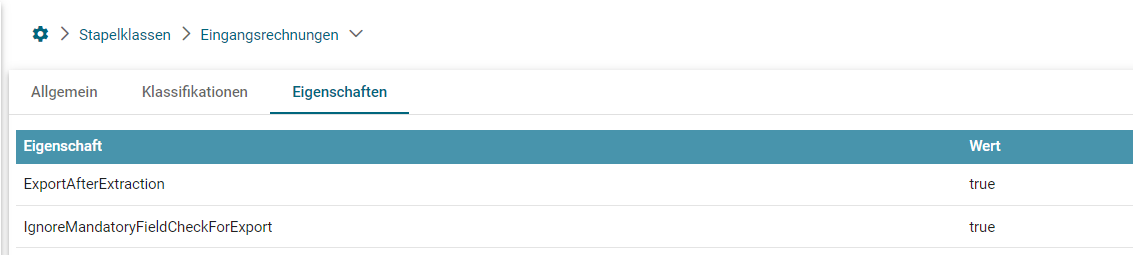
If the latest SQUEEZE for BC version is not used, the following batch class properties must be set in the SQUEEZE client:
Role Center Activities
SQUEEZE for BC extends the Purchasing Agent Role Center with several activity tiles that provide an overview of the current processing status of SQUEEZE documents.
SQUEEZE Activities
These tiles display the number of SQUEEZE documents that require processing (open documents, documents created today, etc.).
On Hold Documents
These tiles display the number of documents on hold, broken down by hold reason:
- Total On Hold Documents: The total number of all documents on hold.
- Vendor Not Found: Documents where the vendor was not found in the system.
- Service Clarification Needed: Documents where service or delivery details need to be clarified.
- Awaiting Goods Receipt: Documents waiting for goods to be received.
Each tile is linked via drilldown to the filtered Squeeze Document Overview.
Order Match Activities
These tiles display the number of documents with deviations from order matching:
- Total Differences Identified: The total number of all documents with identified deviations.
- Quantity Differences: Documents with quantity deviations.
- Price Differences: Documents with price deviations.
- Receipt Date Differences: Documents with receipt date deviations.
- Discount Differences: Documents with discount deviations.
Navigation
In the Role Center, two navigation items are available under the Squeeze group:
- Current Company: Opens the SQUEEZE Document Overview for the current company.
- Cross-Company: Opens the cross-company document overview.
The SQUEEZE Setup can be accessed directly from the Setup area of the Role Center.
Validation
Visual inspection of the read documents
SQUEEZE Document Overview
The document overview lists all documents that have been read by SQUEEZE.
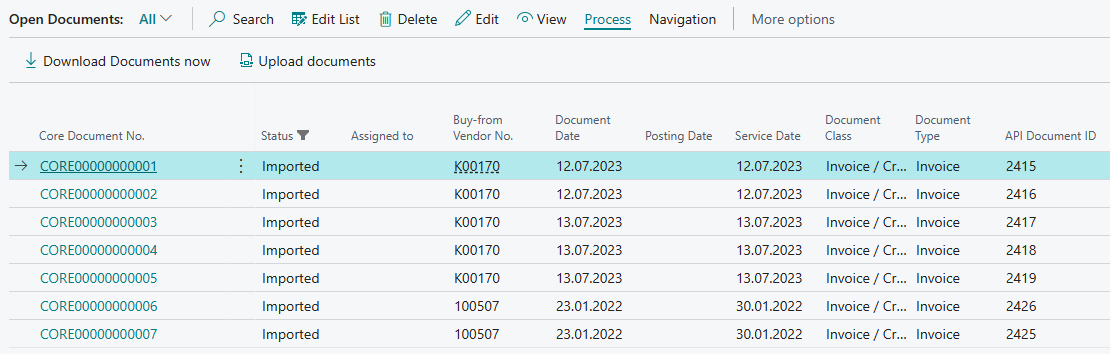
By double-clicking with the mouse or via Edit/View, a single document is opened in the validation view.
Start

Download Documents now
This function is used to manually execute the document pickup from SQUEEZE. Optionally, this is controlled and executed via the corresponding background job.
Upload Documents
Use this function to upload documents directly from BC to your Squeeze tenant.
Navigation

Import Queue Entries
This menu displays a list of SQUEEZE vouchers that are ready to be imported into the SQUEEZE for BC app. By changing the system filter it is also possible to view already imported vouchers.
Cross Company Documents
Opens an cross-company document overview.
Queue
Opens an overview that gives you information about the documents in the SQUEEZE queue of the connected client.
Cross Company Document Overview
The cross-company document overview provides a consolidated view of all SQUEEZE documents across all Business Central companies where SQUEEZE is activated.
Overview
The view displays the following KPIs for each company:
- Company: The name of the respective Business Central company.
- Open Documents: The number of open SQUEEZE documents.
- Custom Processing: The number of documents in "Custom Processing" status.
- Overdue Documents: The number of overdue documents.
- Duplicates: The number of documents flagged as duplicates.
- Rejected Documents: The number of rejected documents.
- Documents Created Today: The number of documents created today.
- My Open Documents: The number of documents assigned to the current user.
Additionally, order matching results are summarized across companies:
- Total Differences Identified: Total number of documents with order match deviations.
- Price / Quantity / Receipt Date / Discount Differences: Breakdown by deviation type.
Navigation
Each KPI is implemented as a drilldown: clicking on a value opens the correspondingly filtered document overview of the respective company in a new tab.
Refresh
The data is loaded asynchronously in the background and refreshes automatically every 60 seconds. A manual refresh can be triggered via the Refresh data action.
The cross-company document overview is accessible from the document overview via the Cross-Company Documents action or via the Role Center (Squeeze > Cross-Company).
Import Queue Entries
The import queue is a middle layer that imports SQUEEZE vouchers into the appropriate target companies - the target company must match the current BC company (important: the name (primary key) is crucial, not the display name) in which the vouchers are downloaded. If no target company has been detected, the documents for validation will be created in the fallback company that has been set up.

Navigation
Import Queue Setup

Fallback Company
Specifies the value of the fallback client. This client is used to import documents that have an empty target client in the import queue.
Warning time span (hours)
Specifies the time period after which a warning should be displayed if there are unprocessed entries.
Process
Handle unprocessed entries
Import Buffer
The Import Buffer action opens a page where SQUEEZE document IDs can be entered manually. This is useful when a specific document needs to be downloaded from SQUEEZE, e.g. when a document was not fetched automatically.
System Filter
By default, the Import Queue only shows unprocessed entries for the current company. Using the system filter, you can also view already processed entries as well as entries from other companies.
The Target Company column is highlighted in red when the target company differs from the current company. This indicates that the document is intended for a different company.
SQUEEZE Document Validation
Voucher validation is the main working area of the application. Here the user checks the read documents, completes and confirms missing information.
Menu
Process

Open field training
The supplier-specific field training is opened over here.
Open line training
The supplier-specific position training is opened over here.
Recreate result
Here over the document is sent again to SQUEEZE to the extraction. There the Readout result re-evaluated based on current master data and training and then made available for collection again.
Start splitting
This is used to call the document separation. This is used if a supplier has sent several invoices in one PDF.
Autocomplete
The positions are automatically completed with the last validated position data of the vendor. This function is only available for documents without purchase order reference.
Order match
The order comparison is opened here.
Validate
This is used to complete the validation process of the document.
Duplicate check
Over here, the duplicate check is performed manually.
Navigation

Dimensions
Here you can reach the dimension menu to define dimensions for the document header.
Actions

Use external viewer
The viewer is undocked over here. This allows you to work on two monitors.
Move document
This is used to move a document to another client.
Download attachments
Over here you download the attachments of the document. Once the download is complete, they will be displayed in the Attachments infobox.
Fasttabs
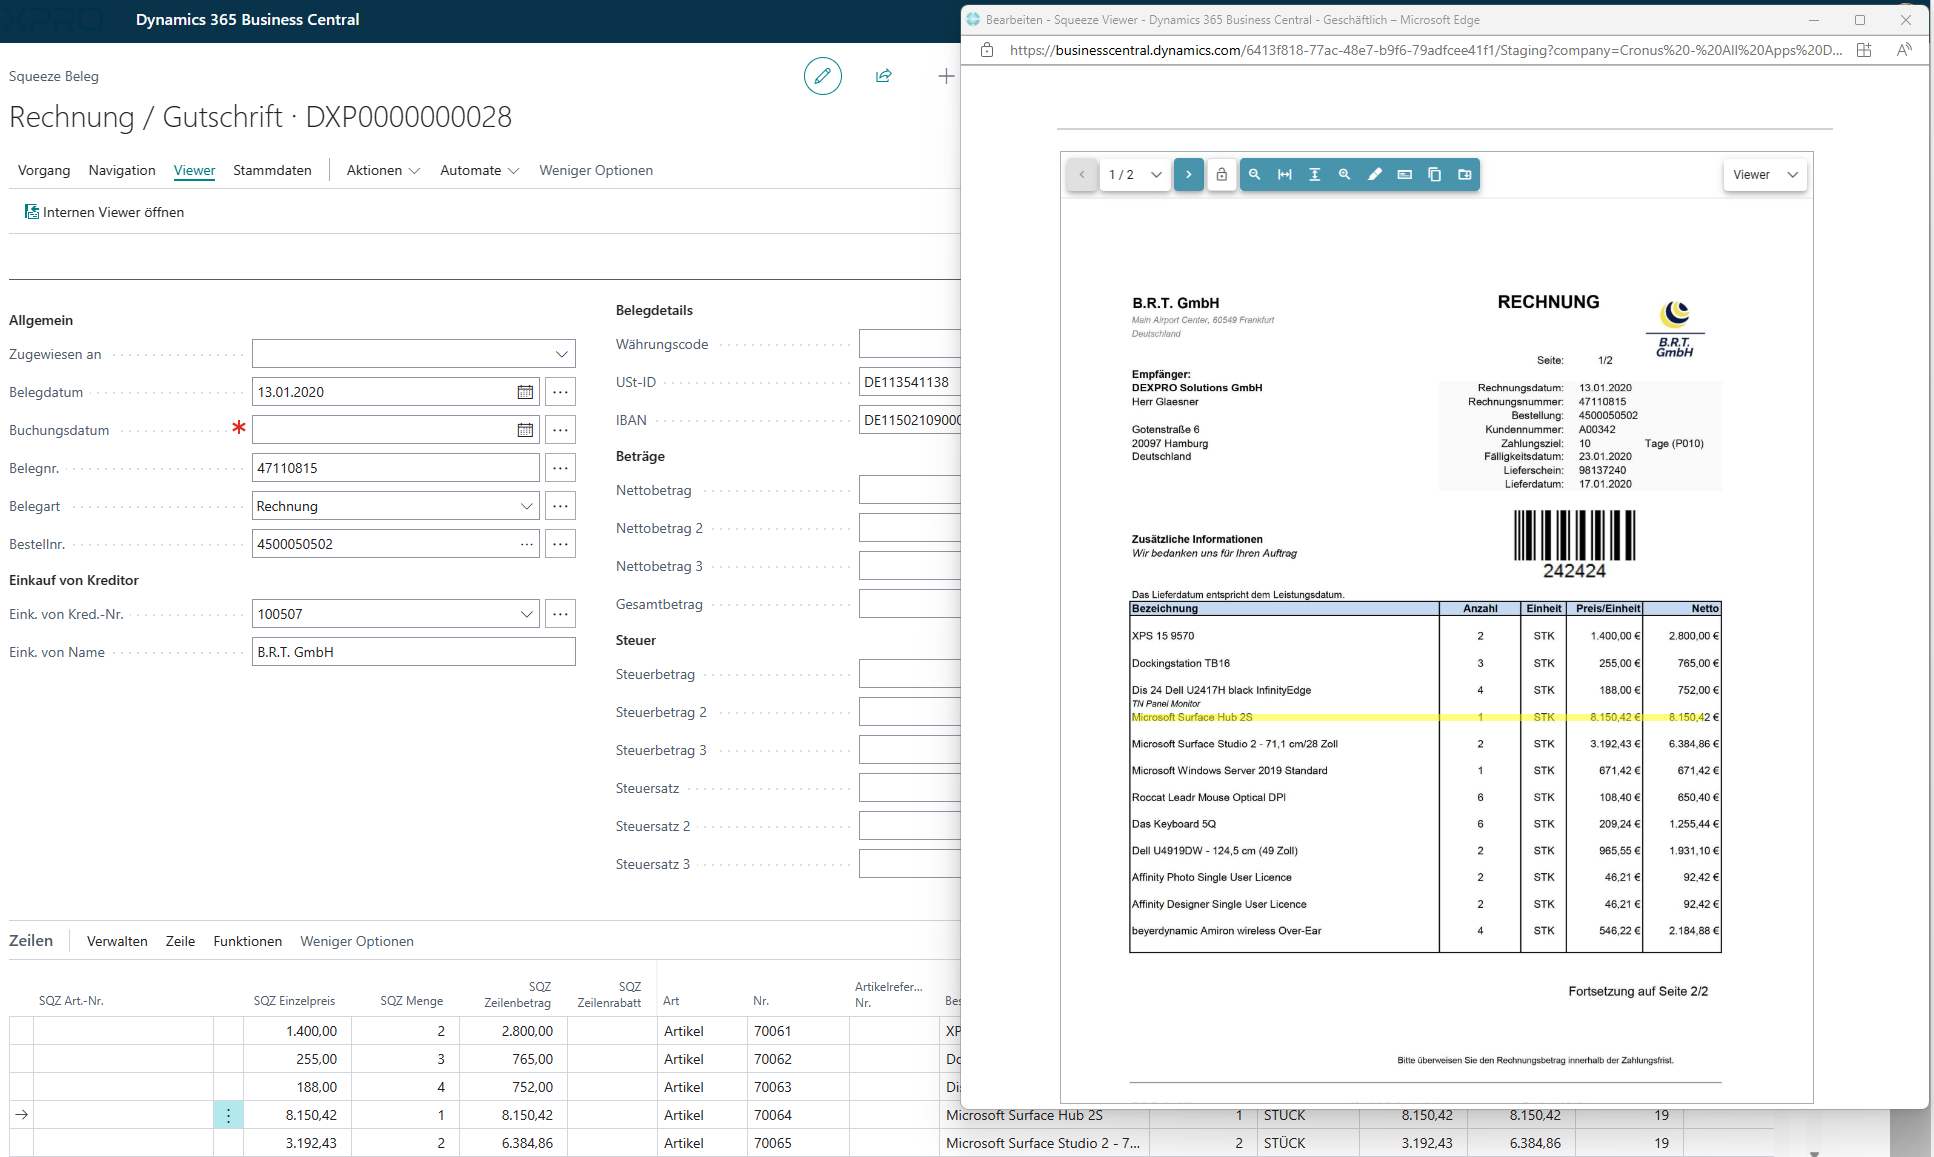
Document
This area displays the document head information and the SQUEEZE Viewer.
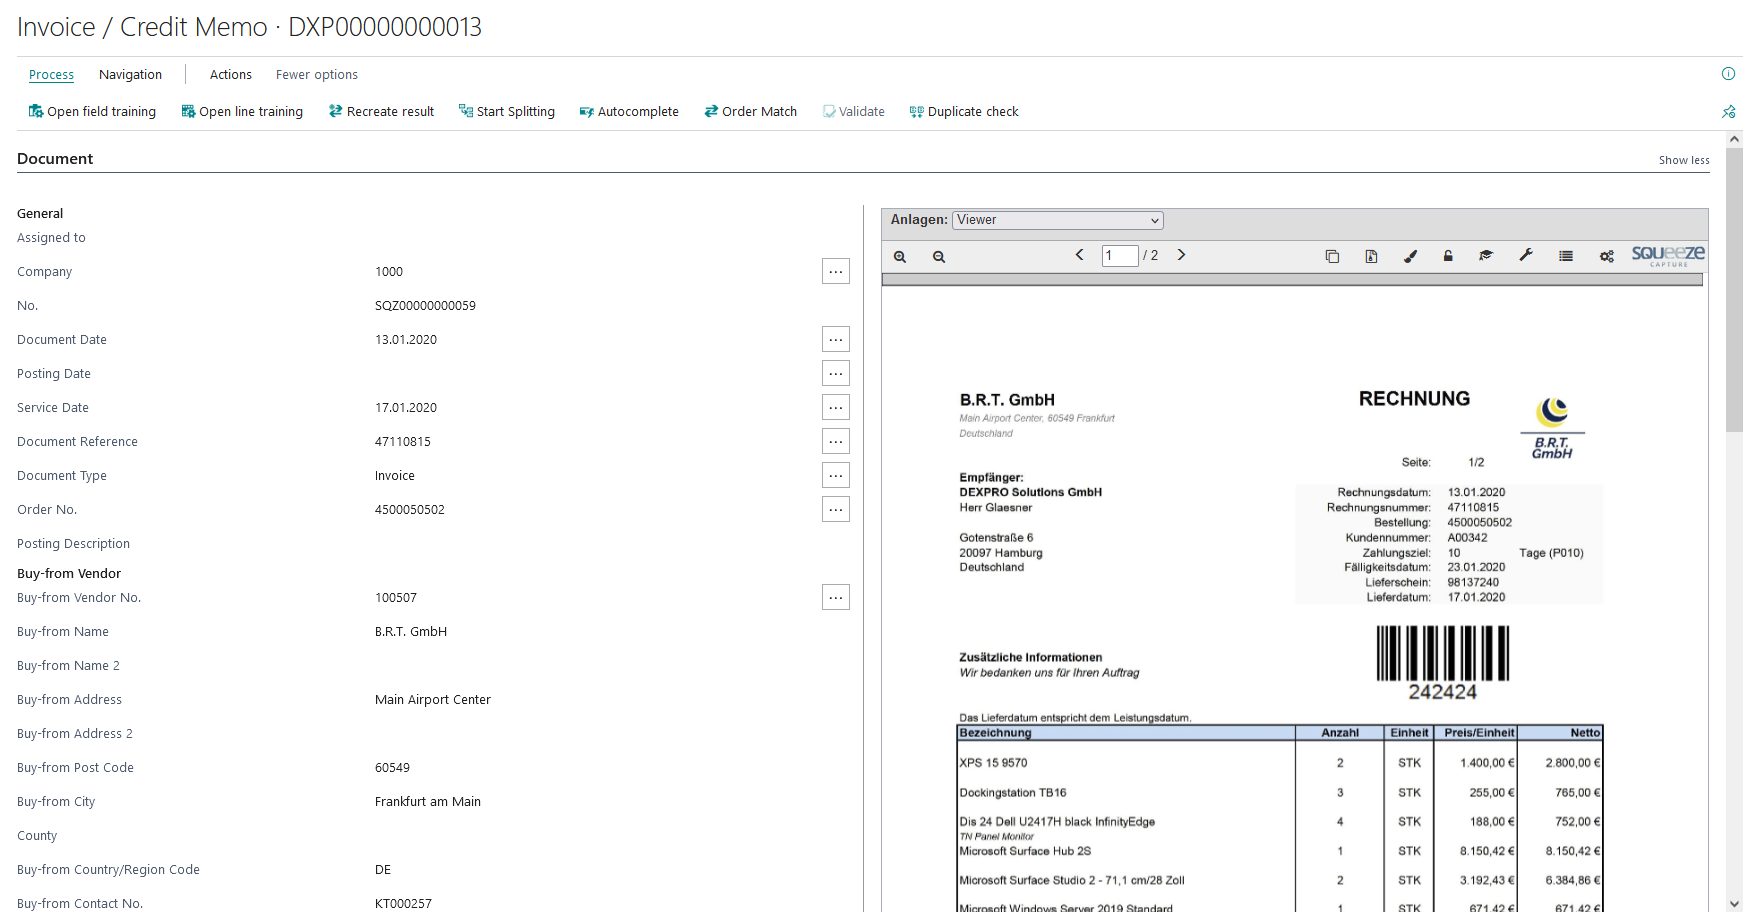
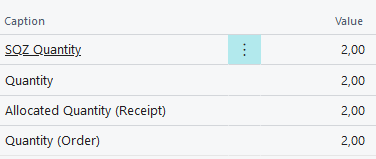
Header fields
These fields are prefilled with the results from the document reading. The user checks these and corrects or enriches them with further data and thus completes the reading result.
The three dots highlight the location of the respective read result in the viewer.
Viewer
On the right side the SQUEEZE Viewer is displayed. This is not a PDF, but an integrated web component, which is remotely controlled from the validation. It serves for the pictorial representation of the document and for the highlighting of
Findings of read values. Furthermore, the supplier-specific field training is also carried out here.
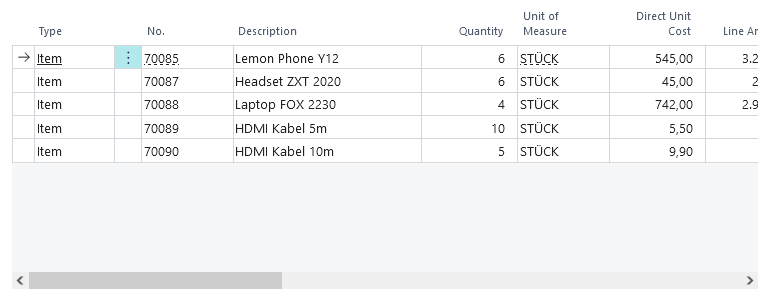
Lines
In this area the read positions are displayed. The user checks these and corrects or enriches them with further data and thus completes the reading result.
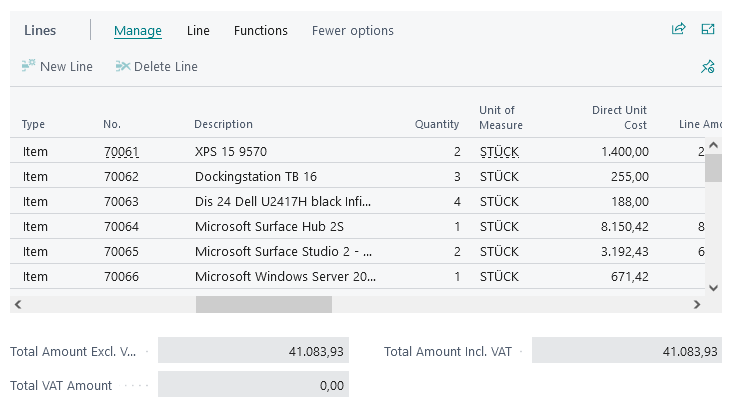
If the reading result is not sufficient for invoices with purchase order reference, the purchase order/goods receipt lines can be imported directly.
Dimensions
Here the shortcut dimensions 1 & 2 of the document are displayed.

SQUEEZE Details
SQUEEZE specific document information is displayed here.

Infoboxes
The respective info boxes are only displayed depending on the situation.
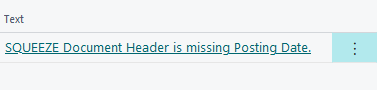
Plausibility entries
All topics to be clarified for a successful validation are listed here.
Metadata boxes
The metadata mapping is only displayed if additional fields deviating from the standard have been transferred by SQUEEZE.
Metadata mapping header fields
Here additional fields from SQUEEZE are listed, which do not belong to the standard assignment of header fields.
Metadata mapping position fields
Here additional fields from SQUEEZE are listed, which do not belong to the standard assignment of the positions.
Order matching boxes
The order matching boxes are only displayed if one or more order numbers have been recognized on the document.
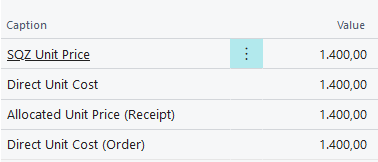
Order matching info (prices)
Here the price comparison is displayed for the selected line. The results of SQUEEZE, the delivery, the order and the current line are compared.
Order matching info (quantities)
Here the quantity comparison is displayed for the selected line. The results of SQUEEZE, the delivery, the order and the current line are compared.
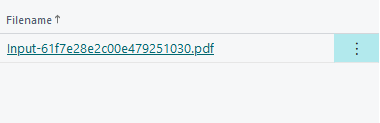
Attachments
This info box is only displayed if the attachments have been downloaded before. The attachments can be removed again via the three dots.
Put Document On Hold / Remove Document From Hold
The Put document on hold action allows you to temporarily put a document on hold. A dialog opens where you must select a reason:
- Vendor Not Found: The vendor was not found in the system.
- Service Clarification Needed: Delivery or service details need to be clarified.
- Awaiting Goods Receipt: Waiting for goods to be received.
An optional free-text note can also be provided. Documents on hold cannot be validated until the hold is removed via Remove document from hold.
Documents on hold are displayed in the Role Center in dedicated activity tiles, broken down by reason.
Withdraw Document Rejection
If a document has already been rejected, the rejection can be withdrawn via the Withdraw document rejection action. The document then returns to its previous status.
Move Document to Other Company
The Move Document to other Company action (in the Actions menu) allows you to move a document to another company. The document is deleted in the current company and recreated in the target company.
Create/Find Vendor
The Create/Find Vendor action allows you to search for a matching vendor in the system or create a new one based on the recognized text fields (name, address, VAT registration number, etc.).
Create Missing Bank Account
The Create Missing Bank Account action allows you to create a vendor bank account from the recognized IBAN, provided the IBAN was recognized on the document but no matching bank account exists for the vendor.
Apply Account Assignment Code
The Apply Account Assignment Code action in the lines allows you to delete all positions and automatically generate new lines based on a configured tax-based account assignment setup. This function is available through the Account Assignment Setups.
Viewer Modes
The SQUEEZE Viewer in the document validation supports three display modes:
- Document Overview: Displays the entire document in the viewer.
- Position Focus: Focuses the viewer on the line items area of the document.
- Detached: Opens the viewer in a separate browser window (see also "External Viewer").
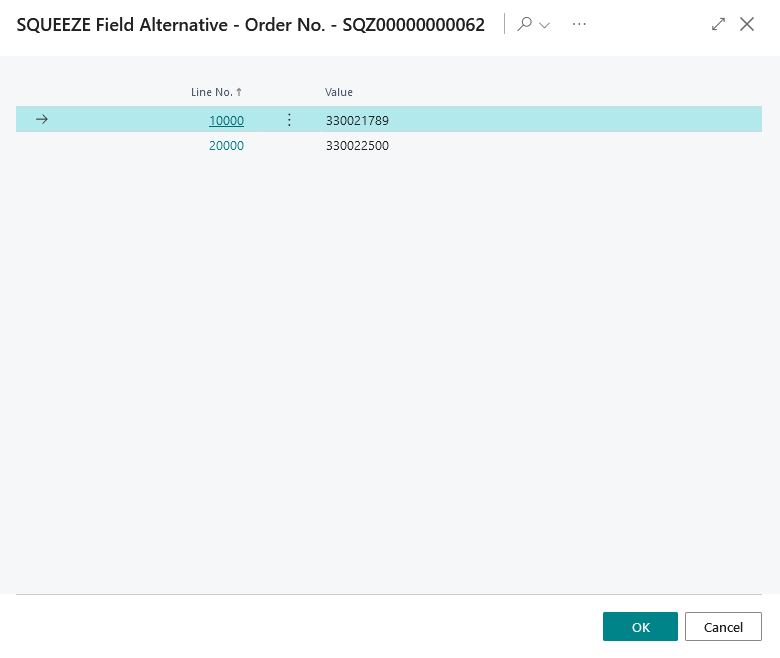
Field Alternatives
When SQUEEZE recognizes multiple possible values for a field during document reading (e.g. multiple possible vendor numbers), these are provided as field alternatives. The field alternatives can be viewed via the info box. The user can then select the appropriate value.
Vendor-specific Training
Training represents an essential optimization component of processing.
If data is not clearly recognized by the system, supplier-specific training can be applied, which increases the degree of automation when entering invoices.
When the training mode is started, all relevant fields for a training can be selected.
Any number of courses can be created per supplier and per invoice field.
External invoice numbers cannot usually be checked for content in the system, as no data exists for verification. This field is ideal for training, for example.
The training window is displayed within the viewer at the bottom of the screen.
Head field training
Train a field
After the training function has been started, the field to be trained must be selected.
After selecting the appropriate field, define the anchor.
Anchor in this case means the reference term. In this case, the term for the external document number attached to the respective invoice. The anchor term is to be marked with the right mouse button on the document in the viewer and is then highlighted in yellow.
Then click on the "Value" field in the action area and then on the value to be searched for. This is also to be marked with the right mouse button. If the searched value is not a coherent value, an arbitrarily large area can also be marked with the right mouse button in order to read out all desired information. If the information is specified, the training can be saved via "Train".
The system generates a "regular printout" - this can be optimized by trained specialists or IT staff at any time. E.g. blanks can be ignored, since these are rarely also indicated in the ERP system / in the booking.
Testing and review of existing training
With "Test" an overview of all previous head field trainings is displayed. The results are output directly as well. Double-clicking on an entry highlights the anchor and the value in the viewer.
Removing a training
To remove a course, open the overview of existing courses and select the entry to be removed. The entry is deleted with the delete key "Del".
Position field Training
Train a column
After the training function has been started, the field to be trained and the corresponding column must be selected.
After this has been selected, the region must be defined.
This should be selected so that it covers the entire column of a field if possible. The region is to be marked with the right mouse button on the document in the viewer and is then highlighted in yellow. It should be noted that no regions should overlap with regions that have already been trained.
If the information is given, the training can be saved via "Train".
Testing and review of existing training
With "Test" an overview of all previous position field trainings is displayed. By double-clicking on an entry, the respective trained area is displayed.
Removing a training
To remove a course, open the overview of existing courses and select the entry to be removed. The entry is deleted with the delete key "Del".
Document Split
The separator function is mainly intended for email invoices. When suppliers do not adhere to the email invoice delivery default (one invoice per PDF file).
In the new window, a dialog is started to separate the documents from each other and thus turn one document into several.
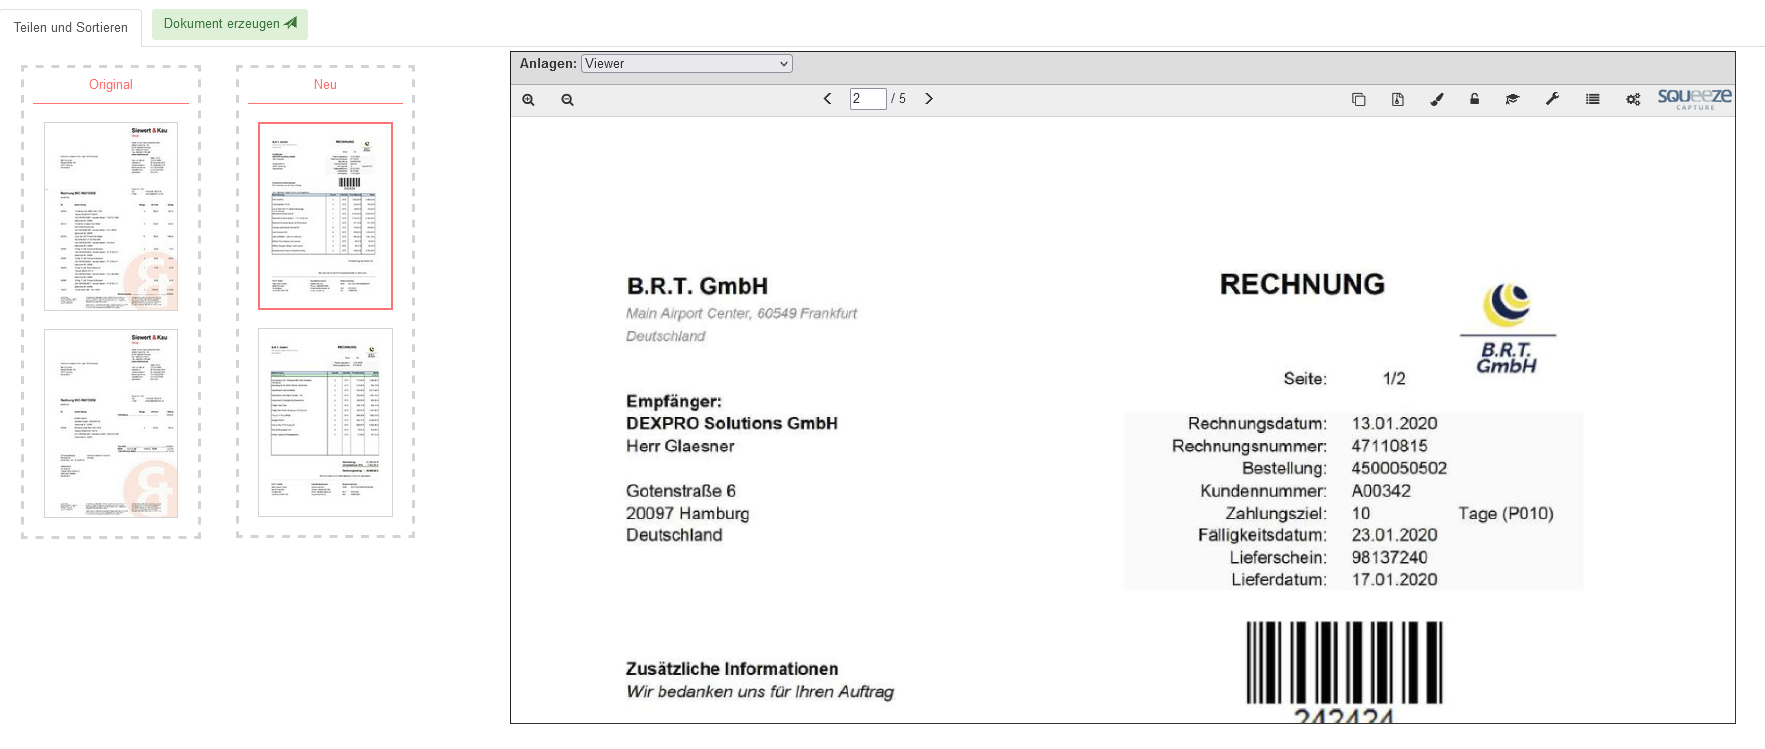
On the left side all pages of the original PDF are listed. In the middle is the area for rebuilding and on the right you can see the currently selected page.
To split a document, the pages belonging to an invoice are transferred individually to the center area either by dragging and dropping them with the mouse or by pressing the arrow key on the keyboard.
There you can also correct the order of the pages.
If the invoice document is correctly separated, the creation of a new single document can be started with "Create document". The new document is read out directly by SQUEEZE, processed and, as soon as it is ready, also made available in the overview list. This process is repeated until the original document has been completely separated.
Order & Goods Receipt Reconciliation
The purchase order & goods receipt comparison checks the read out document items and compares them with all purchase order & goods receipt lines based on the read out purchase order numbers of the document.
The order comparison can only be opened if SQUEEZE has read one or more order numbers from the document or if an order number (stored in the system) has been entered manually in the validation header field.
This comparison is performed automatically after the document has been retrieved from SQUEEZE. The user has the possibility to perform or correct this comparison manually as well.
Menu
Allocate

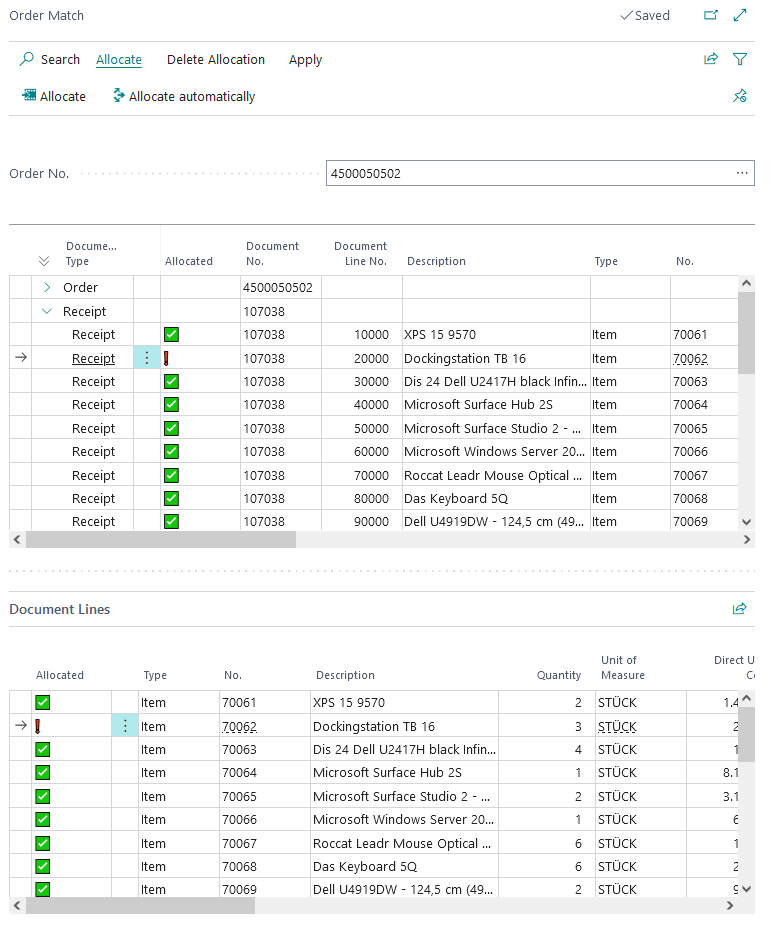
Assigned lines are represented by a green tick  .
.
Allocate
This assigns the selected order/delivery line to the selected SQUEEZE document line.
Allocate automatically
This assigns the appropriate order/delivery line to all SQUEEZE document lines. For this, the order/delivery itself must be selected in the upper area.
Delete allocation

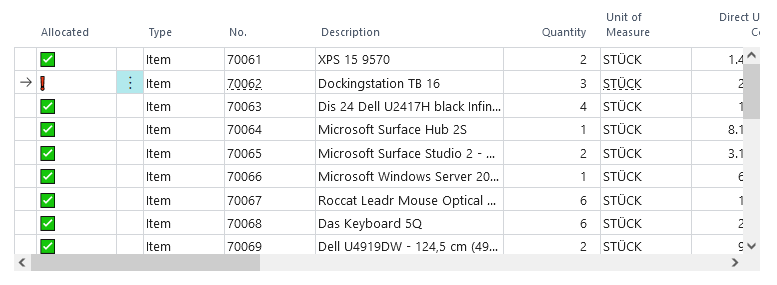
Unassigned lines are represented by a red exclamation mark  .
.
Delete selected allocation
This removes the assignment of the selected line.
Delete all allocations
This removes all assignments.
Apply

Apply selected
This applies the assignment of the selected line. Missing information will be added from the order/delivery line. This also immediately transfers this change to the validation line.
Apply all allocated
This applies the assignment of all assigned lines. Missing information will be added from the assigned order/delivery lines. This will also immediately transfer these changes to the validation lines.
Areas
Order number

The order number currently to be compared is displayed here. If several order numbers have been read out, the corresponding list can be opened via the three dots.

Order & Deliveries
in this area the order and all its lines are listed, as well as all related deliveries and their lines.
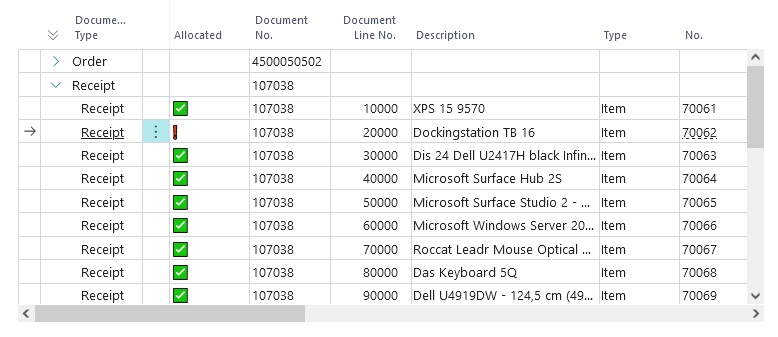
SQUEEZE document lines
In this area all read out positions of the SQUEEZE document are listed.
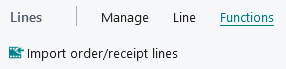
Import Order / Goods Receipt Lines
Get items from purchase order / goods receipt
Menu

Add to import preview
This transfers all selected lines to the import preview. Selected lines are represented by a green check mark .
Delete selected preview line
This removes all selected lines from the import preview.
Apply preview
This transfers all lines from the import preview to the document to be validated. You have the choice whether these lines should replace the SQUEEZE positions or be appended at the end.
Areas
Order number

The order number read out is displayed here. If several order numbers have been read out, the corresponding list can be opened via the three dots.
Order & Deliveries
In this area the order and all its lines are listed, as well as all related deliveries and their lines.
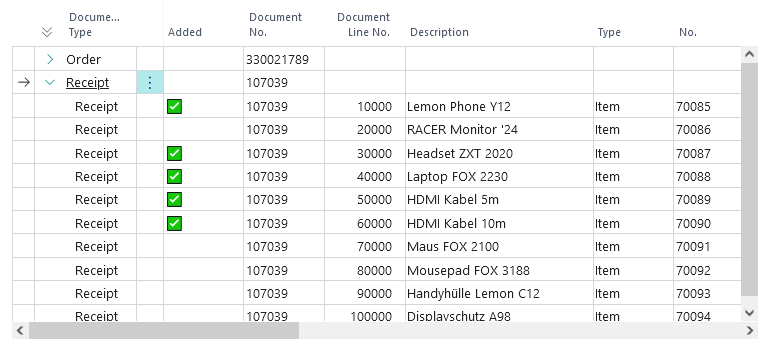
Import preview
All selected items are listed in this area.
External Viewer
To simplify working with the Viewer, the embedded Viewer can be undocked and thus used on a second screen.
All viewer functions, such as highlighting of header and position data, as well as the viewer's training functions are still supported.
To ensure that the undocked viewer remains active and updates itself automatically when a document is changed, the "Use external viewer only" field must be set in the user-specific setup.
Upload Documents
SQUEEZE for BC offers the ability to send documents directly from Business Central to the connected SQUEEZE system.
Upload Documents via the Document Overview
In the SQUEEZE Document Overview, the Upload documents action is available. When invoked, you will be prompted to select the document class. The upload page then opens.
Squeeze File Upload
On the upload page, files can be dropped into the drop zone via drag & drop. Multiple files can be dropped simultaneously.
The Upload files action uploads all dropped files to the SQUEEZE tenant. After a successful upload, each file is marked with a checkmark.
When closing the page, it checks whether all dropped files have been uploaded. If at least one file was not uploaded, a corresponding warning is displayed.
SQUEEZE Queue
The SQUEEZE Queue provides a real-time overview of the processing status of all documents in the SQUEEZE pipeline of the connected tenant.
Overview
The queue displays the number of documents at each processing step:
- Error: Documents where an error has occurred (highlighted in red). The drilldown opens the SQUEEZE web interface.
- Init Process: Documents in the initial processing step.
- Image Optimization: Documents currently being pre-processed for image quality.
- Barcode Extraction: Documents where barcodes are being read.
- OCR: Documents where text recognition is being performed.
- Classification: Documents being assigned to a document class.
- Extraction: Documents where data extraction (document reading) is being performed.
- Export: Documents ready to be fetched by Business Central.
- Backup: Already processed documents.
Non-empty steps are displayed in bold. The view refreshes automatically every 5 seconds.
Actions
- Download Documents now: Triggers a manual document download from SQUEEZE.
- Upload document: Allows uploading a document to the SQUEEZE system.
The queue is accessible from the SQUEEZE Document Overview via the Queue action.
Viewer in Target Document
The SQUEEZE Viewer can also be displayed in the resulting target documents (Purchase Invoices and Purchase Orders). This allows users to view the originally scanned document at any time without having to navigate back to the SQUEEZE document.
Activation
The feature is enabled in the SQUEEZE Setup in the Viewer FastTab via the Viewer in Target Document toggle.
How it works
When the feature is enabled, the SQUEEZE Viewer appears as a FactBox on the following pages:
- Purchase Invoice: The viewer displays the originally scanned document from which the invoice was created.
- Purchase Order: For order confirmations, the viewer displays the associated scanned document.
The viewer supports all standard functions, such as highlighting field locations. Detached mode is also supported.
Note
The link between the target document and the SQUEEZE document is established automatically via DEXPRO Core. The viewer is only displayed if a corresponding SQUEEZE document exists for the respective purchase document.
Plausibility Checks
Plausibility checking is a central component of document validation. It ensures that all relevant data is plausible and complete before a document is processed further. The results are displayed in the Plausibility Entries info box.
Header Field Checks
- Vendor exists / not blocked: The specified vendor must exist in the system and must not be blocked (optionally: blocked status "Payment" can be skipped via "Ignore Vendor Blocked (Payment)" in the Document Class Setup).
- Mandatory fields: Document Date, Posting Date, Document Reference, and Document Type must be filled in.
- Posting Date: The posting date must fall within an allowed posting period (can be disabled via "Disable Posting Date Check").
- IBAN check: If an IBAN was recognized, the system checks whether a matching bank account is stored for the vendor (can be disabled via "Disable IBAN Check").
- VAT Reg. No. check: If a VAT registration number was recognized, the system checks whether it matches the vendor's stored VAT registration number (can be disabled via "Disable VAT Reg. No Check").
- Duplicate check: The system checks whether a document with the same reference number and vendor already exists.
- Currency Code: The specified currency code must exist in the system.
- Order Number: If an order number is specified, the corresponding order must exist in the system.
Amount Checks
- Header Amount Check: Checks whether the net, tax, and total amounts are mathematically correct (can be disabled via "Disable Amounts Check").
- Line Amount Comparison: The sum of line amounts is compared with the header amounts (can be disabled via "Disable Line Comparison").
- Header Tax Check: Checks whether the tax amount matches the net amount and tax rate (can be disabled via "Disable Header Tax Check").
Line Checks
- Posting Groups: For each line, the system checks whether the required VAT posting groups and general posting groups exist.
- Items: If an item is assigned, it must exist in the system.
- Unit of Measure: The specified unit of measure must be valid for the assigned item.
- Location Code: If a location code is specified, it must exist (can be disabled via "Disable Location Code Check").
- Dimensions: Dimension values in header and lines are checked for validity.
- Project data: If project data (Project No., Project Task No.) is assigned, their existence and validity are checked.
Configuration
Individual plausibility checks can be disabled in the Document Classes Setup under the Plausibility Check section. This allows you to adapt the validation to your specific business processes.
Order Confirmations
In addition to purchase invoices and credit memos, SQUEEZE for BC also supports the processing of Order Confirmations. This document class enables automated capture of incoming order confirmations from vendors and reconciliation with existing purchase orders.
Processing
Order confirmations go through the same processing workflow as invoices (SQUEEZE extraction, import, validation). The following specifics apply:
- Mandatory order allocation: Unlike invoices, order confirmations require at least one line to be allocated to an order line before validation can be completed.
- Promised Receipt Date: The delivery date confirmed by the vendor is captured at line level and adopted as "Promised Receipt Date".
- No goods receipt matching: Order confirmations can only be matched against orders, not against goods receipts (posted receipts).
Order Matching for Order Confirmations
Order matching for order confirmations additionally checks the following conditions:
- The promised receipt date must not be empty.
- The confirmed quantity and unit price must not be zero.
- Deviations between confirmed and ordered values (quantity, price, discount, delivery date) are highlighted in the order match info boxes.
Tolerances
Unlike invoices, order confirmations additionally provide the Receipt Date Tolerance setting in the Document Class Setup and the Vendor Related Setup. This defines as a date formula how far the confirmed delivery date may deviate from the expected date (e.g. 2D for two days).
Setup
To process order confirmations, a separate document class of type Order Confirmation must be set up in SQUEEZE and in the Document Classes Setup in Business Central.
Extension Development
This chapter lists important integration events and examples that help in developing an extension for SQUEEZE for BC.
Important:
Customizations may only be performed by appropriately trained consultants/developers. Furthermore, these are always outside of the standard support.
Modify Squeeze origin attachment
Overview
The OnAfterSetOriginFileNameOnBeforeModifyDocumentAttachment integration event allows third-party developers to customize document attachment records before they are modified during the SQUEEZE attachment processing workflow. An origin attachment is the relevant attachment that leads to the creation of a document (e.g. the vendor´s invoice).
Event Declaration
[IntegrationEvent(false, false)]
local procedure OnAfterSetOriginFileNameOnBeforeModifyDocumentAttachment(var DocumentAttachment: Record "DXP Document Attachment")
begin
end;
Event Parameters
| Parameter | Type | Description |
|---|---|---|
DocumentAttachment |
Record "DXP Document Attachment" (var) |
The document attachment record that is about to be modified. Passed by reference, allowing modifications. |
When This Event is Triggered
This event is fired during the SaveAttachments procedure when:
- An attachment is being processed from SQUEEZE
- The attachment is identified as an origin file (
IsOriginFile = true) - The system has set the origin file name and
DXP Is Origin Fileflag - Just before the
DocumentAttachment.Modify(true)call
Use Cases
This integration event is useful for:
- Custom Field Population: Setting additional custom fields on the document attachment
- File Name Transformation: Applying custom naming conventions or formatting
- Metadata Enhancement: Adding custom metadata or tags to attachments
- Validation Logic: Implementing custom validation before the record is saved
- Integration Requirements: Preparing data for external system integrations
Implementation Example
Change The Filename Before Modify
[EventSubscriber(ObjectType::Codeunit, Codeunit::"DXP SQZ API Mgt.", 'OnAfterSetOriginFileNameOnBeforeModifyDocumentAttachment', '', false, false)]
local procedure OnAfterSetOriginFileNameOnBeforeModifyDocumentAttachment(var DocumentAttachment: Record "DXP Document Attachment")
var
    CoreDocument: Record "DXP Document";
    SQZDocumentHeader: Record "DXP SQZ Document Header";
    Vendor: Record Vendor;
    NewFileName: Text[250];
    VendorPrefix: Text[50];
begin
    // Get the core document using the document attachment's Document No.
    if not CoreDocument.Get(DocumentAttachment."Document No.") then
        exit;

    // Check if the core document has a linked SQUEEZE document
    if IsNullGuid(CoreDocument."Linked-to Record Id") then
        exit;

    // Get the SQZ Document Header using the SystemId from Linked-to Record Id
    if not GetSQZDocumentHeaderFromRecordId(CoreDocument."Linked-to Record Id", SQZDocumentHeader) then
        exit;

    // Check if Buy-from Vendor No. is populated
    if SQZDocumentHeader."Buy-from Vendor No." = '' then
        exit;

    // Get the vendor record
    if not Vendor.Get(SQZDocumentHeader."Buy-from Vendor No.") then
        exit;

    // Create vendor prefix from Search Name (fallback to Name if Search Name is empty)
    if Vendor."Search Name" <> '' then
        VendorPrefix := Vendor."Search Name"
    else
        VendorPrefix := Vendor.Name;

    // Clean the vendor prefix (remove invalid filename characters and limit length)
    VendorPrefix := CleanFilenameText(VendorPrefix, 30);

    // Check if vendor prefix already exists in filename to avoid duplicates
    if DocumentAttachment."File Name".StartsWith(VendorPrefix + '_') then
        exit;

    // Create new filename with vendor prefix
    NewFileName := VendorPrefix + '_' + DocumentAttachment."File Name";

    // Update the attachment filename
    DocumentAttachment."File Name" := NewFileName;
end;

local procedure GetSQZDocumentHeaderFromRecordId(LinkedRecordId: Guid; var SQZDocumentHeader: Record "DXP SQZ Document Header"): Boolean
var
    RecRef: RecordRef;
    SystemIdFieldRef: FieldRef;
begin
    // Method 1: Try to get the record directly if LinkedRecordId is actually a SystemId
    if SQZDocumentHeader.GetBySystemId(LinkedRecordId) then
        exit(true);

    // Method 2: If that fails, we need to find the record another way
    // This assumes the Linked-to Record Id might be stored differently
    SQZDocumentHeader.Reset();
    SQZDocumentHeader.SetRange(SystemId, LinkedRecordId);
    exit(SQZDocumentHeader.FindFirst());
end;

local procedure CleanFilenameText(InputText: Text; MaxLength: Integer): Text
var
    CleanText: Text;
begin
    // Remove invalid filename characters
    CleanText := DelChr(InputText, '=', '<>|"/\:*?');

    // Replace spaces with underscores for better filename compatibility
    CleanText := CleanText.Replace(' ', '_');

    // Limit length
    CleanText := CopyStr(CleanText, 1, MaxLength);

    exit(CleanText);
end;
Important Considerations
Data Integrity
- The
DocumentAttachmentrecord is passed by reference, so any changes will be persisted - Consider field length limitations when modifying text fields
Performance
- Keep processing lightweight as this event is called for each origin file attachment
- Consider caching frequently accessed data
Error Handling
- Implement proper error handling to prevent the attachment save process from failing
- Use try-functions for risky operations
Related Events
OnAfterSaveAttachment: Triggered after each attachment is completely saved- Consider using this alternative event if you need to perform actions after the record is saved
Troubleshooting
If your event subscriber isn’t being triggered:
- Test with origin files specifically (non-origin files won’t trigger this event)
Alternative use of the SQUEEZE attachments
The following briefly explains how the attachments downloaded by SQUEEZE for BC can be used for a scenario that differs from the intended use.
After creating the purchase document from the validated SQUEEZE document, you have the option of accessing the attachments ( assuming they have been downloaded in advance).
    // Set IsHandled to true and implement your code
    // Do not forget to deactivate "Transfer attachments to target document" in the Document Class Setup
    [EventSubscriber(ObjectType::Codeunit, Codeunit::"DXP Document Mgt.", 'OnBeforeTransferCoreAttachmentsToStandardDocument', '', false, false)]
    local procedure DXPDocMgtOnBeforeTransferCoreAttachmentsToStandardDocument(Document: Record "DXP Document"; var IsHandled: Boolean)
    begin
    	IsHandled := true;
        HandleCoreAttachmentsAccordingToYourNeeds(Document, IsHandled);
    end;

    procedure HandleCoreAttachmentsAccordingToYourNeeds(Document: Record "DXP Document"; var IsHandled: Boolean)
    var
        CoreAttachments: Record "DXP Document Attachment";
        InStr: InStream;
    begin
        CoreAttachments.SetRange("Document No.", Document."No.");
        CoreAttachments.IsEmpty() then
       		exit;
        CoreAttachments.FindSet();
        repeat
            CoreAttachments.Calcfields(Attachment);
            CoreAttachments.Attachment.CreateInStream(InStr);
            // Here you can handle the file stream according to your needs
         	[...]
        until CoreAttachments.Next() = 0;
end;Adjustment of attachment file names after validation
Overview
This guide shows how developers can customize the file names of attachments in DEXPRO SQUEEZE. The OnBeforeAddLineToDocumentJObj event is executed after the plausibility check, ensuring that all document data is fully validated and available.
Available Event
OnBeforeAddLineToDocumentJObj
For invoices/credit notes: Codeunit 70954657 "DXP SQZ P. Inv/Crdt Memo Impl."
For orderconfirmations: Codeunit 70954658 "DXP SQZ P. Order Conf. Impl."
When accessed: After header processing, before line processing, after plausibility check
Implementation examples
Example 1: Simple vendor prefix for invoices/credit notes
codeunit 50100 "Custom Invoice Filename"
{
        [EventSubscriber(ObjectType::Codeunit, Codeunit::"DXP SQZ P. Inv/Crdt Memo Impl.", 'OnBeforeAddLineToDocumentJObj', '', false, false)]
    local procedure OnBeforeAddLineToDocumentJObjInvoice(var DocumentJObj: JsonObject; DocHeader: Record "DXP SQZ Document Header")
    begin
        CustomizeAttachmentFilenames(DocHeader);
    end;

    local procedure CustomizeAttachmentFilenames(DocHeader: Record "DXP SQZ Document Header")
    var
        DocumentAttachment: Record "DXP Document Attachment";
        VendorPrefix: Text;
        NewFileName: Text[1024];
    begin
        // Beenden, wenn keine Kreditorinformationen vorhanden
        if DocHeader."Buy-from Vendor No." = '' then
            exit;

        // Kreditorenprefix erstellen
        VendorPrefix := DocHeader."Buy-from Vendor No." + '_';

        // Alle Anhänge für dieses Dokument bearbeiten
        DocumentAttachment.Reset();
        DocumentAttachment.SetRange("Document No.", DocHeader."Core Document No.");

        if DocumentAttachment.FindSet(true) then
            repeat
                // Überspringen, wenn Prefix bereits vorhanden
                if not DocumentAttachment."File Name".Contains(VendorPrefix) then begin
                    // Neuen Dateinamen mit Prefix erstellen
                    NewFileName := VendorPrefix + DocumentAttachment."File Name";

                    // Aktualisieren
                    DocumentAttachment."File Name" := CopyStr(NewFileName, 1, MaxStrLen(DocumentAttachment."File Name"));
                    DocumentAttachment.Modify(true);
                end;
            until DocumentAttachment.Next() = 0;
    end;
}
Example 2: Order confirmations - vendor prefix
codeunit 50101 "Custom Order Conf Filename"
{
    [EventSubscriber(ObjectType::Codeunit, Codeunit::"DXP SQZ P. Order Conf. Impl.", 'OnBeforeAddLineToDocumentJObj', '', false, false)]
    local procedure OnBeforeAddLineToDocumentJObjOrderConf(var DocumentJObj: JsonObject; DocHeader: Record "DXP SQZ Document Header")
    begin
        CustomizeAttachmentFilenames(DocHeader);
    end;

    local procedure CustomizeAttachmentFilenames(DocHeader: Record "DXP SQZ Document Header")
    var
        DocumentAttachment: Record "DXP Document Attachment";
        VendorPrefix: Text;
        NewFileName: Text[1024];
    begin
        // Beenden, wenn keine Kreditorinformationen vorhanden
        if DocHeader."Buy-from Vendor No." = '' then
            exit;

        // Kreditorenprefix erstellen
        VendorPrefix := DocHeader."Buy-from Vendor No." + '_';

        // Alle Anhänge für dieses Dokument bearbeiten
        DocumentAttachment.Reset();
        DocumentAttachment.SetRange("Document No.", DocHeader."Core Document No.");

        if DocumentAttachment.FindSet(true) then
            repeat
                // Überspringen, wenn Prefix bereits vorhanden
                if not DocumentAttachment."File Name".Contains(VendorPrefix) then begin
                    // Neuen Dateinamen mit Prefix erstellen
                    NewFileName := VendorPrefix + DocumentAttachment."File Name";

                    // Aktualisieren
                    DocumentAttachment."File Name" := CopyStr(NewFileName, 1, MaxStrLen(DocumentAttachment."File Name"));
                    DocumentAttachment.Modify(true);
                end;
            until DocumentAttachment.Next() = 0;
    end;
}
Example 3: Both document types - Different prefixes for source files
codeunit 50102 "Advanced Filename Handling"
{
    [EventSubscriber(ObjectType::Codeunit, Codeunit::"DXP SQZ P. Inv/Crdt Memo Impl.", 'OnBeforeAddLineToDocumentJObj', '', false, false)]
    local procedure OnBeforeAddLineToDocumentJObjInvoice(var DocumentJObj: JsonObject; DocHeader: Record "DXP SQZ Document Header")
    begin
        CustomizeFilenamesWithSourceHandling(DocHeader);
    end;

    [EventSubscriber(ObjectType::Codeunit, Codeunit::"DXP SQZ P. Order Conf. Impl.", 'OnBeforeAddLineToDocumentJObj', '', false, false)]
    local procedure OnBeforeAddLineToDocumentJObjOrderConf(var DocumentJObj: JsonObject; DocHeader: Record "DXP SQZ Document Header")
    begin
        CustomizeFilenamesWithSourceHandling(DocHeader);
    end;

    local procedure CustomizeAttachmentFilenames(DocHeader: Record "DXP SQZ Document Header")
    var
        DocumentAttachment: Record "DXP Document Attachment";
        VendorPrefix: Text;
        NewFileName: Text[1024];
    begin
        // Beenden, wenn keine Kreditorinformationen vorhanden
        if DocHeader."Buy-from Vendor No." = '' then
            exit;

        // Kreditorenprefix erstellen
        VendorPrefix := DocHeader."Buy-from Vendor No." + '_';

        // Alle Anhänge für dieses Dokument bearbeiten
        DocumentAttachment.Reset();
        DocumentAttachment.SetRange("Document No.", DocHeader."Core Document No.");

        if DocumentAttachment.FindSet(true) then
            repeat
                // Überspringen, wenn Prefix bereits vorhanden
                if not DocumentAttachment."File Name".Contains(VendorPrefix) then begin
                    // Neuen Dateinamen mit Prefix erstellen
                    NewFileName := VendorPrefix + DocumentAttachment."File Name";

                    // Aktualisieren
                    DocumentAttachment."File Name" := CopyStr(NewFileName, 1, MaxStrLen(DocumentAttachment."File Name"));
                    DocumentAttachment.Modify(true);
                end;
            until DocumentAttachment.Next() = 0;
    end;
}
Practical information
Available data at the time of the event:
DocHeader."Buy-from Vendor No."- Kreditorennummer (validiert)DocHeader."Document Date"- BelegdatumDocHeader."Document Reference"- BelegnummerDocHeader."Core Document No."- Verknüpfung zu Anhängen- Alle anderen Belegfelder sind verfügbar
Example results:
- Original:
"Rechnung_2024_001.pdf" - Mit Kreditorenprefix:
"VEND001_Rechnung_2024_001.pdf" - Quelldatei:
"ORIGINAL_VEND001_Rechnung_2024_001.pdf"
Best Practices:
- Duplicate check: Always check whether prefix already exists
- Length validation: New file names may have a maximum of 1024 characters.
Adding a field in the validation (from version 2.10)
The following example extension shows how developers can add fields in the validation (here: document class invoice/credit note).
Optional integration events incl. sample procedures:
codeunit 50100 EventSubs
{
    //
    // [If you want to perform plausibility checks on the newly added header field, this is the place]
    //
    [EventSubscriber(ObjectType::Codeunit, Codeunit::"DXP SQZ P. Inv/Crdt Memo Impl.", 'OnAfterDoHeaderPlausibilityChecks', '', false, false)]
    local procedure SQZPInvCrdtMemoImplOnBeforeDoHeaderPlausibilityChecks(DocHeader: Record "DXP SQZ Document Header"; var PlausibilityCheck: Codeunit "DXP Plausiblity Check Mgt.")
    begin
        CheckCustomer(PlausibilityCheck, DocHeader."Customer No.");
    end;

    //
    // [If you want to perform plausibility checks on the newly added line field, this is the place]
    //
    [EventSubscriber(ObjectType::Codeunit, Codeunit::"DXP SQZ P. Inv/Crdt Memo Impl.", 'OnAfterDoLinePlausibilityChecks', '', false, false)]
    local procedure SQZPInvCrdtMemoImplOnAfterDoLinePlausibilityChecks(DocHeader: Record "DXP SQZ Document Header"; DocLine: Record "DXP SQZ Document Line"; var PlausibilityCheck: Codeunit "DXP Plausiblity Check Mgt.")
    begin
        CheckCustomer(PlausibilityCheck, DocLine."Customer No.");
    end;

    [TryFunction]
    local procedure CustomerExists(CustomerNo: Code[20])
    var
        Customer: Record Customer;
    begin
        Customer.Get(CustomerNo);
    end;

    local procedure CheckCustomer(var PlausibilityCheck: Codeunit "DXP Plausiblity Check Mgt."; CustomerNo: Code[20]): Boolean
    begin
        if CustomerNo = '' then
            exit(false);

        if not CustomerExists(CustomerNo) then begin
            PlausibilityCheck.AddPlausibilityCheckEntry(GetLastErrorText(), Page::"Customer List");
            exit(false);
        end;

        exit(true);
    end;
}
Table Extensions:
SQUEEZE 4 BC
tableextension 50100 "SQZ Doc. Header Ext." extends "DXP SQZ Document Header"
{
    fields
    {
        field(50100; "Customer No."; Code[20])
        {
            TableRelation = Customer;
            ValidateTableRelation = false;
            Caption = 'Customer No.';
        }
    }
}
tableextension 50101 "SQZ Doc. Line Ext." extends "DXP SQZ Document Line"
{
fields
{
field(50100; "Customer No."; Code[20])
{
TableRelation = Customer;
ValidateTableRelation = false;
Caption = 'Customer No.';
}
}
}Target document (here: Purchase Document)
tableextension 50102 "Purchase Header Ext." extends "Purchase Header"
{
    fields
    {
        field(50100; "DXP Customer No."; Code[20])
        {
            DataClassification = CustomerContent;
            TableRelation = Customer;
            Caption = 'DEXPRO Customer No.';
        }
    }
}
Page Extensions:
SQUEEZE 4 BC
pageextension 50100 "SQZ Document Ext." extends "DXP SQZ Document v2"
{
    layout
    {
        addafter(BuyFromVendorInternal)
        {
            field("Customer No. Internal"; Rec."Customer No.")
            {
                ApplicationArea = All;
                ToolTip = 'Specifies the value of the Customer No. field.';
              	//The following code is optional. It is used to highlight a recognized value in the Squeeze Viewer
                trigger OnAssistEdit()
                begin
                    MarkField(Rec.FieldNo("Customer No."), Rec."Customer No.", Rec);
                end;

                trigger OnValidate()
                begin
                    CheckPlausibility();
                end;
            }
        }
        addafter(BuyFromVendorExternal)
        {
            field("Customer No."; Rec."Customer No.")
            {
                ApplicationArea = All;
                ToolTip = 'Specifies the value of the Customer No. field.';
                //The following code is optional. It is used to highlight a recognized value in the Squeeze Viewer
                trigger OnAssistEdit()
                var
                    ApiMgt: Codeunit "DXP SQZ API Mgt.";
                    ViewerResident: Codeunit "DXP SQUEEZE Viewer Resident";
                begin
                    MarkField(Rec.FieldNo("Customer No."), Rec."Customer No.", Rec);
                end;

                trigger OnValidate()
                begin
                    CheckPlausibility();
                end;
            }
        }
    }

    local procedure MarkField(AppFldNo: Integer; FieldVal: Variant; DocHeader: Record "DXP SQZ Document Header")
    var
        ApiMgt: Codeunit "DXP SQZ API Mgt.";
        ViewerResident: Codeunit "DXP SQUEEZE Viewer Resident";
    begin
        ViewerResident := GetViewerResident();
        ApiMgt.MarkField(AppFldNo, FieldVal, ViewerResident, DocHeader);
    end;
}
pageextension 50101 "SQZ Document Sf. Ext." extends "DXP SQZ Document Subform"
{
    layout
    {
        addafter("No.")
        {
            field("Customer No."; Rec."Customer No.")
            {
                ApplicationArea = All;
                ToolTip = 'Specifies the value of the Customer No. field.';
            }
        }
    }
}
Target document (here: Purchase document)
pageextension 50102 "Purchase Invoice Ext." extends "Purchase Invoice"
{
    layout
    {
        addafter("Buy-from Vendor No.")
        {
            field("DXP Customer No."; Rec."DXP Customer No.")
            {
                ToolTip = 'Specifies the value of the DEXPRO Customer No. field.';
                ApplicationArea = all;
            }
        }
    }
}
pageextension 50103 "Purchase Inv. Sf Ext." extends "Purch. Invoice Subform"
{
    layout
    {
        addafter("No.")
        {
            field("DXP Customer No."; Rec."DXP Customer No.")
            {
                ToolTip = 'Specifies the value of the DEXPRO Customer No. field.';
                ApplicationArea = all;
            }
        }
    }
}
Implementation of a user-defined, automatic order reconciliation
Introduction
Automatic order matching is an important part of document processing in Squeeze for Business Central. In the standard system, the system compares incoming documents with existing orders and goods receipts. This documentation shows you how you can extend this matching process to include your own document types.
The standard implementation uses a three-step process:
- Collect relevant document numbers based on business rules
- A detailed comparison is performed for each document number found.
- The positions read by Squeeze are then enriched with the data found.
We will retain this proven approach in the following example implementation.
Integration point
The central integration point is the OnBeforePerformAutomaticOrdermatch event in codeunit 70954632 “DXP SQZ Document Mgt.”. This event is called after header and line data has been created.
[IntegrationEvent(false, false)]
local procedure OnBeforePerformAutomaticOrdermatch(
    DocHeader: Record "DXP SQZ Document Header";
    var OrderNoList: List of [Code[20]];
    var IsHandled: Boolean)
Parameter
DocHeader: The document header with the data to be comparedOrderNoList: A list of document numbers for reconciliationIsHandled: Controls whether standard processing should be skipped
Implementation example
Technical implementation
1. Extension of the document type enum
First, we extend the possible document types to include our own type:
enumextension 50100 "Custom Order Match Doc. Type" extends "DXP Order Match Document Type"
{
    value(50000; "Custom")
    {
        Caption = 'Custom Document';
    }
}
2. Implementation of the matching logic
The central point of our implementation is a code unit that controls the synchronization process. The integration point is:
//codeunit 50100 "Custom Document Matching"
//{
    [EventSubscriber(ObjectType::Codeunit, Codeunit::"DXP SQZ Document Mgt.", 'OnBeforePerformAutomaticOrdermatch', '', false, false)]
    local procedure OnBeforePerformAutomaticOrdermatch(
        DocHeader: Record "DXP SQZ Document Header";
        var OrderNoList: List of [Code[20]];
        var IsHandled: Boolean)
    var
        CustomSourceDoc: Record "Custom Source Document";
        CustomDocNo: Code[20];
    begin
        // Take control of the matching process and prevent standard processing
        IsHandled := true;

        // Find potential matching documents
        CustomSourceDoc.SetRange("Vendor No.", DocHeader."Buy-from Vendor No.");
        // Add your specific document status or type filters
        CustomSourceDoc.SetRange("Document Type", CustomSourceDoc."Document Type"::Order);
        CustomSourceDoc.SetRange(Status, CustomSourceDoc.Status::Released);

        // Add matching document numbers to the list
        if CustomSourceDoc.FindSet() then
            repeat
            	CustomDocNo := CustomSourceDoc."No.";
                if IsDocumentEligibleForMatching(CustomSourceDoc, DocHeader) then
                	if not OrderNoList.Contains(CustomDocNo) then
                    	OrderNoList.Add(CustomDocNo);
            until CustomSourceDoc.Next() = 0;

        // Process all collected documents
        ProcessMatchingDocuments(DocHeader, OrderNoList);
    end;

    local procedure IsDocumentEligibleForMatching(
        CustomSourceDoc: Record "Custom Source Document";
        DocHeader: Record "DXP SQZ Document Header"): Boolean
    begin
        // Implement business rules for document selection
        // For example:
        if CustomSourceDoc."Document Date" > DocHeader."Document Date" then
            exit(false);

        if CustomSourceDoc."Currency Code" <> DocHeader."Currency Code" then
            exit(false);

        // Check for open lines that can be matched
        if not HasOpenLinesToMatch(CustomSourceDoc) then
            exit(false);

        exit(true);
    end;

    local procedure HasOpenLinesToMatch(CustomSourceDoc: Record "Custom Source Document"): Boolean
    var
        CustomSourceLine: Record "Custom Source Line";
    begin
        CustomSourceLine.SetRange("Document No.", CustomSourceDoc."No.");
        CustomSourceLine.SetFilter("Outstanding Quantity", '>0');
        exit(not CustomSourceLine.IsEmpty());
    end;
//}
3. Processing of the documents found
After collecting the relevant document numbers, the actual comparison takes place:
local procedure ProcessMatchingDocuments(
    DocHeader: Record "DXP SQZ Document Header";
    OrderNoList: List of [Code[20]])
var
    TempMatchEntry: Record "DXP SQZ Order Match Entry" temporary;
    OrderNo: Code[20];
begin
    foreach OrderNo in OrderNoList do begin
        // Get matching entries for current document
        GetMatchEntries(OrderNo, TempMatchEntry, DocHeader);

        if not TempMatchEntry.IsEmpty() then
            // Try to find and assign matching lines
            TryMatchDocumentLines(TempMatchEntry, DocHeader);
    end;
end;

local procedure GetMatchEntries(
    DocumentNo: Code[20];
    var TempMatchEntry: Record "DXP SQZ Order Match Entry" temporary;
    DocHeader: Record "DXP SQZ Document Header")
var
    CustomSourceLine: Record "Custom Source Line";
begin
    TempMatchEntry.Reset();
    TempMatchEntry.DeleteAll();

    // Get lines from custom document
    CustomSourceLine.SetRange("Document No.", DocumentNo);

    if CustomSourceLine.FindSet() then
        repeat
            // Create match entry for each relevant line
            CreateMatchEntry(CustomSourceLine, TempMatchEntry);
        until CustomSourceLine.Next() = 0;
end;

local procedure CreateMatchEntry(
    CustomSourceLine: Record "Custom Source Line";
    var TempMatchEntry: Record "DXP SQZ Order Match Entry" temporary)
begin
    TempMatchEntry.Init();
    TempMatchEntry."Document Type" := "DXP Order Match Document Type"::Custom;
    TempMatchEntry."Document No." := CustomSourceLine."Document No.";
    TempMatchEntry."Document Line No." := CustomSourceLine."Line No.";
    TempMatchEntry."No." := CustomSourceLine."Item No.";
    TempMatchEntry.Quantity := CustomSourceLine.Quantity;
    TempMatchEntry."Direct Unit Cost" := CustomSourceLine."Unit Price";
    TempMatchEntry."Line Amount" := CustomSourceLine.Amount;
    TempMatchEntry.Insert();
end;
The matching logic in detail
The actual reconciliation of document lines is performed according to defined business rules:
local procedure TryMatchDocumentLines(
    var TempMatchEntry: Record "DXP SQZ Order Match Entry" temporary;
    DocHeader: Record "DXP SQZ Document Header")
var
    DocLine: Record "DXP SQZ Document Line";
    MatchSetup: Record "Custom Match Setup";
    HasCustomSetup: Boolean;
begin
    // Get configuration
    MatchSetup.Get();

    // Process each potential match entry
    if TempMatchEntry.FindSet() then
        repeat
            DocLine.Reset();
            DocLine.SetRange("Document No.", DocHeader."No.");
            DocLine.SetRange("Buy-from Vendor No.", TempMatchEntry."Buy-from Vendor No.");
            DocLine.SetFilter("Allocated Document Line No.", '%1', 0); // Only unallocated lines

            // Try matching strategies in order of precision
            if TryExactMatch(DocLine, TempMatchEntry) then
                CheckTolerancesAndAllocate(TempMatchEntry, DocLine, MatchSetup)
            else
                if TryItemReferenceMatch(DocLine, TempMatchEntry) then
                    CheckTolerancesAndAllocate(TempMatchEntry, DocLine, MatchSetup)
                else
                    if TryDescriptionMatch(DocLine, TempMatchEntry) then
                        CheckTolerancesAndAllocate(TempMatchEntry, DocLine, MatchSetup)
                    else
                        if TryBasicValuesMatch(DocLine, TempMatchEntry) then
                            CheckTolerancesAndAllocate(TempMatchEntry, DocLine, MatchSetup);
        until TempMatchEntry.Next() = 0;
end;

local procedure TryExactMatch(
    var DocLine: Record "DXP SQZ Document Line";
    TempMatchEntry: Record "DXP SQZ Order Match Entry" temporary): Boolean
begin
    DocLine.SetRange(Type, TempMatchEntry.Type);
    DocLine.SetFilter("No.", '%1|%2', TempMatchEntry."No.", TempMatchEntry."Item Reference No.");
    DocLine.SetRange("SQZ Quantity", TempMatchEntry.Quantity);

    exit(not DocLine.IsEmpty());
end;

local procedure TryItemReferenceMatch(
    var DocLine: Record "DXP SQZ Document Line";
    TempMatchEntry: Record "DXP SQZ Order Match Entry" temporary): Boolean
begin
    DocLine.SetRange(Type);  // Clear previous filters
    DocLine.SetRange("Item Reference No.", TempMatchEntry."Item Reference No.");

    exit(not DocLine.IsEmpty());
end;

local procedure TryDescriptionMatch(
    var DocLine: Record "DXP SQZ Document Line";
    TempMatchEntry: Record "DXP SQZ Order Match Entry" temporary): Boolean
begin
    DocLine.SetRange("Item Reference No."); // Clear previous filter
    DocLine.SetFilter("SQZ Description", '@*' + TempMatchEntry.Description + '*');

    exit(not DocLine.IsEmpty());
end;

local procedure TryBasicValuesMatch(
    var DocLine: Record "DXP SQZ Document Line";
    TempMatchEntry: Record "DXP SQZ Order Match Entry" temporary): Boolean
begin
    DocLine.SetRange("SQZ Description");  // Clear previous filter
    DocLine.SetRange("SQZ Quantity", TempMatchEntry.Quantity);
    DocLine.SetRange("SQZ Unit Price", TempMatchEntry."Direct Unit Cost");

    exit(not DocLine.IsEmpty());
end;

local procedure CheckTolerancesAndAllocate(
    TempMatchEntry: Record "DXP SQZ Order Match Entry" temporary;
    var DocLine: Record "DXP SQZ Document Line";
    MatchSetup: Record "Custom Match Setup")
begin
    DocLine.FindFirst();  // We know there is at least one line

    if IsMatchWithinTolerances(DocLine, TempMatchEntry, MatchSetup) then
        AssignMatchData(DocLine, TempMatchEntry);
end;

local procedure IsMatchWithinTolerances(
    DocLine: Record "DXP SQZ Document Line";
    TempMatchEntry: Record "DXP SQZ Order Match Entry" temporary;
    MatchSetup: Record "Custom Match Setup"): Boolean
var
    QtyTolerance: Decimal;
    AmountTolerance: Decimal;
begin
    QtyTolerance := MatchSetup."Quantity Tolerance";
    AmountTolerance := MatchSetup."Amount Tolerance";

    if Abs(DocLine."SQZ Quantity" - TempMatchEntry.Quantity) > QtyTolerance then
        exit(false);

    if Abs(DocLine."SQZ Unit Price" - TempMatchEntry."Direct Unit Cost") > AmountTolerance then
        exit(false);

    exit(true);
end;

local procedure AssignMatchData(
    var DocLine: Record "DXP SQZ Document Line";
    TempMatchEntry: Record "DXP SQZ Order Match Entry" temporary)
begin
    // Assign the matched data to the document line
    DocLine.Validate("Allocated Document Type", "DXP Order Match Document Type"::Custom);
    DocLine.Validate("Allocated Document No.", TempMatchEntry."Document No.");
    DocLine.Validate("Allocated Document Line No.", TempMatchEntry."Document Line No.");
    DocLine.Validate("Allocated Quantity", TempMatchEntry.Quantity);
    DocLine.Validate("Allocated Unit Price", TempMatchEntry."Direct Unit Cost");
    DocLine.Validate("Allocated Line Amount", TempMatchEntry."Line Amount");
    DocLine.Validate("Allocated Line Discount %", TempMatchEntry."Line Discount %");
    DocLine.Modify(true);
end;
Implementation of a new, generic document class
SQUEEZE → Core → Your processing
This guide is deliberately focused and pipeline-oriented: It shows how document data is downloaded from SQUEEZE, processed in queues, and persisted in DEXPRO Core—and where a third-party extension comes into play.
Term: In this guide, “SQUEEZE app” refers to the Business Central extension that is connected to the SQUEEZE API and controls imports to DEXPRO Core.
Assumptions:
- Third-party developers typically work with published icons, not with the entire source code.
- The SQUEEZE app handles downloading + import queue + creation of the core document as well as the rudimentary creation of the SQUEEZE document, taking field mapping into account, as soon as setup is complete.
- Your extension takes over the business logic once the core document exists: create or extend source records, validate them, generate “Processed JSON,” and optionally create your own target object or document.
1) The end-to-end process SQUEEZE → Core
Once the document class and setup are configured, the SQUEEZE app's import pipeline typically runs as follows:
DXP Document Classextend and bind your implementation:DXP ISource Document.- Configure settings for this Document class‑Setup.
- When validating
DXP SQZ Document Class ID, the SQUEEZE app automatically retrieves the required setup values from SQUEEZE (e.g.,DXP SQZ Export Interface IDandDXP SQZ Line Table ID) and fills them in.
- When validating
- The SQUEEZE app job calls
DXP SQZ API Mgt.DownloadDocumentData(). Can also be called via “Download documents”.- New entries are created in the DXP SQZ import queue (document ID + target client).
- The SQUEEZE app calls
DXP SQZ Import Queue Mgt.TransferImportQueueEntries().- The orchestration code unit
DXP Sqz Create Documentis executed for the entries in the import queue.
- The orchestration code unit
DXP SQZ API Mgt.CreateCoreAndSQUEEZEDocument(DocClass, DocumentId)loads the complete JSON.DXP Document Mgt.AddDocument(DocClass, DocumentId, RawJson, …)is called up.- Result: A
DXP Document‑Record exists. Status =Imported,JSON Rawis filled.
- The SQUEEZE app calls your implementation
ISourceDocument.CreateSource(Document).- Your implementation begins here.
After step 6, you will have:
- A Core‑Container‑Document (
DXP Document). - A SQUEEZE document in the SQUEEZE app.
- Your source records should exist once
CreateSourcehas completed successfully.
2) What you implement (Interfaces)
Source contract, i.e., squeeze page: DXP ISource Document
You implement this to:
- Create your editable source data sets from
DXP Document.JSON Raw - Validate source data records
- Generate “Processed JSON” and transfer it to core processing
Target contract, i.e., target document: DXP IDocument Processing
You implement this if Core is to create/update its own target data set (your own table/document) from the “Processed JSON.”
3) Step 1 — Define document class and assign source implementation
Create an enum extension and bind your source implementation:
enumextension 50100 "MY Document Class Ext." extends "DXP Document Class"
{
    value(50100; "MY Generic Document")
    {
        Caption = 'My Generic Document';
        Implementation = "DXP ISource Document" = "MY Source Document Impl.";
    }
}
4) Step 2 — Configure document class setup (so that the import queue is filled)
Configure the SQUEEZE-specific fields in the document class setup for your new document class.
Important:
- Validating the
DXP SQZ Document Class IDtriggers the automatic loading of the required configuration from SQUEEZE (e.g.,DXP SQZ Export Interface IDandDXP SQZ Line Table ID). - If the call fails, these API-derived fields are cleared again.
Result: The SQUEEZE app can execute DownloadDocumentData() and create entries in the DXP SQZ Import Queue for your class.
5) Step 3 — Ensure field mapping (downloaded mapping + your default values)
The SQUEEZE app can download the field catalog of the connected Squeeze client and persist it in Core Mapping tables (per document class).
Your role as a document class implementer:
- Provide standard field mapping “Squeeze Field Name → AL Field No.” via
InitFieldMapping(...). - Alternatively, map fields via the assignment pages (custom field assignment).
5.1 Implement InitFieldMapping (independent example)
codeunit 50101 "MY Source Document Impl." implements "DXP ISource Document"
{
    procedure InitFieldMapping(var HeaderMapping: Dictionary of [Text, Integer]; var LineMapping: Dictionary of [Text, Integer])
    var
        Header: Record "DXP SQZ Document Header";
        Line: Record "DXP SQZ Document Line";
    begin
        Clear(HeaderMapping);
        Clear(LineMapping);

        // Header fields
        HeaderMapping.Add('vendorNo', Header.FieldNo("Buy-from Vendor No."));
        HeaderMapping.Add('documentDate', Header.FieldNo("Document Date"));
        HeaderMapping.Add('postingDate', Header.FieldNo("Posting Date"));
        HeaderMapping.Add('reference', Header.FieldNo("Document Reference"));

        // Line fields
        LineMapping.Add('description', Line.FieldNo(Description));
        LineMapping.Add('quantity', Line.FieldNo(Quantity));
        LineMapping.Add('unitPrice', Line.FieldNo("Direct Unit Cost"));
    end;

    // other interface methods omitted here...
}
5.2 Validation switch when assigning fields: Validate app field
When the SQUEEZE app or your source creation logic writes JSON values to “app/source fields,” you can control whether the OnValidate trigger is executed.
In DXP Custom Field Mapping:
Validate App Field= Validate the app field during the assignment.Validate(Target) = Perform validation when transferring to the target field.
Use this, for example, if extension fields have business logic in OnValidate or if you want to assign deliberately trigger-free (higher performance).
6) Step 4 — Create Source data sets in CreateSource
CreateSource(Document) is called by the SQUEEZE app immediately after DXP Document Mgt.AddDocument(...) as soon as the core container data record exists.
Minimum responsibilities:
- Read
DXP Document.JSON Raw. - Create SQUEEZE‑Source‑Header/Lines (
DXP SQZ Document Header/DXP SQZ Document Line). - Connect Core‑document with SQUEEZE‑Source‑Header via
UpdateDocumentAfterTransfer.
Optional (recommended if you want functionality equivalent to the standard SQUEEZE document classes): 4) Download attachments if DXP Download Attachments is active. 5) Perform automatic validation if enabled for the document.
6.1 Example: Create SQUEEZE‑Header + Lines with generic helpers
What the helpers do (so you don't have to implement it twice):
-
SqzDocumentMgt.CreateSQUEEZEDocHeader(Document, DocHeader, RawJson)- Creates exactly one data record in
DXP SQZ Document Headerfor the Core‑document (DXP Document). - Sets identification fields as
Core Document No.and the SQUEEZE‑API Document ID. - Assigns header fields from JSON based on the configured mappings:
DXP Field Mapping(field mapping)DXP Custom Field Mapping(Custom field mapping)
- Respects
DXP Custom Field Mapping.Validate App Fieldand thus decides whether the OnValidate trigger is executed when assigning. - Executes the integration event
OnBeforeModifySQUEEZEDocumentHeader(...)as an extension hook. - Standard post-processing is also performed for the built-in standard SQUEEZE classes (e.g., alternative IBAN/VAT ID determination, supplier update, standard posting date, duplicate check).
- Creates exactly one data record in
-
SqzDocumentMgt.CreateSQUEEZEDocLine(DocHeader, RawJson)- Creates the
DXP SQZ Document Line‑data sets based on the JSON‑Rows. - Assign line fields using the same mapping principle (standard + custom; optionally with validation triggers).
- Fill the
Core Document No.in the lines. - For standard SQUEEZE classes, standard line post-processing is also applied (e.g., transfer of recognized values).
- Persists line-related auxiliary data (e.g., coordinates/metadata that use the UI and matching logic).
- Creates the
procedure CreateSource(Document: Record "DXP Document"): Boolean
var
    DocClassSetup: Record "DXP Document Class Setup";
    AutoValidationMgt: Codeunit "DXP Automatic Validation Mgt.";
    JsonHelper: Codeunit "DXP Json Helper";
    DocMgt: Codeunit "DXP Document Mgt.";
    SqzDocumentMgt: Codeunit "DXP SQZ Document Mgt.";
    SqzApiMgt: Codeunit "DXP SQZ API Mgt.";
    RawJson: JsonObject;
    DocHeader: Record "DXP SQZ Document Header";
    AutomaticValidation: Boolean;
begin
    if (not Document."JSON Raw".HasValue()) or (Document.Status <> Document.Status::Imported) then
        exit(false);

    // 1) Unverarbeitetes JSON lesen
    RawJson := JsonHelper.JObjectFromBlob(Document.RecordId(), Document.FieldNo("JSON Raw"));

    // 2) SQUEEZE‑Source‑Dokument mit den generischen Hilfsfunktionen erstellen
    //    (Feldzuordnung + optionales Validierungs‑Trigger‑Verhalten wird im Helper behandelt)
    SqzDocumentMgt.CreateSQUEEZEDocHeader(Document, DocHeader, RawJson);
    SqzDocumentMgt.CreateSQUEEZEDocLine(DocHeader, RawJson);

    // 3) Core → SQUEEZE‑Source‑Header verknüpfen
    DocMgt.UpdateDocumentAfterTransfer(Document."No.", Document.Status::Transferred, DocHeader."API Document ID", DocHeader.RecordId());

    // 4) Optional: Anhänge herunterladen und speichern
    //    (gesteuert über die Dokumentenklassen‑Einrichtung)
    if DocClassSetup.Get(DocHeader."Document Class") then
        if DocClassSetup."DXP Download Attachments" then
            SqzApiMgt.DownloadAndSaveAttachments(DocHeader);

    // 5) Optional: Automatische Validierung
    //    Wenn aktiviert, führt die Validierung die Plausibilitätsprüfungen aus und erstellt das „Processed JSON“.
    AutomaticValidation := AutoValidationMgt.AutomaticValidationActivated(DocHeader."No.");
    if AutomaticValidation then
        SqzDocumentMgt.ValidateSQUEEZEDocument(DocHeader, AutomaticValidation);

    exit(true);
end;
7) Step 5 — Validation + Handover „Processed JSON“
7.1 Validation: IsSourceDataPlausible
Use the Core Plausibility Framework to ensure that errors are displayed consistently:
procedure IsSourceDataPlausible(Source: Variant; var TempPlausibilityCheckEntry: Record "DXP Plausibility Check Entry" temporary): Boolean
var
    PlausibilityCheck: Codeunit "DXP Plausiblity Check Mgt.";
    Header: Record "DXP SQZ Document Header";
begin
    if not Source.IsRecord then
        exit(false);

    Header := Source;
    TempPlausibilityCheckEntry.DeleteAll();

    PlausibilityCheck.FieldIsEmpty(Header, Header.FieldNo("Buy-from Vendor No."), 0, false, false);
    PlausibilityCheck.CheckPostingDate(Header."Posting Date", Header.FieldNo("Posting Date"));
    PlausibilityCheck.GetPlausibilityCheckEntries(TempPlausibilityCheckEntry);

    exit(TempPlausibilityCheckEntry.IsEmpty());
end;
7.2 Build „Processed JSON“ and pass it to the core: CreateProcessedJsonFromSource
Core stores “Processed JSON” in DXP Document.JSON Processed and transfers it to your target processing.
procedure CreateProcessedJsonFromSource(Source: Variant)
var
    CoreTokenMgt: Codeunit "DXP Core Token Mgt.";
    DocMgt: Codeunit "DXP Document Mgt.";
    JsonHelper: Codeunit "DXP Json Helper";
    DocTransferMgt: Codeunit "DXP Document Transfer Mgt.";
    Header: Record "DXP SQZ Document Header";
    Line: Record "DXP SQZ Document Line";
    HeaderJObj: JsonObject;
    LinesJArr: JsonArray;
    LineJObj: JsonObject;
begin
    Header := Source;

    HeaderJObj.Add(CoreTokenMgt.GetVendorNoTok(), Header."Buy-from Vendor No.");
    HeaderJObj.Add(CoreTokenMgt.GetDocDateTok(), Header."Document Date");
    HeaderJObj.Add(CoreTokenMgt.GetDocReferenceTok(), Header."Document Reference");

    // Benutzerdefinierte Felder (Erweiterungsfelder) aus den Source‑Tabellen hinzufügen
    HeaderJObj.Add(CoreTokenMgt.GetCustomFieldsTok(), JsonHelper.Rec2JsonFieldArray(Header, true, true, Header."Document Class", Enum::"DXP Field Type"::Header));

    Line.SetRange("Document No.", Header."No.");
    if Line.FindSet() then
        repeat
            Clear(LineJObj);
            LineJObj.Add(CoreTokenMgt.GetDescriptionTok(), Line.Description);
            LineJObj.Add(CoreTokenMgt.GetQtyTok(), Line.Quantity);
            LineJObj.Add(CoreTokenMgt.GetCustomFieldsTok(), JsonHelper.Rec2JsonFieldArray(Line, true, true, Header."Document Class", Enum::"DXP Field Type"::Line));
            LinesJArr.Add(LineJObj);
        until Line.Next() = 0;

    DocTransferMgt.AddDocLinesToHeaderJson(HeaderJObj, LinesJArr);

    // An Core‑Zielverarbeitung übergeben
    DocMgt.UpdateDocument(
        Header."Core Document No.",
        Enum::"DXP Document Status"::Transferred,
        Enum::"DXP Target Document Process"::"MY Create Custom Document",
        Enum::"DXP Next process step"::"Standard document",
        HeaderJObj);
end;
8) Step 6 — Create your own target document
If you want Core to create your own target data set, extend DXP Target Document Process and implement DXP IDocument Processing:
enumextension 50102 "MY Target Doc Process Ext." extends "DXP Target Document Process"
{
    value(50102; "MY Create Custom Document")
    {
        Caption = 'Create My Custom Document';
        Implementation = "DXP IDocument Processing" = "MY Custom Doc Creation";
    }
}

codeunit 50103 "MY Custom Doc Creation" implements "DXP IDocument Processing"
{
    procedure ProcessStandardDocument(JObject: JsonObject): RecordId
    var
        CoreTokenMgt: Codeunit "DXP Core Token Mgt.";
        DocTransferMgt: Codeunit "DXP Document Transfer Mgt.";
        JsonHelper: Codeunit "DXP Json Helper";
        MyDoc: Record "MY Custom Document";
        TargetVariant: Variant;
    begin
        MyDoc.Init();
        MyDoc.Validate("Vendor No.", JsonHelper.ValAsTxt(JObject, CoreTokenMgt.GetVendorNoTok(), false));
        MyDoc.Validate("Document Date", JsonHelper.ValAsDate(JObject, CoreTokenMgt.GetDocDateTok(), false));
        MyDoc.Insert(true);

        // Überträgt Metadaten sowie benutzerdefinierte/zusätzliche Felder anhand der Core‑Zuordnungen in den Ziel‑Datensatz.
        TargetVariant := MyDoc;
        DocTransferMgt.ProcessAdditionalInformation(JObject, TargetVariant);
        MyDoc := TargetVariant;

        exit(MyDoc.RecordId());
    end;
}
Note: The transfer of metadata and user-defined/additional fields is already included in the above example and is based on the core mapping tables.
9) Troubleshooting (quick checks)
- No entries in
DXP SQZ Import Queue→ Document class setup for SQUEEZE is incomplete. - Core‑
DXP Documentexists, but no source record → YourCreateSource(Document)has failed or returnsfalse. - Source exists, but target is not created →
CreateProcessedJsonFromSourceis not called orDXP Target Document Processis not configured. - Incorrect trigger behavior when assigning → Check
DXP Custom Field Mapping.Validate App FieldandValidate.Validatecontrols whether validation of the target field (OnValidate) is performed.
10) What Core does automatically
When you call up DXP Document Mgt.UpdateDocument(...):
- Core stores the “Processed JSON” in
DXP Document.JSON Processed. - Core sets
DXP Document.Statusto the transferred status. - Core linked/updated
DXP Document.Linked-to Record Idwith the record, which yourDXP IDocument Processing‑implementation returns. - Core transfers Core attachments to the returned data set (and typically appends the “Processed JSON” as a
.jsonattachment).
Custom Document Creation (Custom Processing)
Table of Contents
Overview
This guide explains how to create custom Business Central documents from JSON data provided by DEXPRO Core. The system receives documents with status "Custom Processing", which third-party developers can transform into any BC document type (Purchase Orders, Sales Orders, G/L Journals, Service Orders, etc.).
What You'll Learn
- How to intercept documents marked for custom processing
- The JSON structure containing document header, lines, metadata, and custom fields
- How to create your custom document
Understanding the Document Flow
Core Workflow
┌─────────────────────────────────────────────────────────────────┐
│ 1. Document Import                                              │
│    JSON Raw Data → DXP Document (Status: Imported)              │
└────────────────────────┬────────────────────────────────────────┘
                         │
                         ▼
┌─────────────────────────────────────────────────────────────────┐
│ 2. Source Document Creation                                     │
│    ISourceDocument.CreateSource() → Your Source Tables          │
│    (e.g., SQZ Document Header/Lines or Your Custom Tables)      │
└────────────────────────┬────────────────────────────────────────┘
                         │
                         ▼
┌─────────────────────────────────────────────────────────────────┐
│ 3. Validation & Plausibility Checks                             │
│    ISourceDocument.IsSourceDataPlausible()                      │
│    → Validates data quality, checks for errors                  │
└────────────────────────┬────────────────────────────────────────┘
                         │
                         ▼
┌─────────────────────────────────────────────────────────────────┐
│ 4. Create Processed JSON                                        │
│    ISourceDocument.CreateProcessedJsonFromSource()              │
│    → Builds JSON structure for target document                  │
└────────────────────────┬────────────────────────────────────────┘
                         │
                         ▼
┌─────────────────────────────────────────────────────────────────┐
│ 5. Update Core Document with "Custom Processing" Status         │
│    UpdateDocument() → Sets Status to "Custom Processing"        │
│    → Stores JSON Processed in DXP Document                      │
└────────────────────────┬────────────────────────────────────────┘
                         │
                         ▼
┌─────────────────────────────────────────────────────────────────┐
│ 6. Your Custom Processing (THIS IS WHERE YOU HOOK IN!)          │
│    Subscribe to events or implement interface                   │
│    → Read JSON Processed from DXP Document                      │
│    → Create your target BC document                             │
└────────────────────────┬────────────────────────────────────────┘
                         │
                         ▼
┌─────────────────────────────────────────────────────────────────┐
│ 7. Final Status Update                                          │
│    Document Status → Transferred or Finished                    │
│    Linked-to Record Id → Your created BC document               │
└─────────────────────────────────────────────────────────────────┘
Key Status Values
| Status | Description |
|---|---|
| Imported | Raw JSON received, not yet processed |
| Transferred | Source document created, ready for processing |
| Custom Processing | Your target status - Document ready for custom handling |
| Finished | Target document successfully created |
| Deleted | Processing complete, document archived |
JSON Data Structure
Overview
The "JSON Processed" blob in the DXP Document table contains a structured JSON object with all information needed to create your target document.
Complete JSON Structure
{
  // ═══════════════════════════════════════════════════════════
  // HEADER SECTION - Document-level information
  // ═══════════════════════════════════════════════════════════

  "Type": "Invoice",                    // Document type: Invoice, Credit Memo, Order, etc.
  "VendorNo": "VENDOR001",              // Vendor/Customer number
  "DocumentDate": "2025-10-15",         // Document date
  "PostingDate": "2025-10-16",          // Posting date
  "DocumentReference": "INV-2025-001",  // External document number
  "OrderNo": "PO-12345",                // Reference to order (if applicable)
  "PostingDescription": "Invoice Q4",   // Posting description
  "NetAmount": 1000.00,                 // Net amount (excluding tax)
  "TotalAmount": 1190.00,               // Gross amount (including tax)
  "TaxAmount": 190.00,                  // Total tax amount
  "Currency": "EUR",                    // Currency code

  // ───────────────────────────────────────────────────────────
  // DIMENSIONS - Header-level dimensions as key-value pairs
  // ───────────────────────────────────────────────────────────

  "Dimensions": {
    "DEPARTMENT": "SALES",
    "PROJECT": "PROJ001",
    "COSTCENTER": "CC-100"
  },

  // ───────────────────────────────────────────────────────────
  // CUSTOM FIELDS - Additional header fields (see below)
  // ───────────────────────────────────────────────────────────

  "CustomFields": [
    {
      "Id": 50100,
      "Name": "CustomerNo",
      "Value": "CUST001",
      "Caption": "Customer Number"
    },
    {
      "Id": 50101,
      "Name": "DeliveryTerms",
      "Value": "EXW",
      "Caption": "Delivery Terms"
    }
  ],

  // ───────────────────────────────────────────────────────────
  // METADATA - System-generated field mappings
  // ───────────────────────────────────────────────────────────

  "Metadata": [
    {
      "DocumentClass": "DXP Invoice / Credit Memo",
      "FieldType": "Header",
      "FieldId": 101,
      "Value": "Additional Info"
    }
  ],

  // ═══════════════════════════════════════════════════════════
  // LINES SECTION - Document line items
  // ═══════════════════════════════════════════════════════════

  "Lines": [
    {
      // ─────────────────────────────────────────────────────────
      // Line Basic Information
      // ─────────────────────────────────────────────────────────

      "Type": "Item",                   // Item, G/L Account, Charge (Item), Fixed Asset
      "No": "ITEM001",                  // Item/Account number
      "Description": "Product A",       // Line description
      "VendorItemNo": "VEND-SKU-123",   // Vendor's item number
      "Quantity": 10.0,                 // Quantity
      "UnitOfMeasure": "PCS",          // Unit of measure
      "DirectUnitCost": 100.00,        // Unit price
      "LineDiscount": 5.0,             // Line discount percentage

      // ─────────────────────────────────────────────────────────
      // Line Amounts & Tax
      // ─────────────────────────────────────────────────────────

      "NetAmount": 950.00,             // Line net amount
      "TotalAmount": 1130.50,          // Line gross amount
      "TaxRate": 19.0,                 // Tax percentage
      "VATBusPostingGroup": "DOMESTIC",
      "VATProdPostingGroup": "STANDARD",
      "GenBusPostingGroup": "DOMESTIC",
      "GenProdPostingGroup": "RETAIL",

      // ─────────────────────────────────────────────────────────
      // Order Reference (for matching)
      // ─────────────────────────────────────────────────────────

      "OrderNo": "PO-12345",           // Referenced order number
      "OrderLineNo": 10000,            // Referenced order line number
      "ReceiptNo": "RCP-001",          // Referenced receipt number
      "ReceiptLineNo": 10000,          // Referenced receipt line number

      // ─────────────────────────────────────────────────────────
      // Line Dimensions
      // ─────────────────────────────────────────────────────────

      "Dimensions": {
        "DEPARTMENT": "PROD",
        "PROJECT": "PROJ001"
      },

      // ─────────────────────────────────────────────────────────
      // Line Custom Fields
      // ─────────────────────────────────────────────────────────

      "CustomFields": [
        {
          "Id": 50200,
          "Name": "SerialNo",
          "Value": "SN-12345",
          "Caption": "Serial Number"
        }
      ],

      // ─────────────────────────────────────────────────────────
      // Line Metadata
      // ─────────────────────────────────────────────────────────

      "Metadata": [
        {
          "DocumentClass": "DXP Invoice / Credit Memo",
          "FieldType": "Line",
          "FieldId": 201,
          "Value": "Line-specific metadata"
        }
      ]
    }
    // ... additional lines
  ]
}
Custom Fields vs. Metadata
Custom Fields:
-
User-defined fields from your app
-
Mapped via Custom Field Mapping
-
Can be mapped to any field in the Squeeze Validation
-
Example: Adding a "Customer No." to the Squeeze Validation
Metadata:
-
System-generated fields
-
Extracted by the Squeeze System but not mapped to any Field in BC
Quick Start: Simple Custom Processing
Scenario
You want to create a custom document type (e.g., a Warehouse Shipment) from documents marked with "Custom Processing" status.
Step 1: Subscribe to the Integration Event
Create a codeunit to intercept documents with "Custom Processing" status:
codeunit 50100 "My Custom Document Handler"
{
    [EventSubscriber(ObjectType::Codeunit, Codeunit::"DXP Document Mgt.",
        'OnAfterWriteProcessedJsonToBlob', '', true, true)]
    local procedure OnAfterWriteProcessedJsonToBlob(
        var Document: Record "DXP Document";
        var ProcessedJSONObj: JsonObject)
    begin
        // Only handle Custom Processing status
        if Document.Status <> Document.Status::"Custom Processing" then
            exit;

        // Create your custom document
        CreateMyCustomDocument(Document, ProcessedJSONObj);
    end;

    local procedure CreateMyCustomDocument(
        var Document: Record "DXP Document";
        ProcessedJSON: JsonObject)
    var
        CoreTokenMgt: Codeunit "DXP Core Token Mgt.";
        JsonHelper: Codeunit "DXP Json Helper";
        MyCustomHeader: Record "My Custom Document Header";
        MyCustomLine: Record "My Custom Document Line";
        LineJArray: JsonArray;
        LineJToken: JsonToken;
        LineJObj: JsonObject;
    begin
        // ═══════════════════════════════════════════════════════
        // 1. CREATE HEADER
        // ═══════════════════════════════════════════════════════

        MyCustomHeader.Init();
        MyCustomHeader."No." := '';  // Will be assigned by number series

        // Read standard header fields
        MyCustomHeader."Vendor No." :=
            JsonHelper.ValAsTxt(ProcessedJSON, CoreTokenMgt.GetVendorNoTok(), false);
        MyCustomHeader."Document Date" :=
            JsonHelper.ValAsDate(ProcessedJSON, CoreTokenMgt.GetDocDateTok(), false);
        MyCustomHeader."Document Reference" :=
            JsonHelper.ValAsTxt(ProcessedJSON, CoreTokenMgt.GetDocReferenceTok(), false);

        MyCustomHeader.Insert(true);

        // ═══════════════════════════════════════════════════════
        // 2. PROCESS DIMENSIONS (if your document supports them)
        // ═══════════════════════════════════════════════════════

        ProcessHeaderDimensions(ProcessedJSON, MyCustomHeader);

        // ═══════════════════════════════════════════════════════
        // 3. PROCESS CUSTOM FIELDS
        // ═══════════════════════════════════════════════════════

        ProcessCustomFields(ProcessedJSON, MyCustomHeader);

        // ═══════════════════════════════════════════════════════
        // 4. CREATE LINES
        // ═══════════════════════════════════════════════════════

        LineJArray := JsonHelper.ReadJArrayFromObj(ProcessedJSON, CoreTokenMgt.GetLinesTok());

        foreach LineJToken in LineJArray do begin
            LineJObj := LineJToken.AsObject();

            MyCustomLine.Init();
            MyCustomLine."Document No." := MyCustomHeader."No.";
            MyCustomLine."Line No." := GetNextLineNo(MyCustomHeader."No.");

            // Read line fields
            MyCustomLine."Item No." :=
                JsonHelper.ValAsTxt(LineJObj, CoreTokenMgt.GetNoTok(), false);
            MyCustomLine.Description :=
                JsonHelper.ValAsTxt(LineJObj, CoreTokenMgt.GetDescriptionTok(), false);
            MyCustomLine.Quantity :=
                JsonHelper.ValAsDec(LineJObj, CoreTokenMgt.GetQtyTok(), false);
            MyCustomLine."Unit of Measure" :=
                JsonHelper.ValAsTxt(LineJObj, CoreTokenMgt.GetUoMTok(), false);

            MyCustomLine.Insert(true);

            // Process line dimensions and custom fields if needed
            ProcessLineDimensions(LineJObj, MyCustomLine);
            ProcessLineCustomFields(LineJObj, MyCustomLine);
        end;

        // ═══════════════════════════════════════════════════════
        // 5. UPDATE CORE DOCUMENT STATUS
        // ═══════════════════════════════════════════════════════

        UpdateCoreDocument(Document, MyCustomHeader);
    end;

    local procedure ProcessHeaderDimensions(ProcessedJSON: JsonObject; var MyCustomHeader: Record "My Custom Document Header")
    var
        CoreTokenMgt: Codeunit "DXP Core Token Mgt.";
        DocTransferMgt: Codeunit "DXP Document Transfer Mgt.";
        DimensionsJObj: JsonObject;
        DimSetID: Integer;
    begin
        // Read dimensions from JSON
        if ProcessedJSON.Contains(CoreTokenMgt.GetDimensionsTok()) then begin
            ProcessedJSON.Get(CoreTokenMgt.GetDimensionsTok(), DimensionsJObj);

            // Convert to Dimension Set ID
            if DocTransferMgt.GetDimSetIdFromJsonObj(DimensionsJObj, DimSetID) then begin
                MyCustomHeader."Dimension Set ID" := DimSetID;
                MyCustomHeader.Modify(true);
            end;
        end;
    end;

    local procedure ProcessCustomFields(ProcessedJSON: JsonObject; var MyCustomHeader: Record "My Custom Document Header")
    var
        CoreTokenMgt: Codeunit "DXP Core Token Mgt.";
        JsonHelper: Codeunit "DXP Json Helper";
        CustomFieldsJArray: JsonArray;
        CustomFieldJToken: JsonToken;
        CustomFieldJObj: JsonObject;
        FieldName: Text;
        FieldValue: Text;
    begin
        // Read custom fields array
        if not ProcessedJSON.Contains(CoreTokenMgt.GetCustomFieldsTok()) then
            exit;

        CustomFieldsJArray := JsonHelper.ReadJArrayFromObj(ProcessedJSON, CoreTokenMgt.GetCustomFieldsTok());

        foreach CustomFieldJToken in CustomFieldsJArray do begin
            CustomFieldJObj := CustomFieldJToken.AsObject();
            FieldName := JsonHelper.ValAsTxt(CustomFieldJObj, CoreTokenMgt.GetNameTok(), false);
            FieldValue := JsonHelper.ValAsTxt(CustomFieldJObj, CoreTokenMgt.GetValueTok(), false);

            // Map to your custom fields
            case FieldName of
                'CustomerNo':
                    MyCustomHeader."Customer No." := CopyStr(FieldValue, 1, 20);
                'DeliveryTerms':
                    MyCustomHeader."Delivery Terms" := CopyStr(FieldValue, 1, 10);
                // Add more field mappings as needed
            end;
        end;

        MyCustomHeader.Modify(true);
    end;

    local procedure ProcessLineDimensions(LineJObj: JsonObject; var MyCustomLine: Record "My Custom Document Line")
    var
        CoreTokenMgt: Codeunit "DXP Core Token Mgt.";
        DocTransferMgt: Codeunit "DXP Document Transfer Mgt.";
        DimensionsJObj: JsonObject;
        DimSetID: Integer;
    begin
        if LineJObj.Contains(CoreTokenMgt.GetDimensionsTok()) then begin
            LineJObj.Get(CoreTokenMgt.GetDimensionsTok(), DimensionsJObj);

            if DocTransferMgt.GetDimSetIdFromJsonObj(DimensionsJObj, DimSetID) then begin
                MyCustomLine."Dimension Set ID" := DimSetID;
                MyCustomLine.Modify(true);
            end;
        end;
    end;

    local procedure ProcessLineCustomFields(LineJObj: JsonObject; var MyCustomLine: Record "My Custom Document Line")
    var
        CoreTokenMgt: Codeunit "DXP Core Token Mgt.";
        JsonHelper: Codeunit "DXP Json Helper";
        CustomFieldsJArray: JsonArray;
        CustomFieldJToken: JsonToken;
        CustomFieldJObj: JsonObject;
        FieldName: Text;
        FieldValue: Text;
    begin
        if not LineJObj.Contains(CoreTokenMgt.GetCustomFieldsTok()) then
            exit;

        CustomFieldsJArray := JsonHelper.ReadJArrayFromObj(LineJObj, CoreTokenMgt.GetCustomFieldsTok());

        foreach CustomFieldJToken in CustomFieldsJArray do begin
            CustomFieldJObj := CustomFieldJToken.AsObject();
            FieldName := JsonHelper.ValAsTxt(CustomFieldJObj, CoreTokenMgt.GetNameTok(), false);
            FieldValue := JsonHelper.ValAsTxt(CustomFieldJObj, CoreTokenMgt.GetValueTok(), false);

            // Map to your line custom fields
            case FieldName of
                'SerialNo':
                    MyCustomLine."Serial No." := CopyStr(FieldValue, 1, 50);
                // Add more field mappings
            end;
        end;

        MyCustomLine.Modify(true);
    end;

    local procedure UpdateCoreDocument(var Document: Record "DXP Document"; MyCustomHeader: Record "My Custom Document Header")
    var
        DocumentMgt: Codeunit "DXP Document Mgt.";
    begin
        // Update the core document to link it to your created document
        Document.Status := Document.Status::Transferred;
        Document."Linked-to Record Id" := MyCustomHeader.RecordId;
        Document.Modify(true);

        // Optionally, transfer attachments from Core to your document
        TransferAttachments(Document, MyCustomHeader);
    end;

    local procedure TransferAttachments(Document: Record "DXP Document"; MyCustomHeader: Record "My Custom Document Header")
    var
        DocAttachment: Record "DXP Document Attachment";
        MyDocAttachment: Record "Document Attachment";
        InStr: InStream;
    begin
        DocAttachment.SetRange("Document No.", Document."No.");
        if DocAttachment.FindSet() then
            repeat
                MyDocAttachment.Init();
                MyDocAttachment.ID := 0;

                DocAttachment."File Content".CreateInStream(InStr);
                MyDocAttachment.SaveAttachmentFromStream(
                    InStr,
                    MyCustomHeader.RecordId,
                    DocAttachment."File Name");
            until DocAttachment.Next() = 0;
    end;

    local procedure GetNextLineNo(DocumentNo: Code[20]): Integer
    var
        MyCustomLine: Record "My Custom Document Line";
    begin
        MyCustomLine.SetRange("Document No.", DocumentNo);
        if MyCustomLine.FindLast() then
            exit(MyCustomLine."Line No." + 10000);
        exit(10000);
    end;
}
Key Helper Codeunits
| Codeunit | Purpose |
|---|---|
| DXP Core Token Mgt. | Provides token names for JSON fields (GetVendorNoTok(), GetDocDateTok(), etc.) |
| DXP Json Helper | JSON parsing utilities (ValAsTxt(), ValAsDate(), ReadJArrayFromObj(), etc.) |
| DXP Document Transfer Mgt. | Dimension processing, metadata transfer, custom field handling |
| DXP Document Mgt. | Core document management (UpdateDocument(), UpdateDocumentStatus(), etc.) |
For questions or clarifications, please contact DEXPRO Solutions GmbH.
Embedding the SQUEEZE Viewer part in your own pages WIP
Diese Anleitung beschreibt, wie Sie den SQUEEZE Viewer in beliebige Seiten einbetten (eigene Pages oder Page Extensions) – über den wiederverwendbaren Viewer‑Part:
- Page: "DXP SQZ Viewer Part" (PageType =
CardPart) - Source table: "DXP SQZ Document Header"
Der Viewer‑Part hostet die SQUEEZE Control Add-ins und lädt die Preview‑URL anhand des aktuellen Datensatzes DXP SQZ Document Header.
Referenz‑Implementierung, die in dieser App bereits enthalten ist:
- Page "DXP SQZ Document (Generic)" (Card, SourceTable DXP SQZ Document Header) bettet den Viewer‑Part als FactBox ein und verdrahtet das Resident‑Sharing zur generischen Lines‑Subform.
- Page "DXP SQZ Doc. Generic Subform" (ListPart, SourceTable DXP SQZ Document Line) enthält eine bekannte, funktionierende Minimal‑Implementierung von
MarkRow().
Die Pages können Sie benutzen und mit ihren Feldern erweitern. Die Page "DXP SQZ Document (Generic)" verfügt über einen Viewer in der Factbox und die wichtigsten Actions.
1) Voraussetzungen
-
Ihre Extension muss von der DEXPRO SQUEEZE App abhängig sein (damit Page/Control Add-ins als Symbole verfügbar sind).
-
Der Host‑Datensatz muss eine Möglichkeit bieten, einen DXP SQZ Document Header Datensatz zu referenzieren.
- Die
SourceTabledes Viewer‑Parts ist fest auf DXP SQZ Document Header. - Deshalb muss Ihre Seite ein Feld haben (oder bereitstellen), das sich in
SubPageLinkverwenden lässt, um den Header zu finden. Alternativ kann der Record in dem Viewer-Part gesetzt werden - Beispiele folgen weiter unten.
- Die
-
SQUEEZE muss aktiviert und konfiguriert sein (Setup + API Key). Der Viewer‑Part lädt absichtlich nicht, wenn das Modul nicht aktiviert ist.
2) Empfohlenes Einbettungsmuster
2.1 Als FactBox einbetten (empfohlen)
Für die meisten Szenarien (Card Pages, List Pages) platzieren Sie den Viewer in area(FactBoxes).
Wenn die SourceTable Ihrer Seite DXP SQZ Document Header ist
layout
{
    area(FactBoxes)
    {
        part(SQZViewer; "DXP SQZ Viewer Part")
        {
            ApplicationArea = All;
            Caption = 'Viewer';

            // Link the FactBox part to the current SQZ header
            SubPageLink = "No." = field("No.");
        }
    }
}
Wenn die SourceTable Ihrer Seite NICHT DXP SQZ Document Header ist
Sie können den Viewer‑Part trotzdem einbetten, sofern Ihr Datensatz ein Feld enthält, das die SQUEEZE Header‑Nummer speichert.
Beispiel: Ihr Datensatz hat ein Feld "SQZ Document No." : Code[20]
layout
{
    area(FactBoxes)
    {
        part(SQZViewer; "DXP SQZ Viewer Part")
        {
            ApplicationArea = All;
            Caption = 'Viewer';

            // Link the viewer part’s "No." to your field
            SubPageLink = "No." = field("SQZ Document No.");
        }
    }
}
Wichtig:
- Setze am Part nicht
Enabled = false. Wenn eine FactBox‑Part deaktiviert ist, kann das verhindern, dass das Control Add-in „ready“ wird – dadurch bleibt der Viewer ggf. dauerhaft leer.
2.2 Viewer dynamisch binden (ohne SubPageLink)
Wenn Ihre Host‑Seite keinen einfachen SubPageLink anbieten kann (z. B. weil es sich um eine Zielbeleg‑Seite wie Purchase Invoice handelt und dort die SQUEEZE Belegnummer nicht gespeichert ist), können Sie den Viewer‑Part trotzdem einbetten und im Code binden.
Konzept:
- Viewer‑Part als FactBox hinzufügen – ohne
SubPageLink. - In
OnAfterGetCurrRecord()den relevantenRecord "DXP SQZ Document Header"auflösen. - Den Datensatz per
CurrPage.<PartName>.Page.SetSqzRecord(SqzHeader);in den Part pushen.
Warum SetSqzRecord?
- Im DEXPRO SQUEEZE Viewer‑Part läuft das Laden der URL in
OnAfterGetCurrRecord(). - Beim Navigieren innerhalb einer Seite (z. B. Wechsel zwischen Purchase Invoices) kann
SetRecord(...)allein dazu führen, dass die FactBox nicht sofort neu lädt. SetSqzRecord(...)ist dafür gedacht, den Header sauber neu zu binden und einen Refresh auszulösen, sodass die korrekte Preview ohne Schließen/Öffnen der Seite geladen wird.
Beispiel‑Gerüst:
layout
{
    area(FactBoxes)
    {
        part(SQZViewer; "DXP SQZ Viewer Part")
        {
            ApplicationArea = All;
            Caption = 'Viewer';
        }
    }
}

trigger OnAfterGetCurrRecord()
var
    SqzHeader: Record "DXP SQZ Document Header";
begin
    if TryResolveSqzHeaderForCurrentRecord(SqzHeader) then
        CurrPage.SQZViewer.Page.SetSqzRecord(SqzHeader);
end;
Dieses Pattern ist besonders für Third‑party Pages hilfreich, weil es vermeidet, „SQUEEZE Document No.“ als Tabellenfeld persistieren zu müssen.
3) Viewer‑Modus (Belegübersicht / Positionsfokus / Abgedockt)
Wenn der Viewer als FactBox eingebettet ist, sind Felder typischerweise nicht editierbar. Deshalb bietet der Viewer‑Part Actions, um den Viewer‑Modus zu ändern.
Was beim Wechsel des Modus passiert:
- Belegübersicht: Zeigt eine Übersichtliche Darstellung des Viewers an.
- Positionsfokus: Zeigt eine schmalere Darstellung des Viewers an.
- Abgedockt: Öffnet den Viewer in einem externen Fenster
Für Third‑party Entwickler:
- Sie müssen keine eigene Mode‑Logik implementieren.
- Nutzen Sie die Actions des Viewer‑Parts (erscheinen im FactBox Action‑Menü).
4) Optional, aber wichtig: Zeilen‑Highlighting aktivieren (MarkRow)
Wenn Sie eine Lines‑Subform haben und die Benutzererfahrung „Zeile klicken → Viewer markiert Koordinaten“ wünschen, muss Ihre Lines‑Page Messages über dieselbe Viewer‑Resident‑Instanz posten, die der Viewer‑Part initialisiert.
Warum das wichtig ist:
- Die Viewer‑UI ist eine Control Add‑in Instanz, die in einer Codeunit
DXP SQUEEZE Viewer Residentgespeichert wird. - Wenn Ihre Lines‑Page eine eigene Variable
DXP SQUEEZE Viewer Residentverwendet (die nicht vom Viewer‑Part initialisiert wurde), hatApiMgt.PostMessage(...)keine Control‑Add‑in Instanz zum Ansprechen – es wird nichts markiert.
4.1 Pattern (Host‑Page verdrahtet Viewer‑Resident in Lines)
Annahmen:
- Ihre Header‑Page hat:
part(SQZViewer; "DXP SQZ Viewer Part")part(DocumentLines; <Ihre Lines ListPart>)
- Ihre Lines‑ListPart stellt eine Procedure bereit:
SetViewerResident(var NewResident: Codeunit "DXP SQUEEZE Viewer Resident")
Das ist ein expliziter Vertrag/Annahme für interaktives Line‑Highlighting.
Ergänzen Sie das auf Ihrer Header‑Page:
trigger OnAfterGetCurrRecord()
var
    SharedResident: Codeunit "DXP SQUEEZE Viewer Resident";
begin
    CurrPage.SQZViewer.Page.GetViewerResident(SharedResident);
    CurrPage.DocumentLines.Page.SetViewerResident(SharedResident);
end;
Hinweise:
- Das gehört in
OnAfterGetCurrRecord()der Host‑Page (dort ist der aktuelle Header stabil, und die Parts existieren). - Wenn Ihre Host‑Page andere Part‑Namen verwendet, passen Sie
CurrPage.<PartName>.Page...entsprechend an.
4.2 Was die Lines‑Subform tun muss
Ihre Lines‑Page sollte MarkRow() in OnAfterGetCurrRecord() aufrufen und MarkRow() ähnlich zur Standard‑Seite implementieren:
- Wenn der externe Viewer aktiv ist (Abgedockt), nur die State‑Tabelle aktualisieren.
- Ansonsten
ApiMgt.PostMessage(ApiMgt.MarkFieldByCoordinatesObj(Rec.RecordId), Resident)aufrufen.
Das ist die Mindestanforderung für interaktives Highlighting.
4.3 Referenz‑Implementierung: minimale Lines‑Subform mit MarkRow
Das ist ein bekannt funktionierendes Minimal‑Pattern (basierend auf der Standard SQUEEZE Lines‑Subform). Third‑party Entwickler können es kopieren und Felder/Repeater‑Spalten nach Bedarf anpassen:
page 70954672 "DXP SQZ Doc. Generic Subform"
{
    Caption = 'Lines';
    PageType = ListPart;
    AutoSplitKey = true;
    DelayedInsert = true;
    SourceTable = "DXP SQZ Document Line";
    RefreshOnActivate = true;

    layout
    {
        area(content)
        {
            repeater(General)
            {
                field("Line No."; Rec."Line No.")
                {
                    ApplicationArea = All;
                    Visible = false;
                }
                // Add your visible SQZ fields here...
            }
        }
    }

    trigger OnAfterGetCurrRecord()
    begin
        MarkRow();
    end;

    var
        ApiMgt: Codeunit "DXP SQZ API Mgt.";
        Resident: Codeunit "DXP SQUEEZE Viewer Resident";
        MarkedLineNo: Integer;

    procedure SetViewerResident(var NewResident: Codeunit "DXP SQUEEZE Viewer Resident")
    begin
        Resident := NewResident;
        MarkedLineNo := 0;
    end;

    local procedure MarkRow()
    var
        DocHeader: Record "DXP SQZ Document Header";
        LineCoordMgt: Codeunit "DXP SQZ Coordinates Mgt.";
        ViewerState: Codeunit "DXP Viewer State";
    begin
        if MarkedLineNo = Rec."Line No." then
            exit;

        if not LineCoordMgt.CoordinateExists(Rec.RecordId) then
            exit;

        // Detached viewer: update the state table only
        if IsExternalViewerActive() then begin
            if DocHeader.Get(Rec."Document No.") then
                ViewerState.UpdateViewerStateWithCoordinates(DocHeader."API Document ID", Rec.RecordId);
        end else
            // Internal viewer: post message to the control add-in instance via the shared resident
            ApiMgt.PostMessage(ApiMgt.MarkFieldByCoordinatesObj(Rec.RecordId), Resident);

        MarkedLineNo := Rec."Line No.";
    end;

    local procedure IsExternalViewerActive(): Boolean
    var
        ViewerState: Codeunit "DXP Viewer State";
    begin
        exit(ViewerState.GetViewerMode() = "DXP SQZ Viewer Mode"::Detached);
    end;
}
5) Fehlersuche (Viewer bleibt leer)
5.1 Der Viewer lädt nie eine Preview
Prüfe zuerst:
- Ist das SQUEEZE Modul aktiviert und das Setup vollständig?
- Hat der verknüpfte DXP SQZ Document Header Datensatz eine gültige
"API Document ID"? - Ist der Viewer‑Modus aktuell Abgedockt und ein externer Viewer offen?
- Der interne Viewer lädt nicht, solange der externe Viewer geöffnet ist.
5.2 FactBox ist sichtbar, aber Control Add-in initialisiert nicht
- Deaktiviere den Viewer‑FactBox‑Part nicht über
Enabled = false. - Stelle sicher, dass die FactBox tatsächlich angezeigt wird (FactBoxes können vom Benutzer eingeklappt/ausgeblendet werden).
5.3 MarkRow hebt nichts hervor
- Stelle sicher, dass die Lines‑Page dieselbe Viewer‑Resident‑Instanz wie der Viewer‑Part nutzt (siehe Abschnitt 4).
- Stelle sicher, dass Koordinaten für den Zeilen‑Datensatz existieren (
DXP SQZ Coordinates Mgt.muss Koordinaten zuRec.RecordIdfinden).
6) Minimales Beispiel: Viewer in eine eigene Page Extension einbauen
pageextension 50100 "MY SQZ Doc Ext." extends "DXP SQZ Document (Generic)"
{
    layout
    {
        addfirst(FactBoxes)
        {
            part(MySQZViewer; "DXP SQZ Viewer Part")
            {
                ApplicationArea = All;
                Caption = 'Viewer';
                SubPageLink = "No." = field("No.");
            }
        }
    }
}
7) Hinweise / Einschränkungen
- Der Viewer‑State ist session‑getrieben (via
DXP Viewer State). Wenn mehrere Seiten mit Viewer gleichzeitig offen sind, können Modus/External‑Viewer‑State alle beeinflussen. - Der Viewer‑Part ist für Datensätze mit SQUEEZE‑Bezug gedacht; er versucht nicht, automatisch „irgendeinen“ Header zu suchen.
8) Beispiel: Viewer auf einem Zielbeleg anzeigen (Purchase Invoice)
Dieser Abschnitt adressiert ein häufiges Third‑party Szenario:
Annahmen:
- Der Zielbeleg (z. B. Purchase Invoice) wurde aus einem Core‑Beleg erstellt.
- Der Core‑Beleg ist weiterhin in der Tabelle "DXP Document" verfügbar.
- Der Core‑Beleg speichert eine Rückverknüpfung zum Ziel‑Datensatz im Feld "Linked-to Record Id".
- Der SQUEEZE Quell‑Header existiert noch und kann aus dem Core‑Beleg aufgelöst werden (typischerweise über Core Document No.).
8.1 Core‑Beleg aus dem Ziel‑Datensatz auflösen
local procedure TryGetCoreDocumentForTarget(TargetRecId: RecordId; var CoreDoc: Record "DXP Document"): Boolean
begin
    CoreDoc.Reset();
    CoreDoc.SetRange("Linked-to Record Id", TargetRecId);
    exit(CoreDoc.FindFirst());
end;
8.2 SQUEEZE Header aus dem Core‑Beleg auflösen
local procedure TryGetSqzHeaderForCore(CoreDocNo: Code[20]; var SqzHeader: Record "DXP SQZ Document Header"): Boolean
begin
    SqzHeader.Reset();
    SqzHeader.SetRange("Core Document No.", CoreDocNo);
    exit(SqzHeader.FindFirst());
end;
8.3 Viewer einbetten (dynamisches Binden)
Beispiel: Purchase Invoice erweitern (konzeptionell; Basis‑Page‑Name ggf. an Ihre Umgebung anpassen).
Diese Implementierung verwendet:
- Einen FactBox‑Part
- Ein
ShowViewer‑Flag, um den Part auszublenden, wenn kein SQZ Header aufgelöst werden kann. SetSqzRecord(...), damit die Preview beim Wechsel des Belegs sofort korrekt neu lädt.- Ein
SingleInstanceContext‑Codeunit, um Viewer‑Resident und SQZ‑Kontext mit der Purch. Invoice Subform zu teilen (FactBoxes und Subforms sind separate Pages).
pageextension 50100 "MY Purch. Invoice Viewer" extends "Purchase Invoice"
{
    layout
    {
        addfirst(FactBoxes)
        {
            part(DXPSQZViewer; "DXP SQZ Viewer Part")
            {
                ApplicationArea = All;
                Caption = 'SQUEEZE Viewer';
                Visible = ShowViewer;
            }
        }
    }

    var
        ShowViewer: Boolean;

    trigger OnAfterGetCurrRecord()
    var
        CoreDoc: Record "DXP Document";
        SqzHeader: Record "DXP SQZ Document Header";
        SharedResident: Codeunit "DXP SQUEEZE Viewer Resident";
        ViewerCtx: Codeunit "DXP SQZ Purch. Inv. Viewer Ctx";
    begin
        ShowViewer := false;
        if not TryGetCoreDocumentForTarget(Rec.RecordId, CoreDoc) then
            exit;

        if not TryGetSqzHeaderForCore(CoreDoc."No.", SqzHeader) then
            exit;

        ShowViewer := true;

        CurrPage.DXPSQZViewer.Page.SetSqzRecord(SqzHeader);

        CurrPage.DXPSQZViewer.Page.GetViewerResident(SharedResident);
        ViewerCtx.SetResident(SharedResident);
        ViewerCtx.SetSqzContextForPurchInv(Rec."No.", SqzHeader."No.", SqzHeader."API Document ID");
    end;

    local procedure TryGetCoreDocumentForTarget(TargetRecId: RecordId; var CoreDoc: Record "DXP Document"): Boolean
    begin
        CoreDoc.Reset();
        CoreDoc.SetRange("Linked-to Record Id", TargetRecId);
        exit(CoreDoc.FindFirst());
    end;

    local procedure TryGetSqzHeaderForCore(CoreDocNo: Code[20]; var SqzHeader: Record "DXP SQZ Document Header"): Boolean
    begin
        SqzHeader.Reset();
        SqzHeader.SetRange("Core Document No.", CoreDocNo);
        exit(SqzHeader.FindFirst());
    end;
}
Zugehöriges Context‑Codeunit (speichert Resident + SQZ‑Kontext, damit die Subform korrekt highlighten kann):
codeunit 50101 "MY SQZ Purch. Inv. Viewer Ctx"
{
    SingleInstance = true;

    procedure SetResident(var NewResident: Codeunit "DXP SQUEEZE Viewer Resident")
    begin
        Resident := NewResident;
        HasResident := true;
    end;

    procedure TryGetResident(var OutResident: Codeunit "DXP SQUEEZE Viewer Resident"): Boolean
    begin
        if not HasResident then
            exit(false);

        OutResident := Resident;
        exit(true);
    end;

    procedure SetSqzContextForPurchInv(PurchInvNo: Code[20]; SqzDocNo: Code[20]; ApiDocumentId: Text[50])
    begin
        PurchInvToSqzDocNo.Set(PurchInvNo, SqzDocNo);
        PurchInvToApiDocumentId.Set(PurchInvNo, ApiDocumentId);
    end;

    procedure TryGetSqzContextForPurchInv(PurchInvNo: Code[20]; var SqzDocNo: Code[20]; var ApiDocumentId: Text[50]): Boolean
    begin
        if not PurchInvToSqzDocNo.Get(PurchInvNo, SqzDocNo) then
            exit(false);

        PurchInvToApiDocumentId.Get(PurchInvNo, ApiDocumentId);
        exit(true);
    end;

    var
        Resident: Codeunit "DXP SQUEEZE Viewer Resident";
        HasResident: Boolean;
        PurchInvToSqzDocNo: Dictionary of [Code[20], Code[20]];
        PurchInvToApiDocumentId: Dictionary of [Code[20], Text[50]];
}
8.4 Wichtiger Hinweis: SQUEEZE Header‑Status nach Verarbeitung
Sie haben ein häufiges Setup beschrieben, in dem der SQUEEZE Header nach dem Erstellen des Zielbelegs noch existiert, aber Status = Deleted ist.
Der Viewer‑Part kann die Preview trotzdem laden, solange "API Document ID" vorhanden ist und SQUEEZE aktiviert ist.
Optionen:
- Wenn Sie die Preview nach Zielbeleg‑Erstellung nicht anzeigen möchten, bauen Sie eine Guard‑Logik auf der Host‑Page ein (Viewer‑Part dann nicht binden, wenn der SQZ Header „Deleted“ ist).
Welche Option korrekt ist, hängt von Ihren Prozessanforderungen ab.
9) Sonderfall: Hervorheben aus der Purchase Invoice Subform (Purchase Line → SQZ line)
Manchmal mächten Sie diese Benutzererfahrung auf einer Zielbeleg‑Seite:
In dieser Situation basiert Ihre Lines‑Page nicht auf "DXP SQZ Document Line", daher können Sie MarkFieldByCoordinatesObj(Rec.RecordId) nicht direkt aufrufen.
Stattdessen müssen Sie die passende SQUEEZE Line auflösen und danach mit der RecordId dieser SQUEEZE Line highlighten.
9.1 Zwei mögliche Verknüpfungsstrategien
Es gibt zwei realistische Wege, eine Einkaufszeile wieder auf eine SQUEEZE Line zu mappen:
-
Expliziter Allocation‑Link (nur in manchen Szenarien verfügbar)
- Verwendet Felder auf
"DXP SQZ Document Line":"Allocated Document Type"(enum"DXP Order Match Document Type")"Allocated Document No.""Allocated Document Line No."
- Verwendet Felder auf
-
Heuristischer Match nach Inhalt (empfohlen als Fallback)
- Verwendet Felder, die typischerweise auf beiden Seiten existieren (Type/No/Quantity/Unit Cost/Line Amount/Description).
- Das funktioniert auch dann, wenn keine Allocation‑Beziehung gepflegt wird.
- Es ist nicht mathematisch perfekt (Duplikate sind möglich), daher sollten Matching‑Regeln auf Ihren Use Case angepasst werden.
9.2 Empfohlenes Wiring (Host‑Page übergibt SQZ‑Kontext + Resident)
Sie benötigen in der Purchase‑Lines‑Subpage zwei Dinge:
- Den Viewer‑Resident (damit
PostMessage(...)die richtige Control‑Add‑in Instanz trifft) - Den aktuellen SQZ Header‑Kontext (damit Sie SQZ Lines auf das richtige Dokument filtern)
Empfohlenes Pattern auf der Host‑Page (nachdem Sie SqzHeader aufgelöst haben):
trigger OnAfterGetCurrRecord()
var
    SharedResident: Codeunit "DXP SQUEEZE Viewer Resident";
    SqzHeader: Record "DXP SQZ Document Header";
begin
    if not TryResolveSqzHeaderForCurrentRecord(SqzHeader) then
        exit;

    CurrPage.DXPSQZViewer.Page.SetSqzRecord(SqzHeader);

    CurrPage.DXPSQZViewer.Page.GetViewerResident(SharedResident);
    ViewerCtx.SetResident(SharedResident);
    ViewerCtx.SetSqzContextForPurchInv(Rec."No.", SqzHeader."No.", SqzHeader."API Document ID");
end;
9.3 Minimales Beispiel: Purch. Invoice Subform triggert Highlighting im Viewer
Dieses Beispiel erweitert Purch. Invoice Subform. Beachten Sie: der Datensatz der Basis‑Subform ist ein Record "Purchase Line", daher müssen die Resolver‑Prozeduren Record "Purchase Line" akzeptieren.
Das hier gezeigte Allocation‑Mapping ist die funktionierende Implementierung für Purchase‑Invoice‑Szenarien: es verknüpft über Receipt ("Receipt No." / "Receipt Line No.") statt über Belegnummer/Zeilennummer der Rechnung.
pageextension 50101 "MY Purch. Inv. Sf Mark" extends "Purch. Invoice Subform"
{
    trigger OnAfterGetCurrRecord()
    begin
        MarkSqzLineForPurchInvLine();
    end;

    var
        ApiMgt: Codeunit "DXP SQZ API Mgt.";
        Resident: Codeunit "DXP SQUEEZE Viewer Resident";
        ViewerState: Codeunit "DXP Viewer State";
        LineCoordMgt: Codeunit "DXP SQZ Coordinates Mgt.";
        ViewerCtx: Codeunit "DXP SQZ Purch. Inv. Viewer Ctx";
        SqzDocNo: Code[20];
        ApiDocumentId: Text[50];

    local procedure MarkSqzLineForPurchInvLine()
    var
        SqzLine: Record "DXP SQZ Document Line";
    begin
        if not ViewerCtx.TryGetSqzContextForPurchInv(Rec."Document No.", SqzDocNo, ApiDocumentId) then
            exit;

        if not ViewerCtx.TryGetResident(Resident) then
            exit;

        if not TryResolveSqzLineForPurchLine(SqzDocNo, Rec, SqzLine) then
            exit;

        if not LineCoordMgt.CoordinateExists(SqzLine.RecordId) then
            exit;

        if ViewerState.GetViewerMode() = "DXP SQZ Viewer Mode"::Detached then
            ViewerState.UpdateViewerStateWithCoordinates(ApiDocumentId, SqzLine.RecordId)
        else
            ApiMgt.PostMessage(ApiMgt.MarkFieldByCoordinatesObj(SqzLine.RecordId), Resident);
    end;

    local procedure TryResolveSqzLineForPurchLine(SqzDocNo: Code[20]; PurchLine: Record "Purchase Line"; var SqzLine: Record "DXP SQZ Document Line"): Boolean
    begin
        // 1) Allocation link via receipt (Purchase Invoice Szenario)
        SqzLine.Reset();
        SqzLine.SetRange("Document No.", SqzDocNo);
        SqzLine.SetFilter("Allocated Document No.", '%1&<>%2', PurchLine."Receipt No.", '');
        SqzLine.SetFilter("Allocated Document Line No.", '%1&<>%2', PurchLine."Receipt Line No.", 0);
        if SqzLine.FindFirst() then
            exit(true);

        // 2) Fallback: content-based match (Type/No/Amounts)
        exit(TryResolveSqzLineByContent(SqzDocNo, PurchLine, SqzLine));
    end;

    local procedure TryResolveSqzLineByContent(SqzDocNo: Code[20]; PurchLine: Record "Purchase Line"; var BestSqzLine: Record "DXP SQZ Document Line"): Boolean
    var
        Candidate: Record "DXP SQZ Document Line";
        BestScore: Integer;
        Score: Integer;
        QtyTol: Decimal;
        AmtTol: Decimal;
    begin
        QtyTol := 0.00001;
        AmtTol := 0.01;

        BestScore := 0;
        Candidate.Reset();
        Candidate.SetRange("Document No.", SqzDocNo);

        // Prefer narrowing early on stable fields
        Candidate.SetRange(Type, PurchLine.Type);
        if PurchLine."No." <> '' then
            Candidate.SetRange("No.", PurchLine."No.");

        if not Candidate.FindSet() then
            exit(false);

        repeat
            Score := 0;

            // Strong signals
            if Candidate.Type = PurchLine.Type then
                Score += 20;
            if (PurchLine."No." <> '') and (Candidate."No." = PurchLine."No.") then
                Score += 40;

            // Weak/medium signals (tolerant)
            if (Candidate.Quantity <> 0) and (Abs(Candidate.Quantity - PurchLine.Quantity) <= QtyTol) then
                Score += 10;
            if (Candidate."Direct Unit Cost" <> 0) and (Abs(Candidate."Direct Unit Cost" - PurchLine."Direct Unit Cost") <= AmtTol) then
                Score += 10;
            if (Candidate."Line Amount" <> 0) and (Abs(Candidate."Line Amount" - PurchLine."Line Amount") <= AmtTol) then
                Score += 10;
            if (Candidate.Description <> '') and (PurchLine.Description <> '') and (Candidate.Description = PurchLine.Description) then
                Score += 5;

            if Score > BestScore then begin
                BestScore := Score;
                BestSqzLine := Candidate;
            end;
        until Candidate.Next() = 0;

        // Guard: avoid picking a random line when nothing matches well.
        exit(BestScore >= 30);
    end;
}
FAQ
Here you will find questions and answers to various scenarios.
Master data cannot be synchronized
Checking the squeeze masterdata tables in BC
In the setup for the Squeeze master data tables, you can see which master data tables are to be synchronized or have already been synchronized. You can also deactivate synchronization with Squeeze for individual tables there.
Checking the Squeeze Master Data
On the Squeeze page, you can check whether all master data tables already exist. If any are missing, a 404 error may occur during the synchronization attempt. This is avoided in the latest app version by subsequently creating the table in Squeeze in case of doubt.
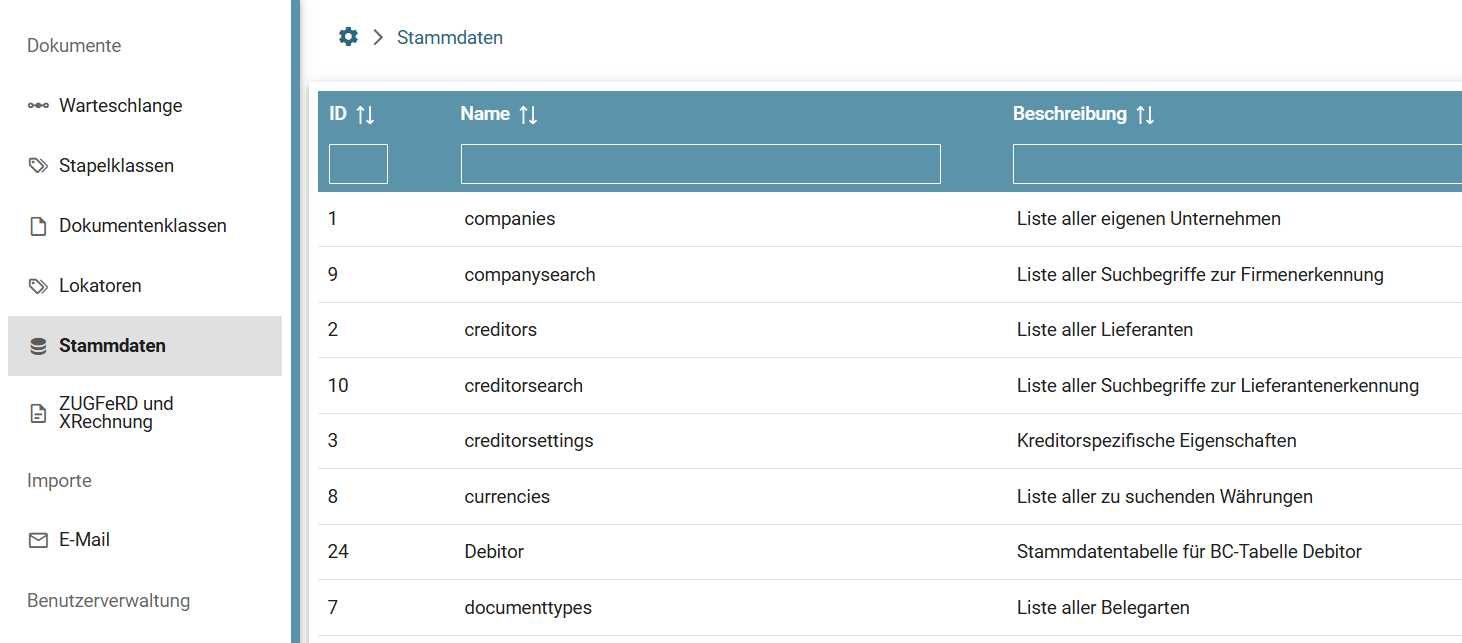
Checking the setup
Squeeze Setup
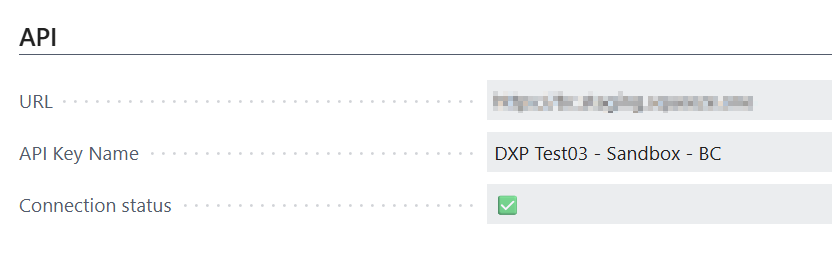
Does the Squeeze URL match? Is the correct squeeze system stored? Check the URL for this.
What is the connection status? Is the tick green? If not, get a current API key.
Has the initial master data upload already taken place?
Document class Setup
Are the API settings of the document class correct? Please check whether the IDs entered match those on the DEXPRO platform.
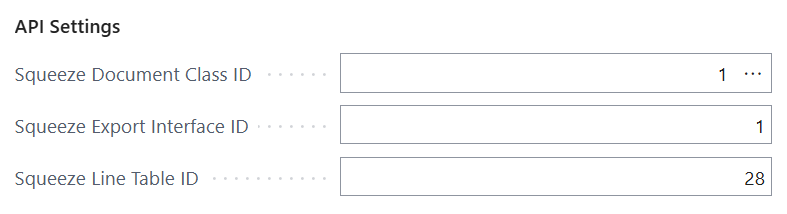
Checking the Documentclass Id
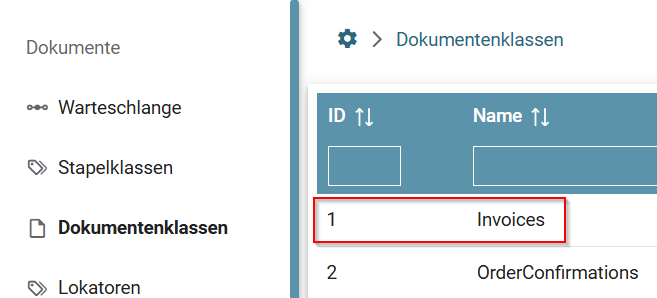
Checking the Export Interface id
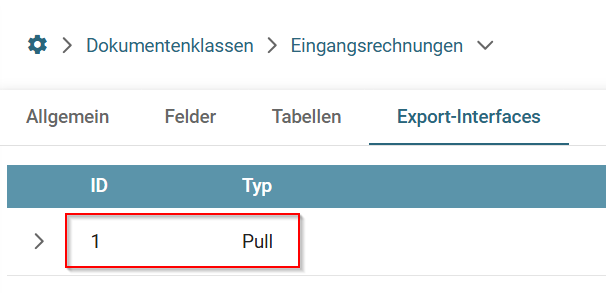
Checking the Line Table id
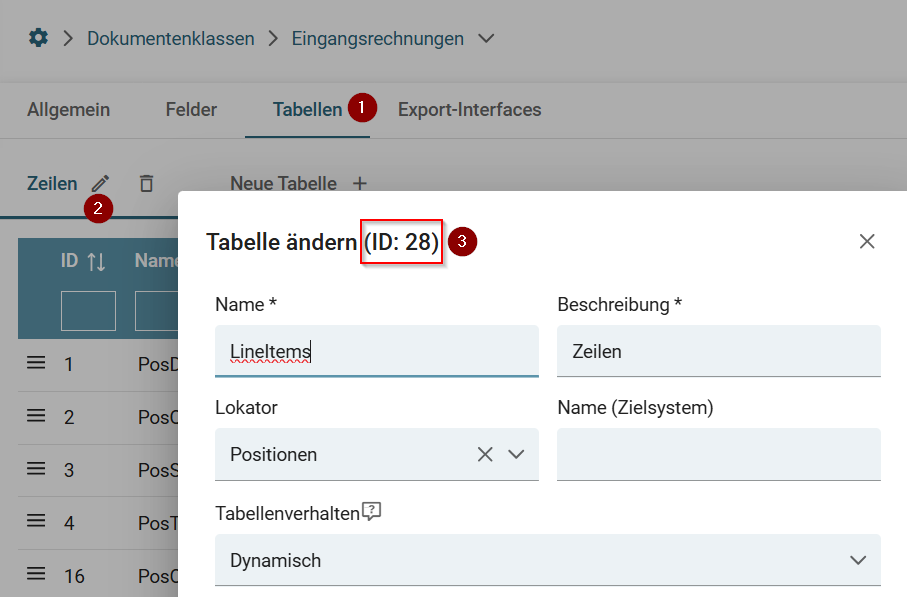
Documents are not retrieved from Squeeze and remain there in the export step
Checking the import queue
Is there already an entry in the import queue with the Squeeze docId? Please also remove the system filtering when checking.
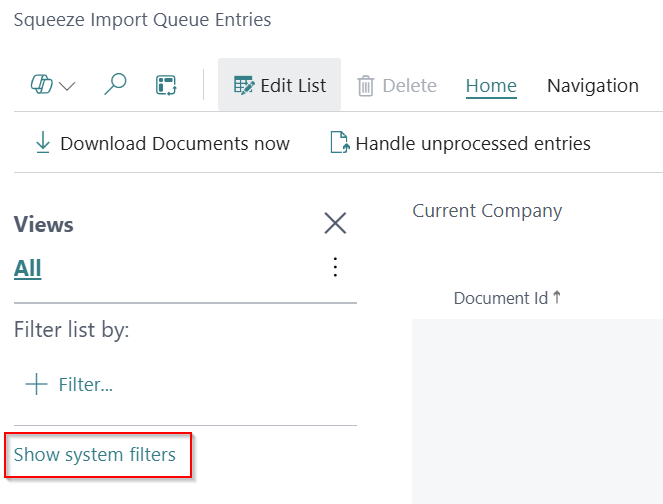
Click on “Show system filter” to display the system filters.
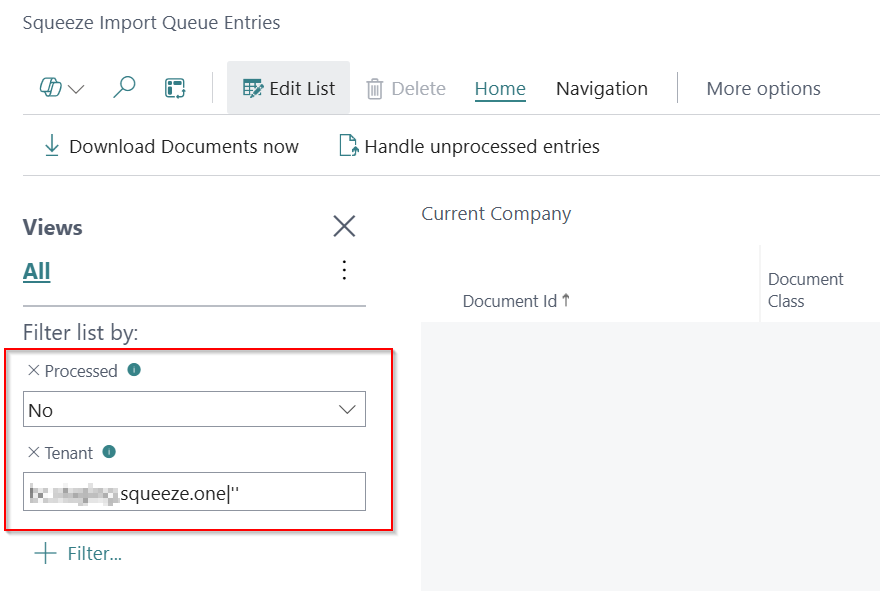
As soon as these filters have been removed, all documents are displayed across all clients. Check whether the Squeeze docid exists in the “Document Id” column and whether the entry has already been processed. If so, it cannot be downloaded again. The document must then be manually set to the “Processed” step on the Squeeze page (DEXPRO platform).
If the document is not in the list, the uncollected document can be pulled directly via the import buffer.
Checking the setup
Squeeze Setup
Does the Squeeze URL match? Is the correct squeeze system stored? Check the URL for this.
What is the connection status? Is the tick green? If not, get a current API key.
Document class Setup
Are the API settings of the document class correct? Please check whether the IDs entered match those on the DEXPRO platform.
Checking the Documentclass Id
Checking the Export Interface id
Checking the Line Table id