Breeze Interface for Dynamics 365 BC - en-US
Manual for the administration and use of BREEZE for Microsoft Dynamics 365 Business Central.
We deliver our all-in-one BREEZE workflow solutions for document-oriented business processes from a single source, whether as OnPremises or as Solution-as-a-Service.
The BREEZE workflow engine quickly steers documents and data through the entire review process with simple "if-then" rules and conditions, all the way to final approval.
- System Requirements
- Installation
- Configuration & Administration
- Permission sets
- DEXPRO Core
- Breeze Interface Setup
- Document Class Setup
- Target Template Setup
- Generic Custom Fields
- OAuth 2.0 setup (for SaaS only)
- Breeze Workflow
- Application / Usage
- Extension Development
System Requirements
System requirements for using BREEZE for Dynamics 365 BC
Supported Microsoft Dynamics 365 Business Central versions
Microsoft Dynamics 365 Business Central integration is possible from the following version due to minimum technical requirements:
Supportet Microsoft Dynamics 365 Business Central Versions
The prerequisite for operation is that the respective Microsoft Dynamics 365 Business Central version is still in regular support. The extended support is excluded.
Licensing — Customer/Partner Responsibility: Editing Business Central data still requires each approver/editor to hold a suitable, paid Business Central user licence; a Microsoft 365 licence alone is not sufficient. DEXPRO makes no warranty regarding licensing — the customer and their Microsoft licensing partner are responsible for clarifying the exact requirements with Microsoft.
Supported BREEZE versions
A licensed BREEZE system is required to connect BREEZE to Microsoft Dynamics 365 Business Central and for operation.
- minimum Documents Version: Documents 5h #2311
- minimum DEXPRO Invoice Solution Version: Invoice 1.1.015
Installation
Licenses
Microsoft
Information about the Microsoft Business Central licenses.
BREEZE
The DEXPRO BREEZE system that should be connected to Business Central requires a valid customer license.
Obtaining the DEXPRO modules
Detailed informationen are here.
OnPrem
For OnPrem installations, an runtime package with the required apps is provided upon request of a registered reseller / partner. These modules are added to the customer license by the partner and then imported into Microsoft Dynamics Business Central. It should be noted that the DEXPRO Core module forms the basis for all DEXPRO modules and must therefore be imported first.
Cloud
For cloud installations, you only need the Microsoft AppSource. This is where the required DEXPRO modules are downloaded.
![]()
Configuration & Administration
Permission sets
In order to use the modules, the appropriate authorization set must be assigned to the respective users.
The following are supplied with:
-
DXP Core Admin - DEXPRO Core Administrator
-
DXP Core User - DEXPRO Core User
- DXP BREEZE Admin - DEXPRO BREEZE Administrator
- DXP BREEZE User - DEXPRO BREEZE User
DEXPRO Core
The DEXPRO Core manages the individual DEXPRO apps and their documents per client.
All documents that have been entered and processed via the various DEXPRO modules in Microsoft Dynamics 365 Business Central are displayed. A global number series, which is used across all DEXPRO apps, is used to complete individual documents. This offers the advantage that users only have to work with one number series per document.
Further information can be found here.
Breeze Interface Setup
In the Breeze Interface setup, processing is set up within the app.
Process
Copy Setup
This copies the setup to other clients.
Navigation
Document class setup
Target Template Setup
General
In this FastTab you can enable/disable the use of this app.

No. Series
The number series for the Breeze Interface documents is stored here.

Document Class Setup
In the document class setup, the mapping between the respective document class and your export interface is done. Furthermore, the field mapping of each document class is downloaded here, creating a set of standard fields and their usage in Microsoft Dynamics 365 Business Central.
The document class setup is cross-app and is managed via the DEXPRO Core.
Process

Download field mapping
This downloads the field structure of the SQUEEZE document class. These are needed for the metadata mapping.
Navigation

Metadata mapping
List
Document classes
This overview lists all the document classes that have been set up.

Card
Document class
Here, each document class is set up individually.
General

In this fastab the name of the document class, the next process step, as well as the automatic enrichment of the positions is set up.
Breeze

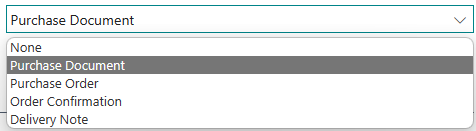
Here you can set the default target template for this document class.
The following are available as standard:
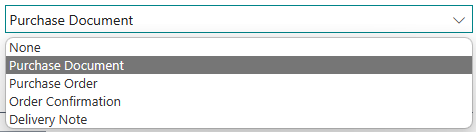
Target Template Setup
Target templates for the Breeze interface are managed here. These templates are available by default:
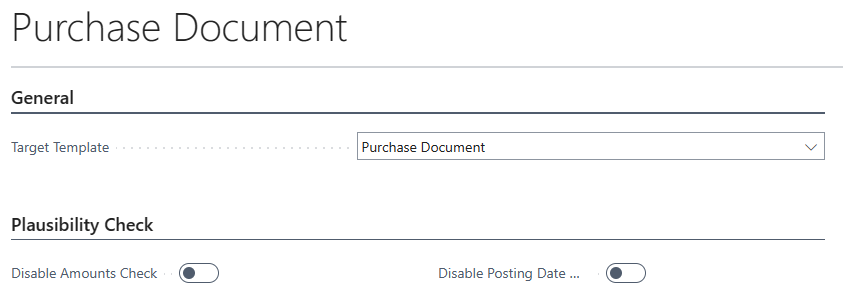
General
Here you can see which target template is currently being edited.
Plausibility Check
Here, certain plausibility checks per target template can be deactivated.
Generic Custom Fields
Customer-specific fields can be added here that extend or deviate from our standard template. This mapping ensures that this additional content is assigned to the right places.

The corresponding BC field is assigned to each technical JSON field name.
On the Breeze side, the fields must be added via the additionalFields.
OAuth 2.0 setup (for SaaS only)
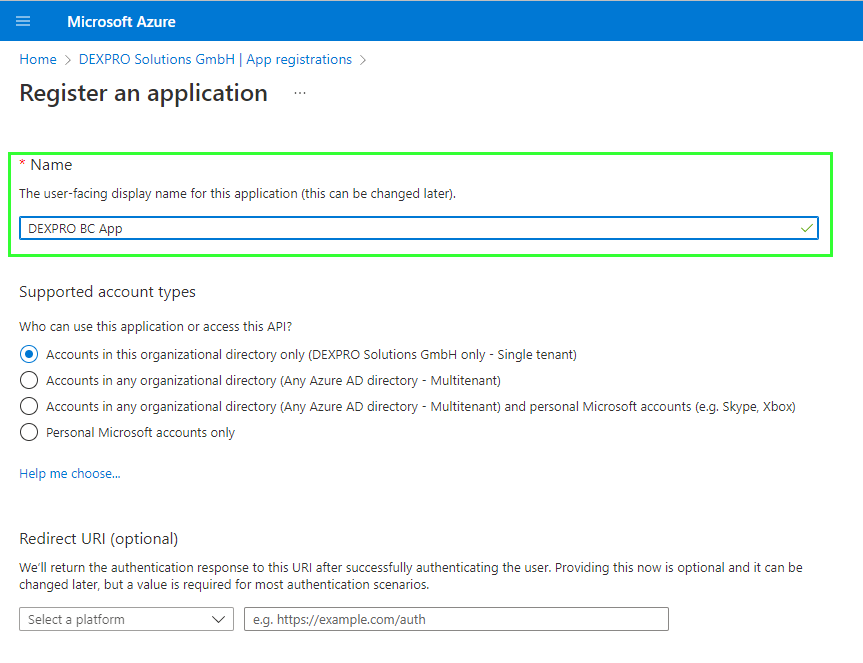
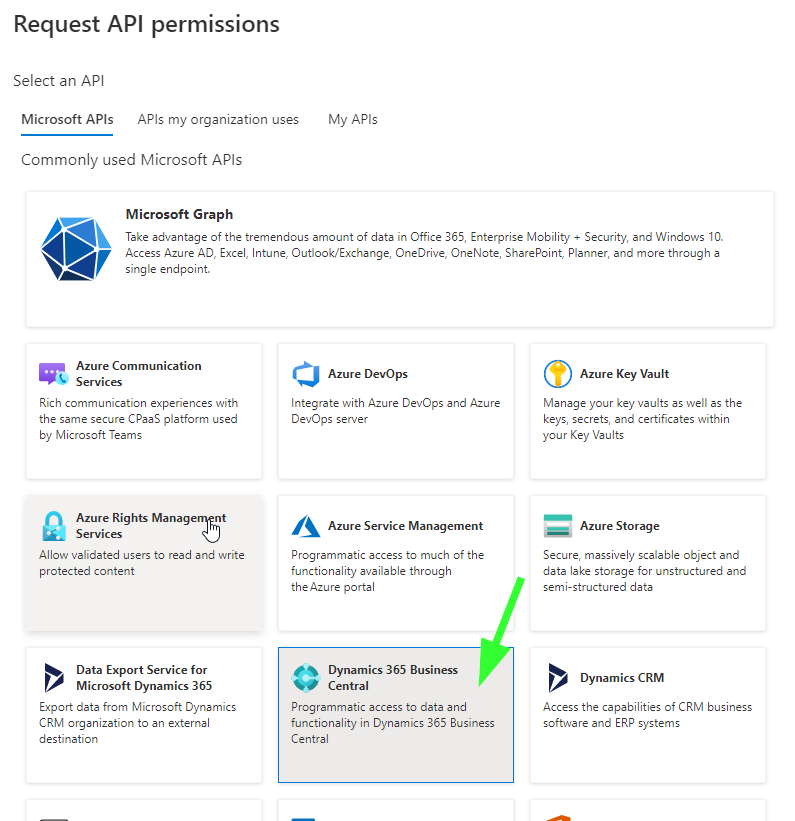
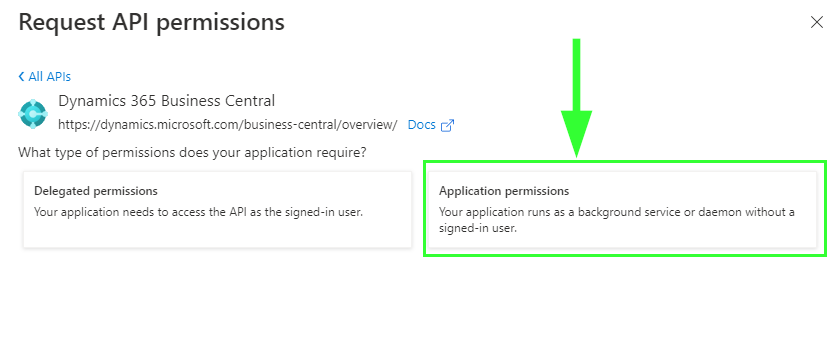
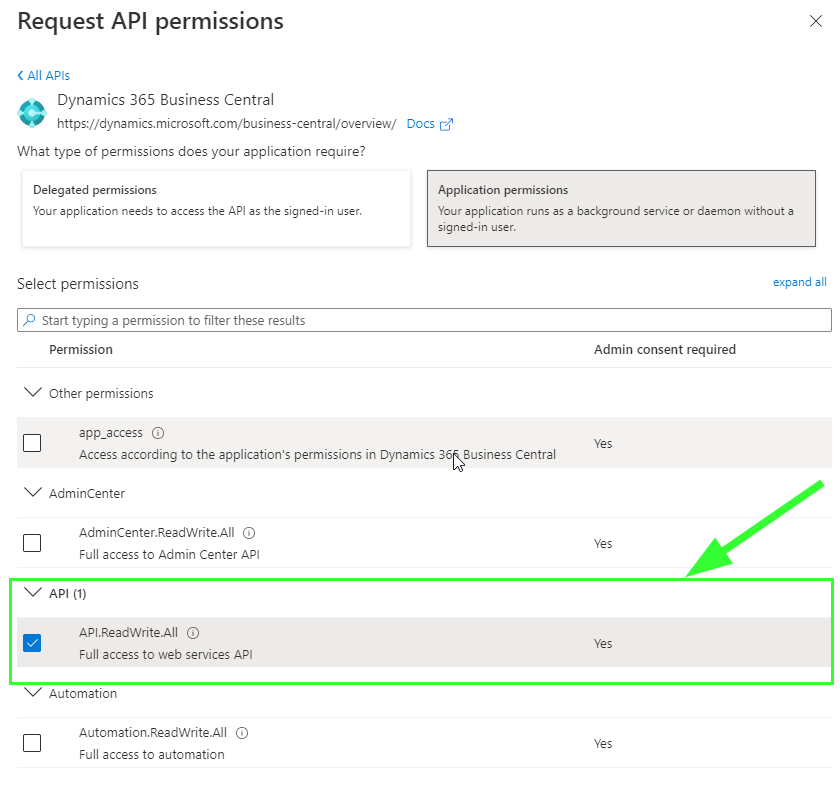
Access to web services in Microsoft Dynamics 365 Business Central (BC) in the SaaS version is only possible via OAuth 2.0. The necessary setup of the app in Azure Active Directory and its link to BC is described below.
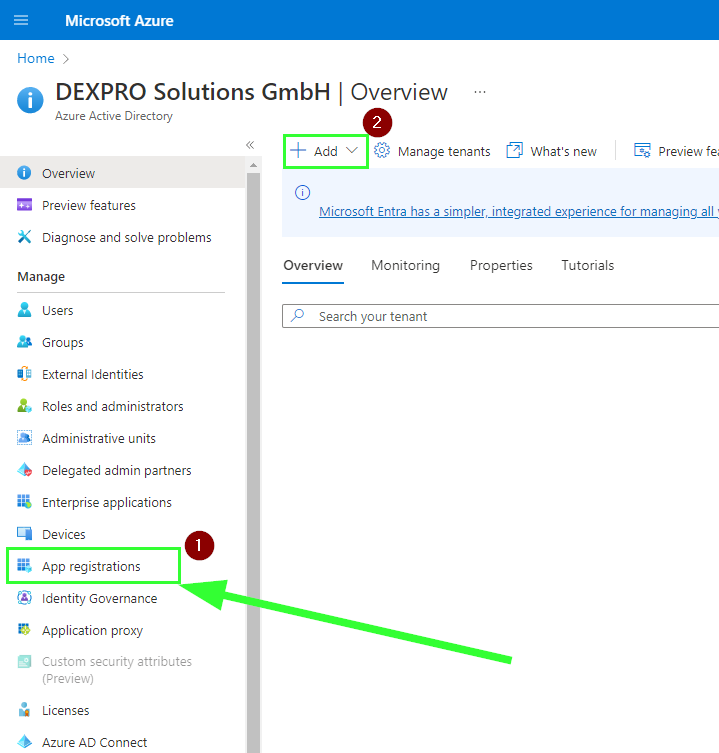
Azure Portal
Launch Azure Portal and open Microsoft Entra ID

Create a new app under App registrations
Create API permissions
The Application (client) ID can already be copied and stored at this point (will be needed later)

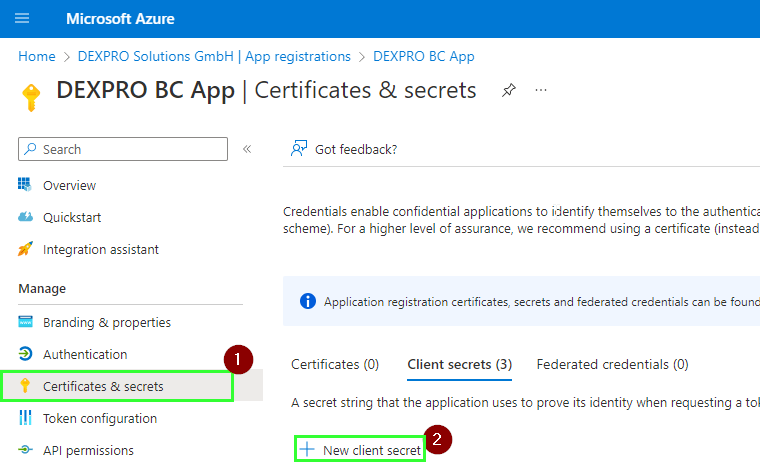
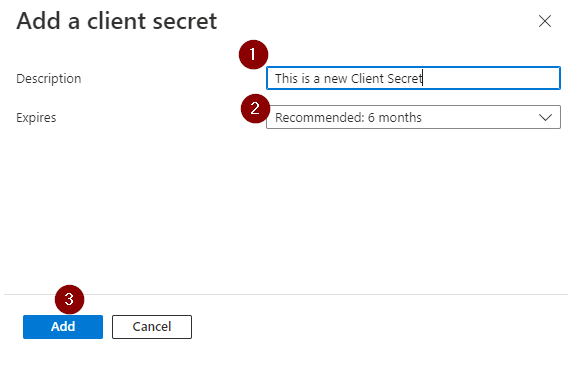
Create Client secret and store it in a secure location
Business Central
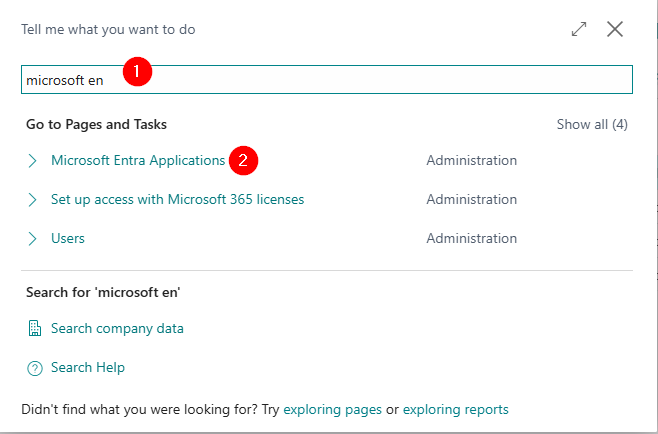
Open Microsoft Entra Applications and create a new entry

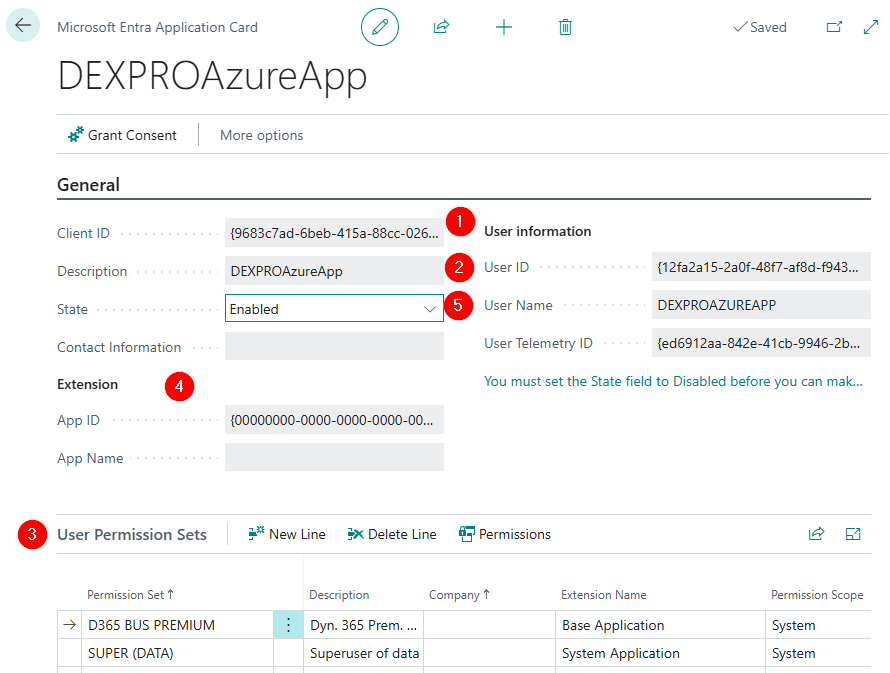
Set up Microsoft Entra Application
- Enter the Client ID
- Enter description (description is a bit misleading. This is rather a user name).
- Assign user permission set(s) individually.
- (Optional)
- Activate application
Breeze Workflow
To connect our Breeze Invoice Workflow to Dynamics 365 BC please read this manual.
Application / Usage
This describes the process from the provision of validated squeeze purchasing documents to external workflows to the posting transfer of released documents.
Breeze Interface Documents
All documents that are in the Breeze process are listed here.

Statuswerte
- WaitingForRetrieval: The document is ready and waiting to be picked up by the workflow system.
- Retrieved: The document was picked up by the workflow.
- Processed: The document was processed successfully.
- Error: The document has at least one error, which must be corrected in the workflow.
- Rejected: The document was marked as rejected by the workflow system.
- WaitingForJson: The document is waiting for the Json file to be enriched.
- ChangeCompany: The document is waiting to be processed by the background process and transferred to another client.
Transfer to the unposted purchasing documents
After the workflow system has released the purchasing document, it is transferred to the Breeze interface. A plausibility check is then performed in the interface. If the check is successful, an unposted purchasing document is created.
If the plausibility check failed, the document is set to the status "error" and the error message is appended to the respective position in the Json structure of the document. Now the document is again waiting to be picked up and corrected by the workflow.

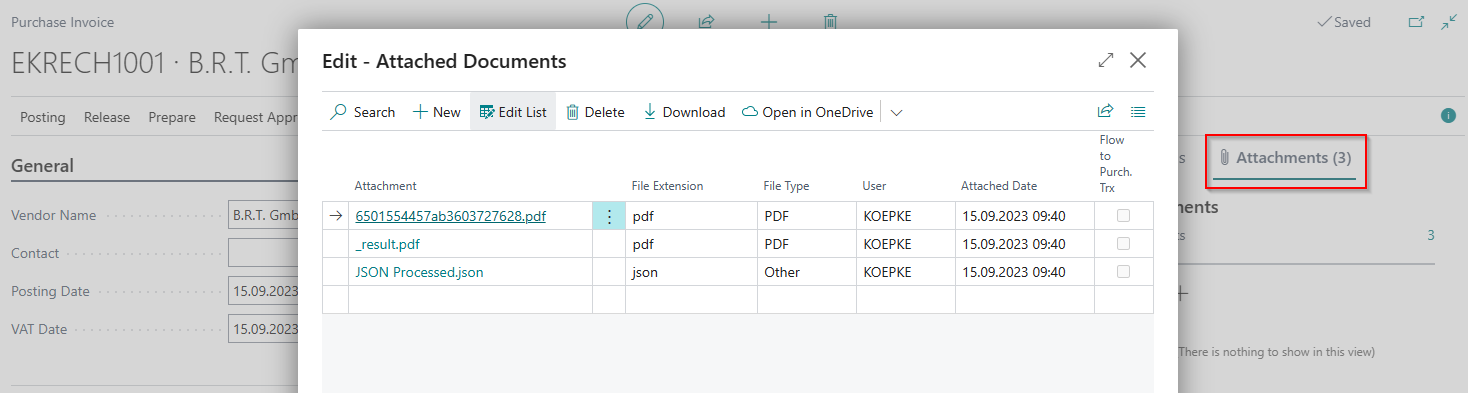
The unposted purchase document is created with all data from the Json structure. If attachments from the process have been attached, these will also be transferred to the unposted document.
Breeze Interface API
Here you will find the documentation for the following products:
Extension Development
This chapter lists important integration events and examples that help in developing an extension for BREEZE Interface for BC.
Important:
Customizations may only be performed by appropriately trained consultants/developers. Furthermore, these are always outside of the standard support.
Guide to implementing customized document creation
Overview
This documentation provides guidance on implementing custom document creation processes using the Integration Event OnDocumentCreation in the DEXPRO Core Framework. While the default implementation creates purchase documents (Tables 38, 39), this guide shows you how to implement your own document creation logic using the provided JSON data.
Requirements
The following setting must be made in the document class setup before validating a document:
- Next process step: Breeze Interface
- Target Template: None


Have you validated a document with the DEXPRO Squeeze app and transferred it to the next process step, Breeze Interface? If so, you will now see it in Breeze Interface in a waiting status (WaitingForRetrieval). At this point, you have the option of transferring the validated document to an approval workflow so that it can be reported back after approval and transferred to the target document creation process. Further information on the Breeze Interface API can be found here.

Once you have changed the status of the Breeze receipt to "Processed", it will be reported to the DEXPRO Core for further processing—this is the integration point where you need to start.
Integration point
The central integration point is the OnDocumentCreation event in Codeunit 70954599 “DXP Doc. Creation Def. Impl.” in the DEXPRO Core app. This event is triggered during document processing and enables the implementation of custom document creation logic.
Event Signature
[IntegrationEvent(false, false)]
local procedure OnDocumentCreation(JObject: JsonObject; var CreatedDocumentRecordId: RecordId)
Parameter
JObject: Contains the complete JSON data with the document informationCreatedDocumentRecordId: Must be set with the RecordId of the created document
Implementation Guide
Step 1: Create Subscriber-Codeunit
First, create a codeunit that subscribes to the OnDocumentCreation event:
codeunit 50100 "Custom Document Creation"
{
    [EventSubscriber(ObjectType::Codeunit, Codeunit::"DXP Doc. Creation Def. Impl.", 'OnDocumentCreation', '', false, false)]
    local procedure OnDocumentCreation(JObject: JsonObject; var CreatedDocumentRecordId: RecordId)
    begin
        // Your implementation here
        CreateCustomDocument(JObject, CreatedDocumentRecordId);
    end;
}
Step 2: Implement document creation logic
Here is an example of how to implement custom document creation:
local procedure CreateCustomDocument(JObject: JsonObject; var CreatedDocumentRecordId: RecordId)
var
    CustomHeader: Record "Custom Document Header";
    CustomLine: Record "Custom Document Line";
    JsonHelper: Codeunit "DXP Json Helper";
    HeaderJObject: JsonObject;
    LinesJArray: JsonArray;
    LineJToken: JsonToken;
    LineNo: Integer;
begin
    // 1. Create Header
    CustomHeader.Init();
    CustomHeader."Document Type" := GetDocumentType(JObject);
    CustomHeader."Vendor No." := CopyStr(JsonHelper.ValAsTxt(JObject, 'vendorNo', true), 1, MaxStrLen(CustomHeader."Vendor No."));
    CustomHeader."Document Date" := JsonHelper.ValAsDate(JObject, 'docDate', true);
    CustomHeader."Posting Date" := JsonHelper.ValAsDate(JObject, 'postingDate', true);
    CustomHeader."Document Reference" := CopyStr(JsonHelper.ValAsTxt(JObject, 'docReference', true), 1, MaxStrLen(CustomHeader."Document Reference"));
    CustomHeader.Insert(true);

    // 2. Process Lines
    LinesJArray := JsonHelper.ReadJArrayFromObj(JObject, 'lines');
    LineNo := 10000;

    foreach LineJToken in LinesJArray do begin
        CustomLine.Init();
        CustomLine."Document No." := CustomHeader."No.";
        CustomLine."Line No." := LineNo;
        CustomLine."Item No." := CopyStr(JsonHelper.ValAsTxt(LineJToken.AsObject(), 'no', true), 1, MaxStrLen(CustomLine."Item No."));
        CustomLine.Quantity := JsonHelper.ValAsDec(LineJToken.AsObject(), 'qty', true);
        CustomLine."Unit Price" := JsonHelper.ValAsDec(LineJToken.AsObject(), 'unitPrice', true);
        CustomLine.Insert(true);

        LineNo += 10000;
    end;

    CreatedDocumentRecordId := CustomHeader.RecordId;
end;
JSON-Structure
The JSON input follows this structure:
{
   "type":"Invoice",
   "vendorNo":"K00170",
   "iban":"DE58520503530052599766",
   "vatRegNo":"DE540026784",
   "barcode":"123456789",
   "docDate":"2023-07-13",
   "serviceDate":"2023-07-13",
   "postingDate":"2025-01-23",
   "postingDesc":"Die ist eine Buchungsbeschreibung.",
   "docReference":"R308154",
   "orderNo":"B23106029",
   "netAmount":7894.71,
   "netAmount2":0.0,
   "netAmount3":0.0,
   "taxRate":19.0,
   "taxRate2":0.0,
   "taxRate3":0.0,
   "taxAmount":1499.99,
   "taxAmount2":0.0,
   "taxAmount3":0.0,
   "totalAmount":9394.7,
   "currency":"EUR",
   "assignedTo":"BERND.FEDDERSEN",
   "note":"Die ist eine Bemerkung!",
   "dimensions":{
      "ABTEILUNG":"PROD",
      "EINKÄUFER":"BF",
      "KOSTENTRÄGER":"IT"
   },
   "dimensionSetID":27,
   "customFields":{
      "docClass":"DXP Invoice / Credit Memo",
      "namesAndValues":[
         {
            "name":"Customer_No",
            "value":"01121212"
         },
         {
            "name":"Custom_Date",
            "value":"2025-01-26"
         }
      ]
   },
   "orderMatchDifference":"false",
   "lines":[
      {
         "orderNo":"B23106029",
         "orderLineNo":10000,
         "receiptNo":"ELIEF107004",
         "receiptLineNo":10000,
         "vendorItemNo":"",
         "type":"Item",
         "no":"90002",
         "description":"JogiTek G 1337 Gaming-Headset",
         "qty":17.0,
         "uom":"STÜCK",
         "unitPrice":99.99,
         "lineDisc":0.0,
         "netAmount":1699.83,
         "totalAmount":2022.8,
         "taxRate":19.0,
         "vatBusPostingGroup":"INLAND",
         "vatProdPostingGroup":"MWST.19",
         "dimensions":{
            "ABTEILUNG":"PROD",
            "BEREICH":"30",
            "EINKÄUFER":"BF",
            "KOSTENTRÄGER":"IT",
            "VERKAUFSKAMPAGNE":"WINTER"
         },
         "dimensionSetID":53,
         "genProdPostingGroup":"HANDEL",
         "genBusPostingGroup":"INLAND",
         "deferralCode":"",
         "quantityDifference":"false",
         "unitPriceDifference":"false",
         "discountDifference":"false",
         "receiptDateDifference":"false",
         "customFields":{
            "docClass":"DXP Invoice / Credit Memo",
            "namesAndValues":[
               {
                  "name":"Custom_Field_1",
                  "value":"Text in Zeile 10000"
               },
               {
                  "name":"Custom_Field_2",
                  "value":"2025-01-31"
               }
            ]
         }
      },
      {
         "orderNo":"B23106029",
         "orderLineNo":30000,
         "receiptNo":"ELIEF107004",
         "receiptLineNo":30000,
         "vendorItemNo":"",
         "type":"Item",
         "no":"90005",
         "description":"Sumsing Galaxy 23",
         "qty":12.0,
         "uom":"STÜCK",
         "unitPrice":349.99,
         "lineDisc":0.0,
         "netAmount":4199.88,
         "totalAmount":4997.86,
         "taxRate":19.0,
         "vatBusPostingGroup":"INLAND",
         "vatProdPostingGroup":"MWST.19",
         "dimensions":{
            "ABTEILUNG":"PROD",
            "BEREICH":"50",
            "EINKÄUFER":"BF",
            "KOSTENTRÄGER":"IT",
            "VERKAUFSKAMPAGNE":"WINTER"
         },
         "dimensionSetID":55,
         "genProdPostingGroup":"HANDEL",
         "genBusPostingGroup":"INLAND",
         "deferralCode":"",
         "quantityDifference":"false",
         "unitPriceDifference":"false",
         "discountDifference":"false",
         "receiptDateDifference":"false",
         "customFields":{
            "docClass":"DXP Invoice / Credit Memo",
            "namesAndValues":[
               {
                  "name":"Custom_Field_1",
                  "value":"Text in Zeile 20000"
               },
               {
                  "name":"Custom_Field_2",
                  "value":"2025-01-30"
               }
            ]
         }
      },
      {
         "orderNo":"B23106029",
         "orderLineNo":20000,
         "receiptNo":"ELIEF107004",
         "receiptLineNo":20000,
         "vendorItemNo":"",
         "type":"Item",
         "no":"90000",
         "description":"Y-Phone Ultra Pro 23",
         "qty":5.0,
         "uom":"STÜCK",
         "unitPrice":399.0,
         "lineDisc":0.0,
         "netAmount":1995.0,
         "totalAmount":2374.05,
         "taxRate":19.0,
         "vatBusPostingGroup":"INLAND",
         "vatProdPostingGroup":"MWST.19",
         "dimensions":{
            "ABTEILUNG":"PROD",
            "BEREICH":"70",
            "EINKÄUFER":"BF",
            "KOSTENTRÄGER":"IT",
            "VERKÄUFER":"JH",
            "VERKAUFSKAMPAGNE":"WINTER"
         },
         "dimensionSetID":58,
         "genProdPostingGroup":"HANDEL",
         "genBusPostingGroup":"INLAND",
         "deferralCode":"",
         "quantityDifference":"false",
         "unitPriceDifference":"false",
         "discountDifference":"false",
         "receiptDateDifference":"false",
         "customFields":{
            "docClass":"DXP Invoice / Credit Memo",
            "namesAndValues":[
               {
                  "name":"Custom_Field_1",
                  "value":"Text in Zeile 30000"
               },
               {
                  "name":"Custom_Field_2",
                  "value":"2025-01-29"
               }
            ]
         }
      }
   ]
}
Best practice
- Error handling: Implement proper error handling for JSON parsing and database operations:
local procedure CreateCustomDocument(JObject: JsonObject; var CreatedDocumentRecordId: RecordId)
var
    CustomHeader: Record "Custom Document Header";
begin
    if not DoesJsonHaveRequiredFields(JObject) then
        Error('Required fields are missing in the JSON payload');

    if not TryCreateCustomHeader(JObject, CustomHeader) then
        Error('Failed to create document header');

    // ... rest of the implementation
end;
- Validation: Implement proper validation before document creation:
local procedure ValidateDocument(JObject: JsonObject): Boolean
var
    Vendor: Record Vendor;
    VendorNo: Code[20];
begin
    VendorNo := CopyStr(JsonHelper.ValAsTxt(JObject, 'vendorNo', true), 1, MaxStrLen(VendorNo));
    if not Vendor.Get(VendorNo) then
        Error('Vendor %1 does not exist', VendorNo);
    // Add more validation as needed
    exit(true);
end;
Common scenarios
Scenario 1: Create different document types
local procedure GetDocumentType(JObject: JsonObject): Enum "Custom Document Type"
var
    DocType: Text;
begin
    DocType := JsonHelper.ValAsTxt(JObject, 'type', true);
    case DocType of
        'Invoice':
            exit("Custom Document Type"::Invoice);
        'CreditMemo':
            exit("Custom Document Type"::"Credit Memo");
        else
            Error('Unknown document type: %1', DocType);
    end;
end;
Scenario 2: Processing custom fields
local procedure ProcessCustomFields(JObject: JsonObject; var CustomDoc: Record "Custom Document Header")
var
    CustomFieldsObj: JsonObject;
    CustomFieldsArr: JsonArray;
    FieldToken: JsonToken;
begin
    if not JsonHelper.TokenExists(JObject, 'customFields') then
        exit;

    CustomFieldsObj := JsonHelper.ReadJObjectFromObj(JObject, 'customFields');
    CustomFieldsArr := JsonHelper.ReadJArrayFromObj(CustomFieldsObj, 'namesAndValues');

    foreach FieldToken in CustomFieldsArr do
        ProcessCustomField(FieldToken.AsObject(), CustomDoc);
end;
Troubleshooting
- RecordId is empty: Ensure that you set the CreatedDocumentRecordId parameter:
CreatedDocumentRecordId := CustomHeader.RecordId;
- JSON-Parsing-Error: Use the JsonHelper functions for secure parsing:
if not JsonHelper.TokenExists(JObject, 'vendorNo') then
    Error('Vendor number is missing in JSON');
- Data validation: Implement proper data validation:
if JsonHelper.ValAsDec(LineJToken.AsObject(), 'qty', true) <= 0 then
    Error('Quantity must be greater than 0');